About this website
This website contains HOLs (Hands-On Labs) as well as guides for the course High Performance and Distributed Computing for Big Data in the Inter-university Master's Degree in Health Data Science. The Hands on Labs are designed for Unit 3: Cloud Computing and Unit 4: Big Data.
![]()
Table of Contents
Class sessions
- Session 1 & 2 - Introduction to Cloud Computing + Github Pages
- Session 3 - Introduction to AWS + EC2
- Session 4 - AWS S3
- Session 5 - AWS Lambda
- Session 5 - AWS VPC
- Session 6, 7 & 8 - AWS Networking + 2nd Assignment
Useful guides
Hands-On labs (activities to deliver)
- HOL 01 - Deploying your personal website
- HOL 02 - Deploying an hybrid infrastructure for researchers in AWS
Miscellaneous
Student's blogs
Add your name and website here!
- Linnaeus Bundalian
- Samuel Leal
- Sofia Cantalupo
- Saioa Elizondo
- Sofía González Estrada
- Juan Pedro Fernandez
- Jaume Juan
- Ignasi Prats
- Alba Giró
- Aicha Zribi
- Celia Rivilla
- Laura Malaguilla
- Maria Fité
- Daniel Girbes
- David Cabezas
- Laia Coronas Sala
- Zainab Al Yasiri
- Ariadna Saez
- Pol Monterde
- Julius Okanta
- Martin Kusasira Morgan
- Clàudia Lozano
- Frances Scarlett Thomas
- Marcelo Cunha
- Clara Brunet
- Julen Rodriguez Eraso
- Yael Eskenazi
- Enric Canut
- Azucena Álvarez
- Antonio García
- Sofia Di Capua
- Raúl Verea
- Irene Cuéllar
- Soufiane Aatab
- Adrian Redondo Fernandez
- Pau Bordoy Vellibre
- Marc Albesa Vives
- Georgina Vogler
- Jordi Hernández Cano
- Marcell Winkler
- Annabel Margalef
- Júlia Arbat
- Marta Alberola Martin
- Hassan berry
- Onome Akpogheneta
- Judith Osuna
- Olivia Burton
- Maria Fernandez
- Eva Paraskevadaki
How to contribute
This project is open to contributions. If you want to contribute, please follow the instructions below.
The link to the source code is: https://github.com/HDBC-17705110-MDBS/HandsOnLabs
Contributing to the project
-
Fork the repository: Click the Fork button at the top right of the page. This will create a copy of the repository in your GitHub account. See image:
-
Clone the repository to your machine: Use Git to clone the repository you forked to your machine.
git clone forked_repository_url
- Create a new branch: Before making changes, create a new branch where you will make your modifications. This helps keep things organized. Use the following command:
git checkout -b branch_name
-
Make changes: Make the necessary changes to the project files.
-
Add and commit the changes: Use the following commands to add the changes and make a commit.
-
Push the changes to your GitHub repository with the following command:
git push origin branch_name
- Create a PR: Go to your repository on GitHub and select the branch where you made the changes. A highlighted message will appear saying that you made a new branch. Click on "Compare & pull request" to start the PR.
You can also go to the new branch by clicking on the dropdown menu and selecting the branch you created 1 and clicking on the New pull request button 2. See image:
-
Create a PR: Provide a detailed description of the changes you made. You can also add screenshots or additional information to help the reviewers understand your changes. Click on New pull request and you will see a screen like the following:
-
Send the PR: Once you have filled in all the information, click on the "Create pull request" button to send the PR to the original project.
-
Wait for the PR to be reviewed: Once the PR is sent, the maintainers of the project will review your changes. They may ask for additional changes or approve the PR.
-
PR approved: Once the PR is approved, the maintainers will merge your changes into the project.
-
PR rejected: If the PR is rejected, the maintainers will provide feedback on the changes that need to be made. You can make the changes and send the PR again.
How to build the book
Installation of mdbook
To install mdbook, you first need to install Rust. You can find the installation instructions at https://www.rust-lang.org/tools/install.
Once Rust is installed, you can install mdbook with the following command:
cargo install mdbook --vers 0.4.34
cargo install mdbook-admonish
mdbook-admonish install
Editing the files
The files are in Markdown format. You can find more information about the Markdown format at Markdown Guide.
Evaluate changes by generating the book in HTML format on your computer
mdbook serve --open
Session 1 & 2 - Introduction to Cloud Computing + Github Pages
The first two sessions' goal was to introduce you to the basics of cloud computing. Making sure basic concepts are understood and building some sense of when and why to use cloud computing.
Hands-On Lab 1 was introduced at the end of Session 2, the idea is to deploy a personal website using GitHub Pages. During class we went through the steps to set everything up so I suggest you take a look at the slides and the recording if you are having trouble setting up your website.
Slides
The slides for the first two sessions can be found here and are also available below:
Recording
Recordings for the first two sessions can be found on the subject's moodle with the following names (or by clicking the links):
- Unit 3 - Cloud Computing - Sesion 1 (Cloud theory)
- Unit 3 - Cloud computing - Session 2 (Cloud theory + GitHub Pages)
Session 3 - Introduction to AWS + EC2
During this session we introduced Amazon Web Services (AWS) and the Elastic Compute Cloud (EC2) service. We went through the basics of AWS, covering how to setup your account, access the AWS Dashboard and create an EC2 instance. We also saw how to work on the remote machine through SSH with an example setup based on uv to manage python environments and deployed a jupyter notebook server that can be accessed from anywhere.
Setting up SSH keys and configuring Security Groups was also covered.
A guide was created to help you set up your AWS account for the first time. The gudie doesn't cover anything thas was not covered during the session, but I suggest you take a look at it if you are having trouble setting up your account and getting all the way through the steps until succesfully connecting to your EC2 instance.
Slides
The slides for the third session can be found here and are also available below:
Recording
The recording of the third session can be found on the subject's moodle with the following name (or by clicking the link):
Session 4 - AWS CLI + S3
During this session we introduced the AWS Command Line Interface (CLI) and the Simple Storage Service (S3). We went through the basics of the CLI, covering how to install it on your local machine, configure it both on your local machine and on a remote EC2 instance with AWS Credentials. We also saw how to interact with the S3 service, creating buckets, uploading files from the browser AWS Console and from python code using the boto3 library. Usage of AWS CLI to sync files between local and remote S3 buckets was also covered.
A guide was created to help you set up your AWS Credentials as well as other things you'll have to do each time you start your lab. All the contents of the guide where covered during the session, but I suggest you take a look at it any time you need to start your lab again and are having trouble.
Slides
The slides for the fourth session can be found here and are also available below:
Recording
The recording of the fourth session can be found on the subject's moodle with the following name (or by clicking the link):
Session 5 - AWS Lambda
In this session we will introduce AWS Lambda, a serverless computing service provided by AWS. We will go through the basics of Lambda, covering how to create a Lambda function, how to configure it and how to trigger it from S3. We will also see how to interact with other AWS services from a Lambda function.
We will also see how to package python dependencies as Lambda Layers and how to make them available to your Lambda function.
Resources
The image dataset for cell counting can be downloaded by clicking here or here.
Slides
The slides for the fifth session can be found here and are also available below:
Recording
The recording of the fifth session can be found on the subject's moodle with the following name (or by clicking the link):
Session 6, 7 and 8 - AWS Networking + 2nd Assignment
In Session 6 we are going to explore the basics of networking. Understanding how do networks work both inside AWS and in general. We'll see concepts such as what are public and private IP addresses, what is a subnet, what does a router do, etc. To put this into practice we'll work on a lab where we'll create a VPC and a couple subnets, one that can be accessed from the internet and another that can't. We'll also create a couple EC2 instances, one in each subnet, and we'll see how they can communicate with each other.
During Session 7 we'll see what are VPNs and how to create one in AWS by working on top of the lab we created in Session 6.
Finally no Session 8 we're going to finish the VPN creation on the lab we started on Session 7. Once that is done the 2nd assignment will be presented. More information on the second assignment can be here.
Slides
The slides for the sessions can be found here.
Recording
The recording of the sixth, seventh and eighth session can be found on the subject's moodle with the following names (or by clicking the links below):
- Unit 3 - Cloud computing - Session 6 - AWS Networking Part 1
- Unit 3 - Cloud computing - Session 7 - AWS Networking Part 2
- Unit 3 - Cloud computing - Session 8 - AWS Networking Part 3 + 2nd Assignment
Guide 1 - Setting up AWS for the first time
Use this guide to set up AWS for the first time. If you have already set up AWS and want to work on your project, follow this guide.
Table of contents
- Introduction
- Step 1: Creating an AWS Academy account
- Step 2: Accessing the AWS Dashboard
- Step 3: Creating an SSH key pair
- Step 3: Importing the public key to AWS
- Step 4: Creating an EC2 instance
- Step 5: Connecting to the EC2 instance
- What's next?
Introduction
This guide will help you set up your AWS Academy account so you can work on Hands-On Lab 2. If you successfully follow this guide you will end up with:
- AWS Academy account created
- Access to the AWS Dashboard
- An SSH key pair on your local machine
- An EC2 instance created with your key pair configured
- A remote terminal on the EC2 instance
Keep in mind that everytime you want to work with your AWS project and a new session is started, you will need to repeat some of the steps in this guide so try to understand what is being done and why.
So just to make it clear, this guide is intended to be followed only once; the first time you set up your AWS account. The next time you want to work on your project you should follow this guide.
If you encounter any issues during the setup, please reach out to me at ferran.aran@udl.cat, via Teams message or through the Moodle.
This guide will provide links to external resources. Sometimes you will need to visit them to complete the setup and sometimes they are just for you to learn more about the topic. Make sure to follow the instructions carefully.
Step 1: Creating an AWS Academy account
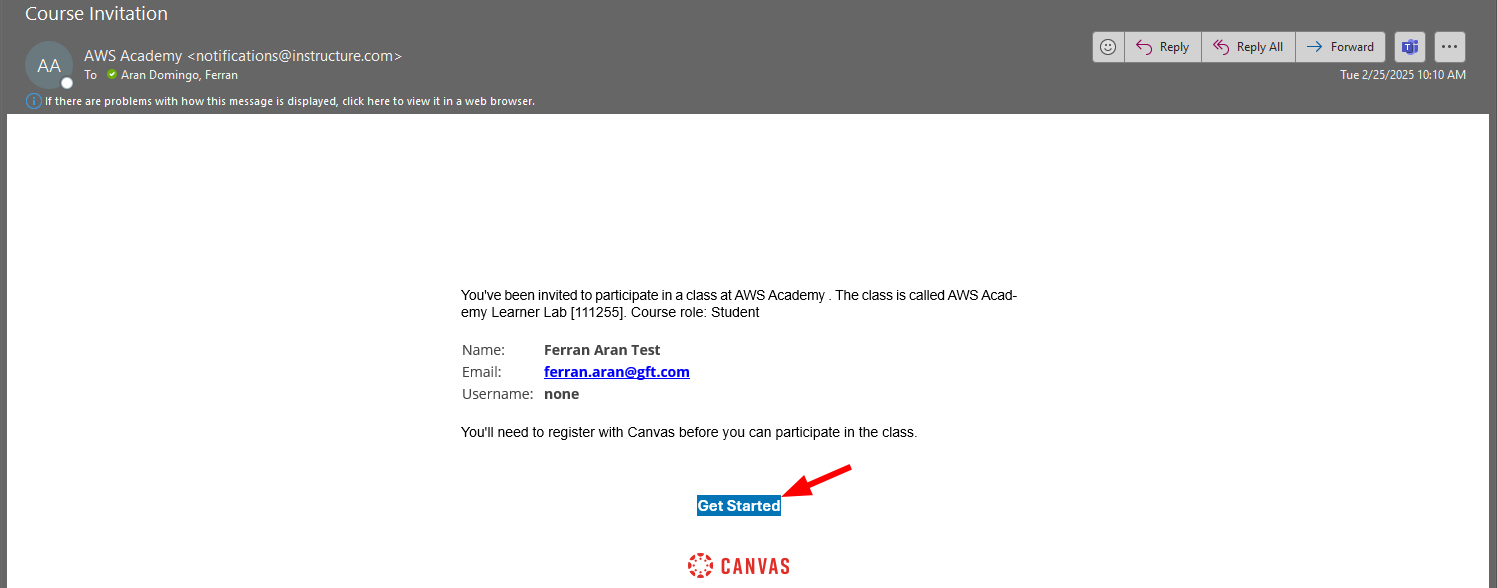
You should have received an email from AWS Academy with the subject "Course Invitation". If you haven't received it, please let me know as I have had to do this by hand and may have missed you. The email will contain a button with the text "Get Started". Click on it to start the registration process. Below is an example of the email you should have received:
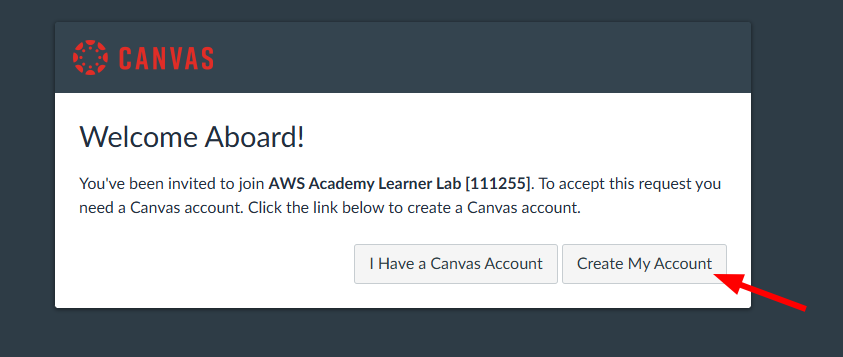
After clicking on the "Get Started" button, you will be redirected to the AWS Academy login page. You should now click on "Create my account" to start the registration process as shown below:
Choose a password and finish the registration process. Once you have completed the registration process, you will be redirected to the AWS Academy dashboard. Congratulations! You have successfully created your AWS Academy account.
Step 2: Accessing the AWS Dashboard
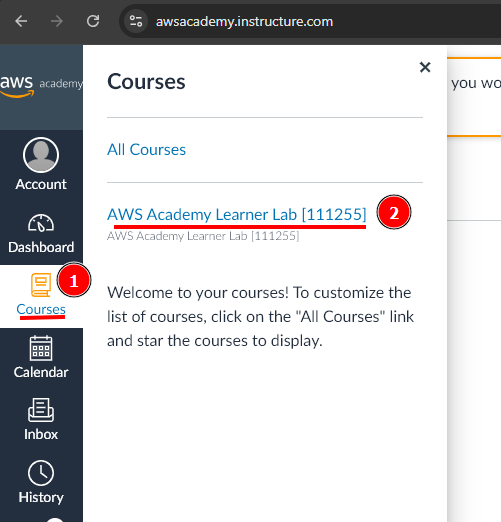
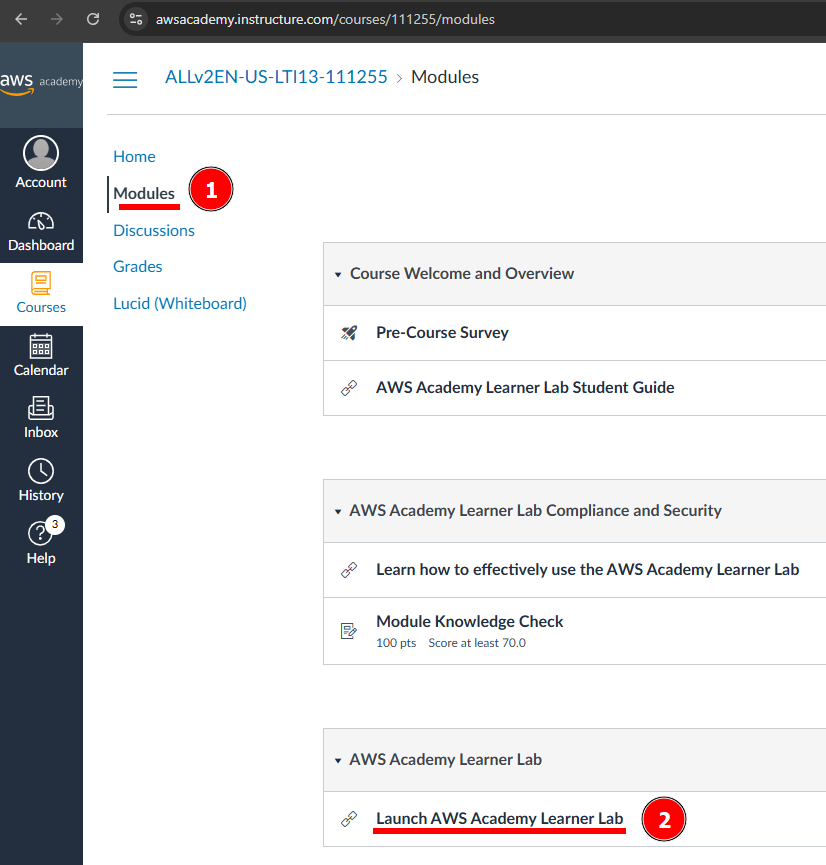
Now that you have created your AWS Academy account, you can access the AWS Dashboard. The first thing you should do is to click on the Courses tab on the left side of the screen. You will see a list of courses available to you. Click on the course AWS Academy Learner Lab as shown in the screenshot below:
The course AWS Academy Learner Lab is the course you will be using to complete the Hands-On Labs (you'll see how in a moment), if you remember on class we talked about the AWS Academy Cloud Foundations course, which is not mandatory but highly recommended for those who want to have a stronger foundation. Notice how there's only one course on the screenshot below, that's not what you should be seeing, you should see two courses, one for the AWS Academy Cloud Foundations and one for the AWS Academy Learner Lab. If you don't see the AWS Academy Cloud Foundations course and would like to have access to it, please let me know since, once again, I had to do this by hand and may have missed you.
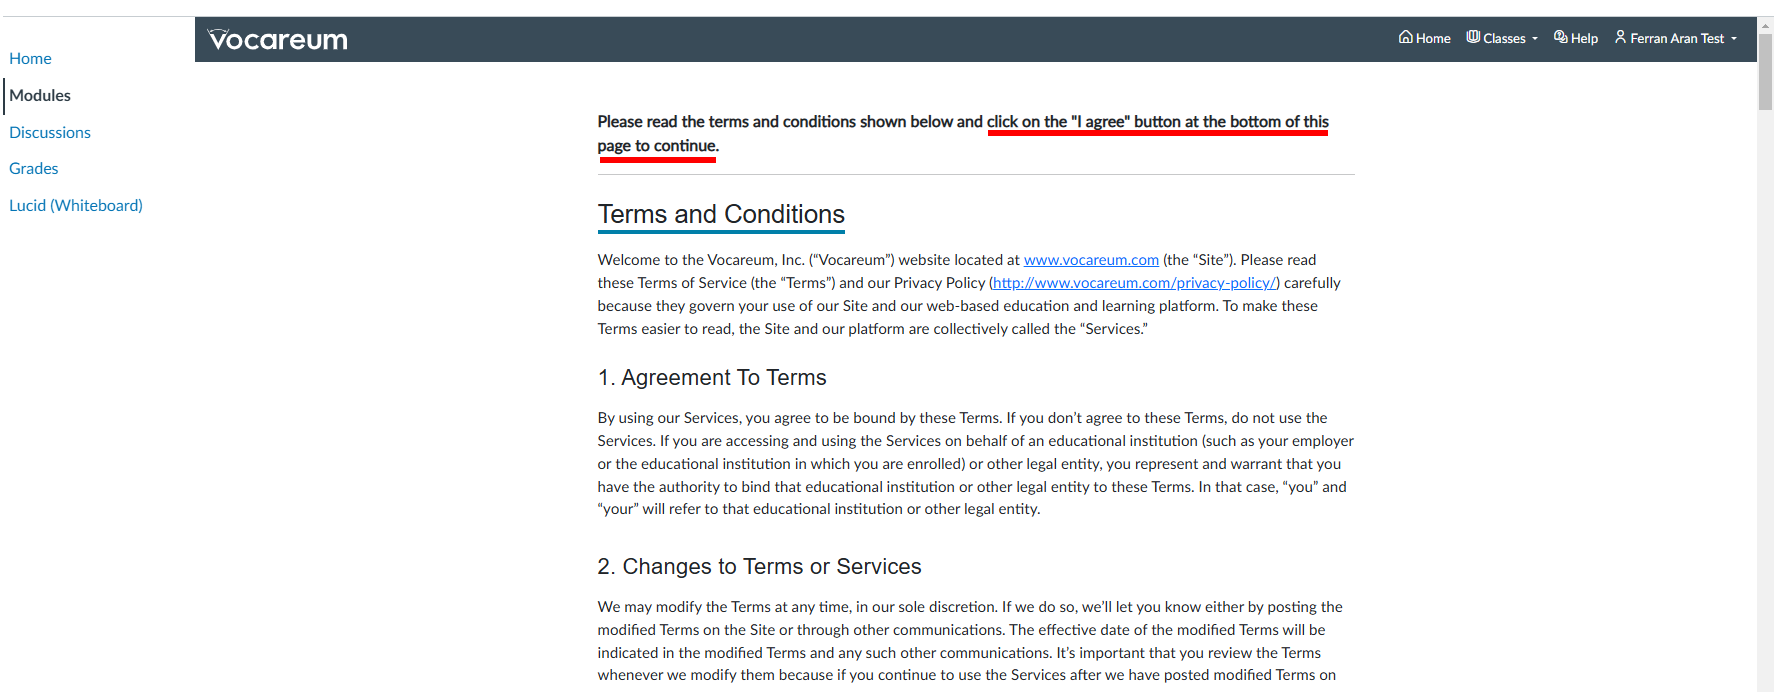
Now we have to look for the Modules tab on the left side of the screen. Click on it and you will see a list of modules available to you. Click on the module AWS Academy Learner Lab as shown below:

You will now be asked to accept the terms and conditions of the course. To do so, scroll all the way down and click on the I Agree button.
After accepting the terms and conditions, you will now be just a couple clicks away from accessing the AWS Dashboard. You need to first click on the Start Lab button.
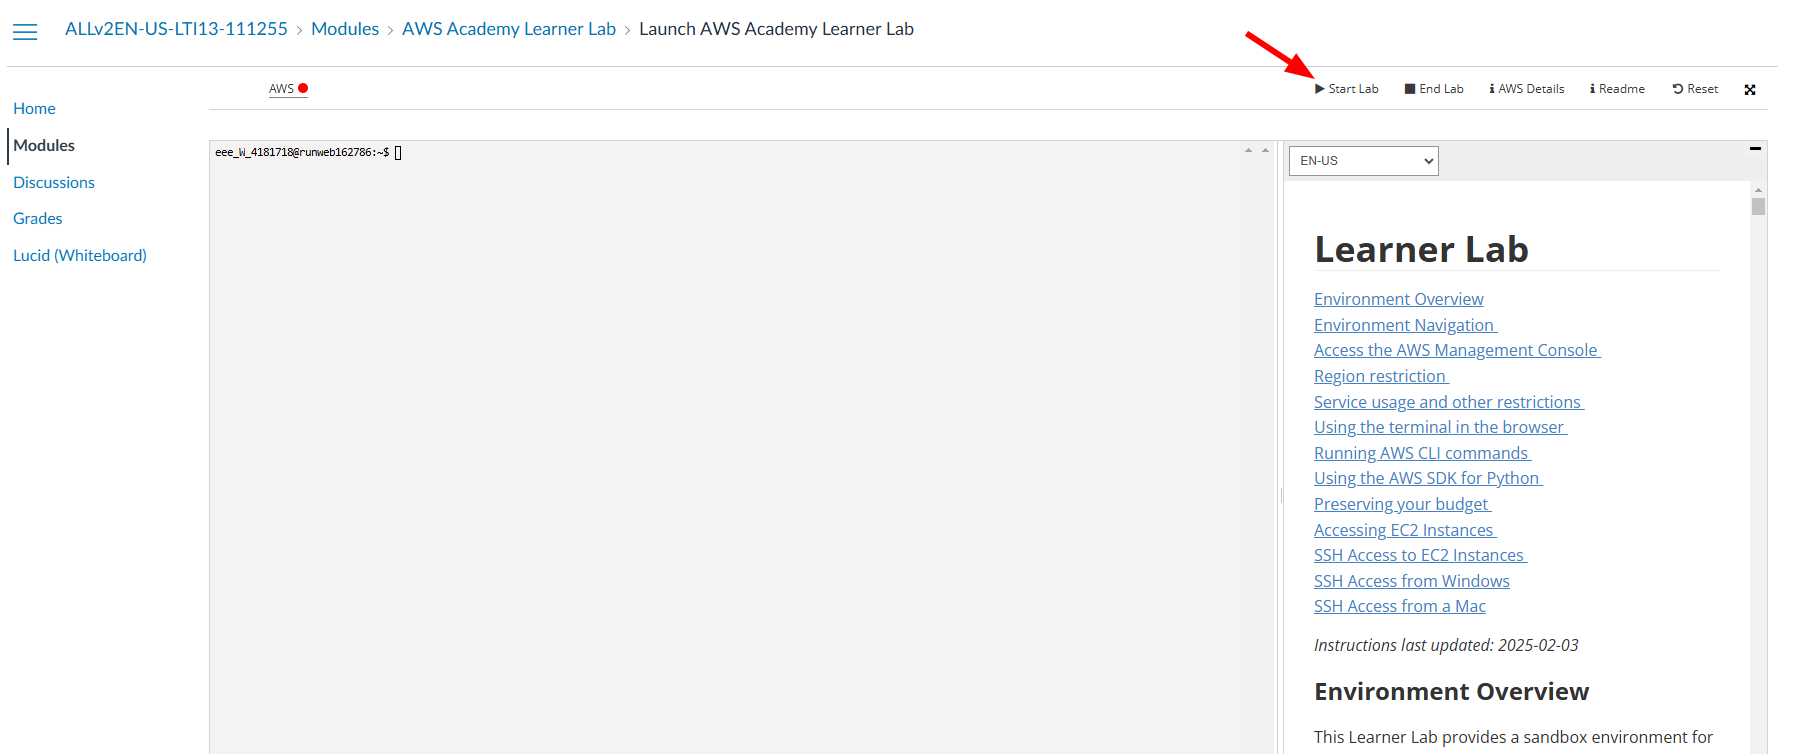
I have tested on Firefox and Google Chrome only. Firefox fails to load the lab. If your browser is failing to load the lab I suggest trying a different one.
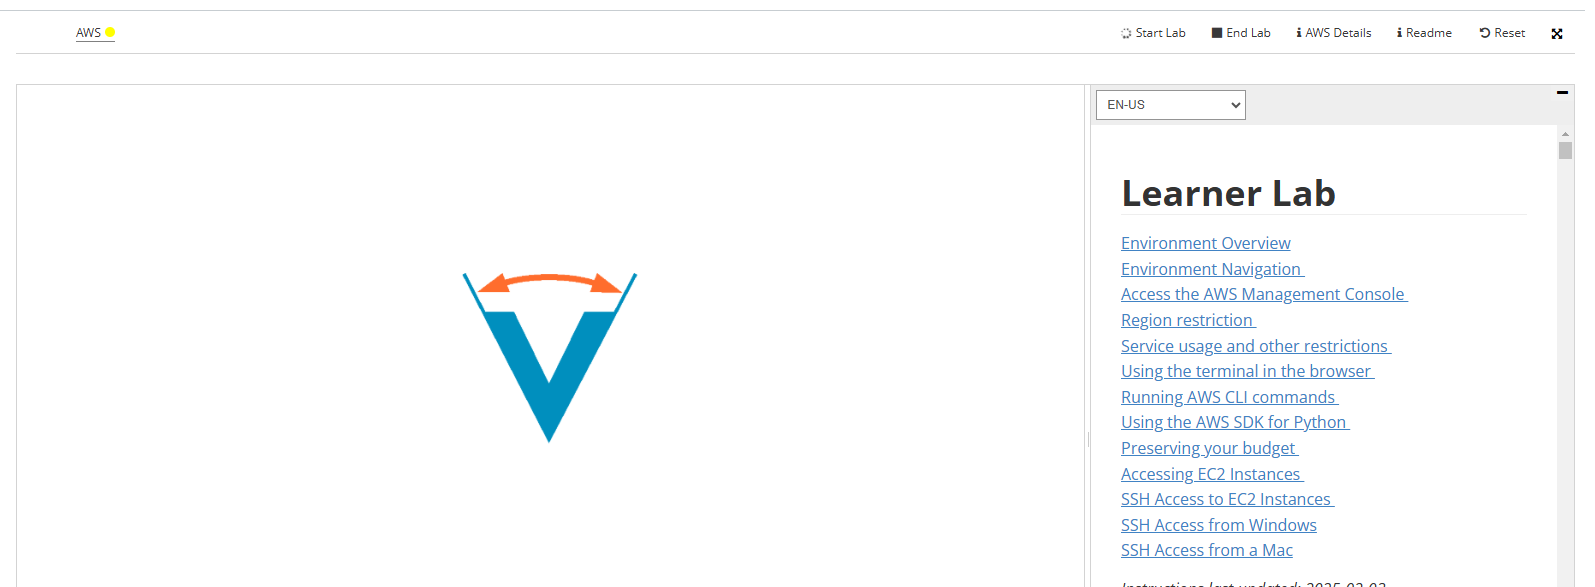
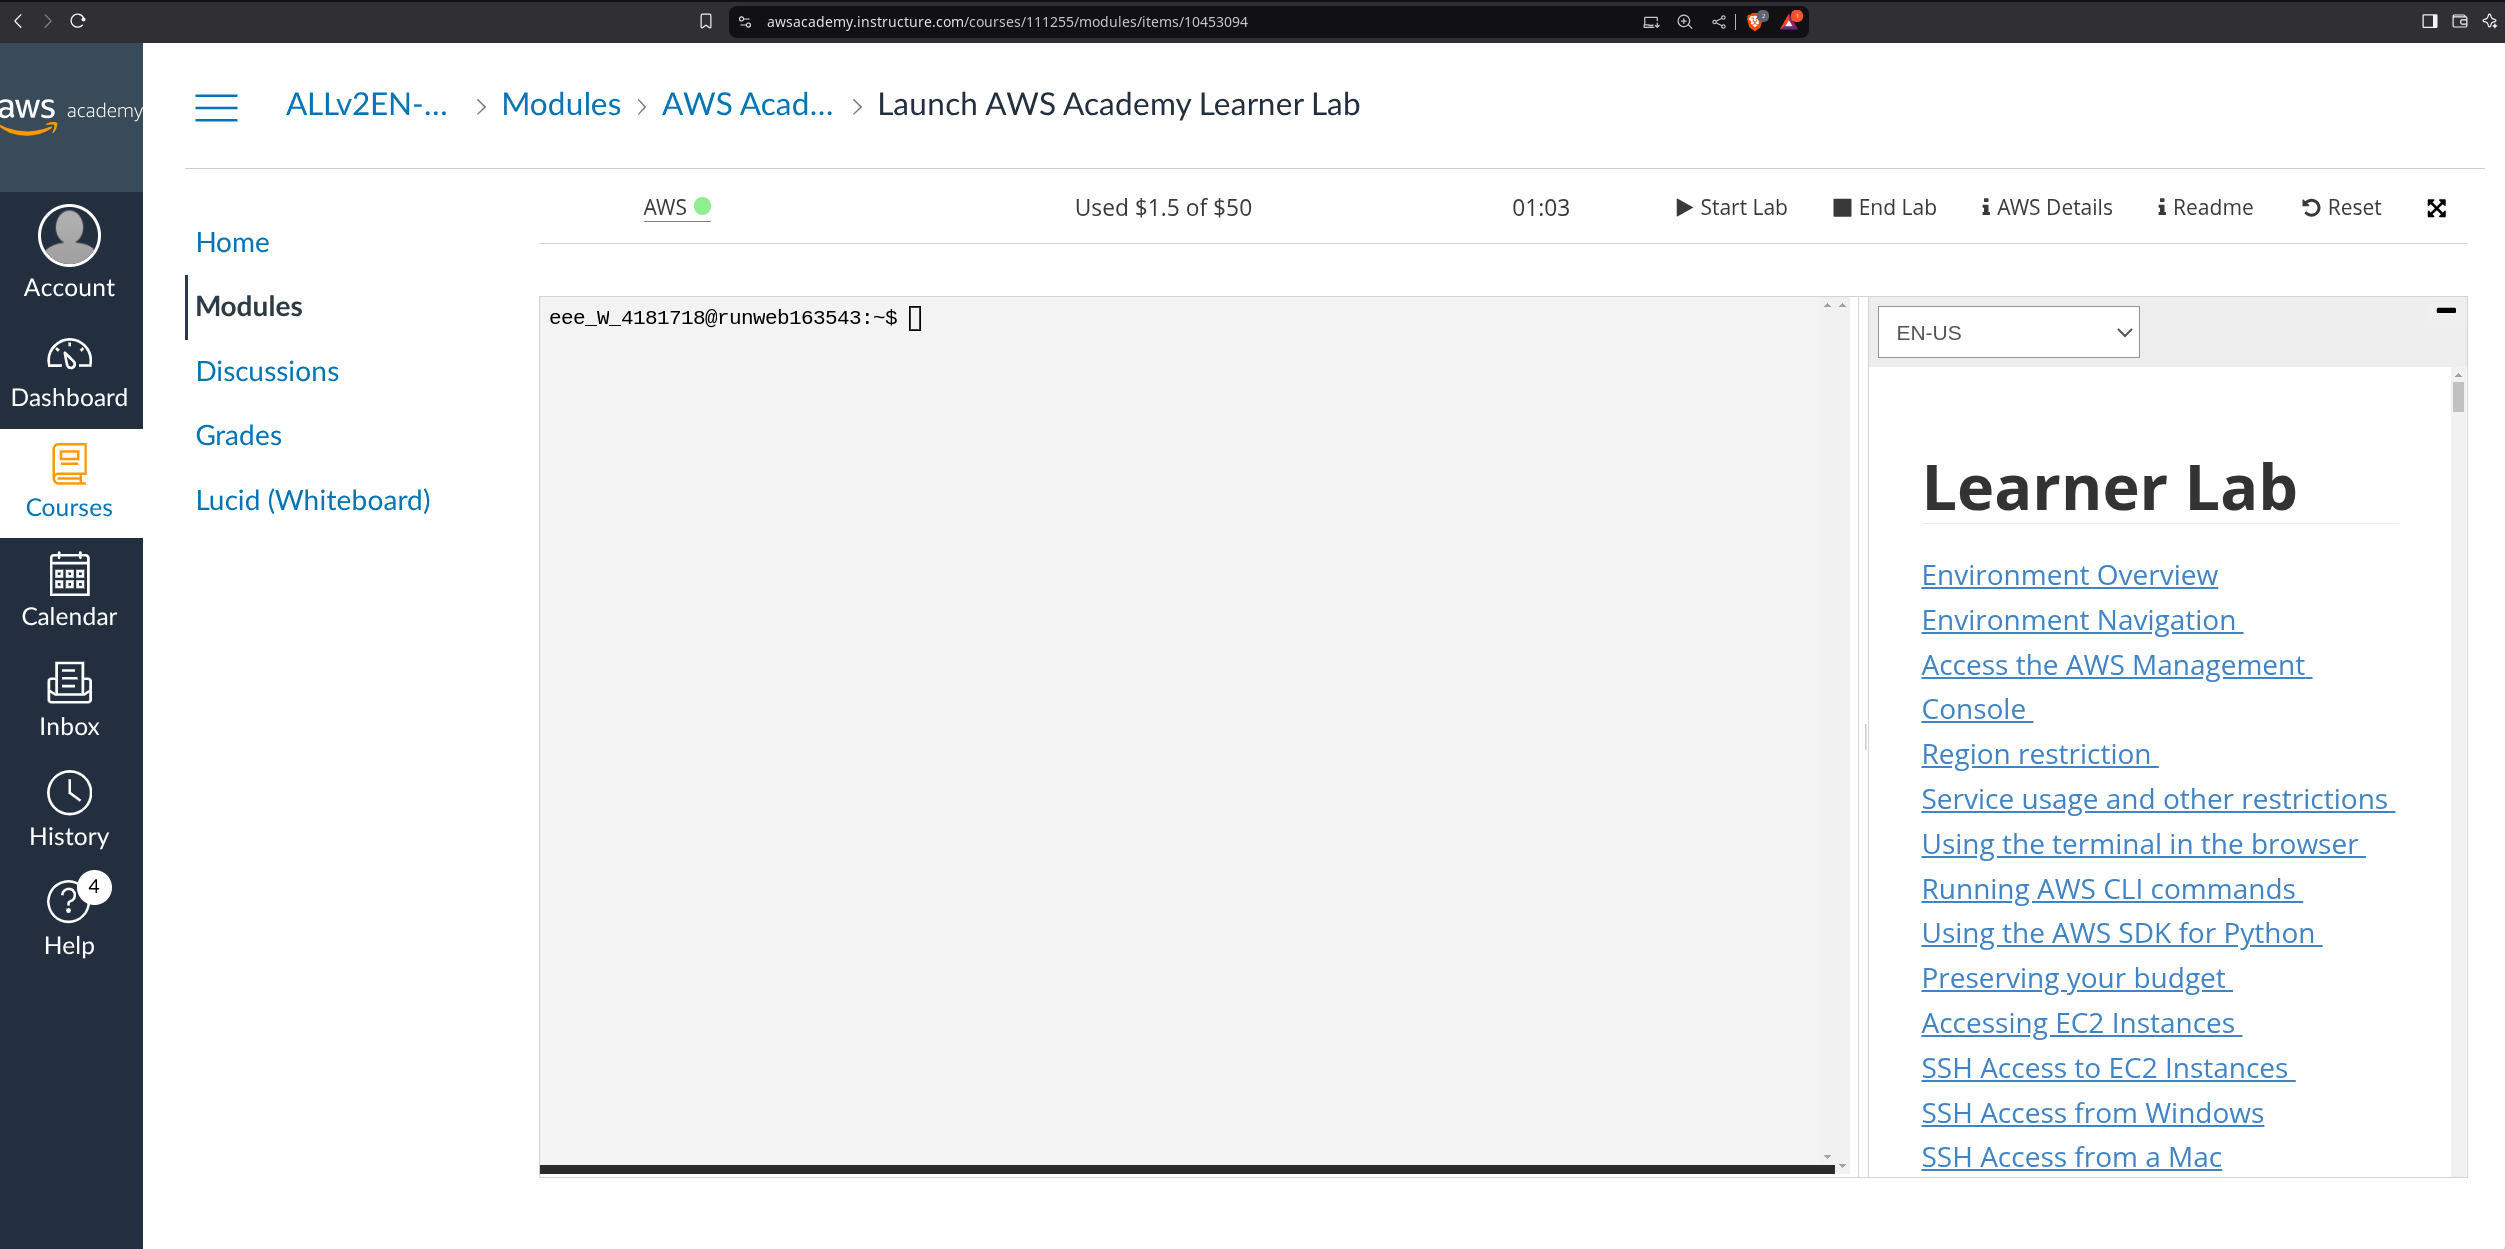
Now give it a couple minutes to load. You'll see this animation while the lab is being prepared for you:
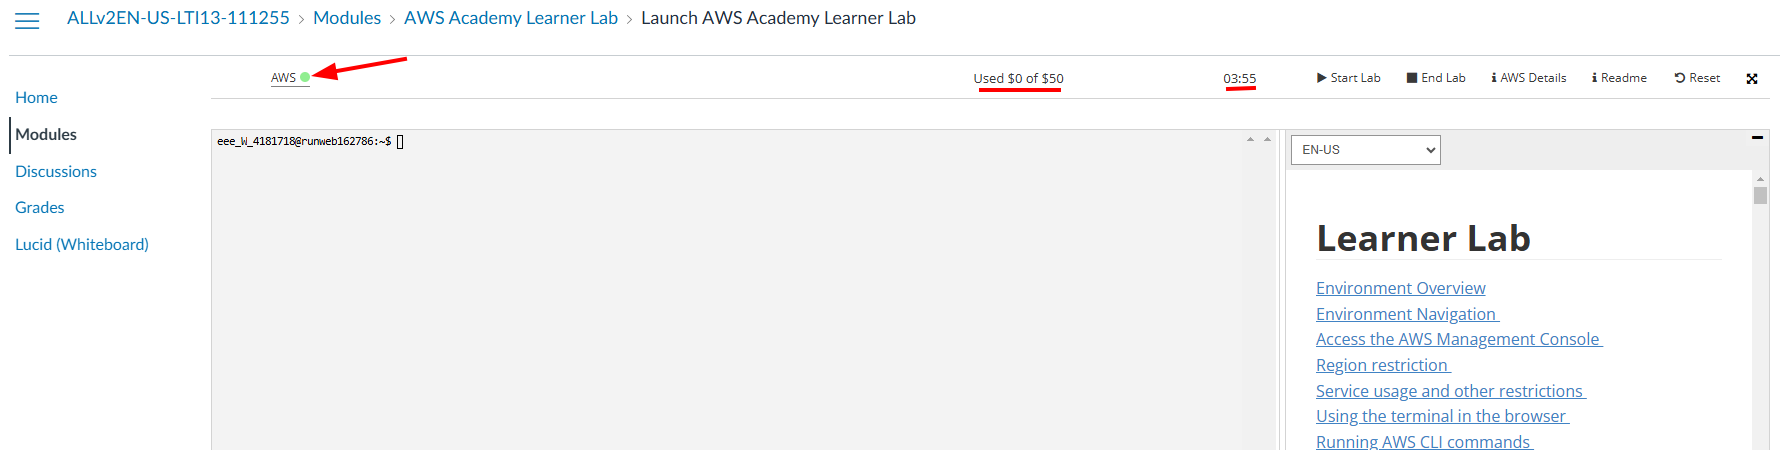
Finally, when the lab is ready, you'll see that the dot next to AWS is green. You'll also se a timer counting down from 4 hours. This is the time you have to work on the lab. To the left of the timer you'll see how's your budget going. You have a budget of $50 to spend on AWS services. Click on AWS to access the AWS Dashboard as shown below.
If you exceed the $50 budget, you will no longer have acces to the AWS Dashboard and will loose your work. Make sure to keep an eye on the budget and if you see that you're getting close to the limit, let me know so I can create a new lab for you.
Great! You have now accessed the AWS Dashboard. You will see a screen similar to the one below:

Step 3: Creating an SSH key pair
Later on this guide we will create an EC2 instance, to work with this remote computer we will need to connect to it using SSH. To do so, we will need an SSH key pair.
We are going to do this using a terminal on our local machine. Remember that a terminal is a program that allows you to interact with your computer using text commands, if this sounds confusing to you I suggest to read through this post. For windows users you can also read this post specifically for the Windows Terminal. MacOS users should already have a terminal installed on their computer. And there is also this great video that is aimed towards a general understanding of the terminal tailored for Data Scientists.
It is really important to understand when are we working on our local machine and when are we working on the remote machine. The first step will always be to open a terminal on our own computer, but once we connect to the remote machine through the SSH command, although it may seem like nothing changed, the terminal is now connected to the remote machine. This means from now on the commands we type will be executed on the remote machine, not on our local machine. If you're not sure if you're working on your local machine or on the remote machine, just type pwd and see what the output is. If it's your local machine, you'll see the path to the directory you're in on your local machine, if it's the remote machine, you'll see the path to the directory you're in on the remote machine. pwd stands for print working directory.
The first step for creating the SSH keypair will be to make sure the .ssh directory extists, to do so, open a terminal on your local machine and type the following command:
mkdir .ssh
The command may throw an error if the directory already exists, that's fine, it just means that the directory was already there. Just to get used to the terminal, we'll use the ls command to list the contents of the directory. Type the following command:
ls .ssh
You should see no output from the command, that's because the directory is empty. It may be that you already had SSH keys created so in that case the ls .ssh command would have written some lines to the terminal listing the files in the ssh folder.
Now we are going to create the SSH key pair. Type the following command:
ssh-keygen -t rsa -f .ssh/aws-keypair
You will be asked to enter a passphras. You can leave it empty by pressing Enter twice (I suggest you do so for simplicity, if not, each time you connect to the remote machine you'll have to enter the passphrase). You should see an output similar to the one below:
Generating public/private rsa key pair.
Enter passphrase (empty for no passphrase):
Enter same passphrase again:
Your identification has been saved in .ssh/aws-keypair
Your public key has been saved in .ssh/aws-keypair.pub
The key fingerprint is:
SHA256:uhINFvYaJh6MbwFQCXdZyrW7W46jFGHUhLglDgQ5OYE ferran@DESKTOP-0841
+---[RSA 3072]----+
|XBooo*+          |
|E.++*o..         |
| O ==o.          |
|. B.=...         |
| o *.=. S        |
|  + o..o         |
| .  ..o .        |
|   .. .*         |
|    .o+..        |
+----[SHA256]-----+
Here, ssh-keygen is the command to generate the key pair, -t rsa specifies the type of key to create, in this case an RSA key, -f .ssh/aws-keypair specifies the file name for the key pair. You can name the file whatever you want, but it is important to remember the name you gave it. In this case we are naming it aws-keypair. I recommend you name it the same way as I do so you don't get confused later on.
You don't need to fully understand how do public and private keys work and how are they used to make an SSH connection, but if you're interested in learning more I highly recommend to watch this video. Note that they suggest using putty to connect to the remote machine when on a Windows computer while I suggest using the terminal, as I said in class this is a personal choice but I will be doing the labs using the terminal so if you want to follow along I suggest you do the same.
Once again, we can check the contents of the .ssh directory by typing the following command:
ls .ssh
And we should now see two files, aws-keypair and aws-keypair.pub. The first one is the private key and the second one is the public key. The private key should never be shared with anyone, while the public key is the one to be shared with the remote machine. A useful command to inspect the contents of a file is cat. For example, to see the contents of the public key, type the following command:
cat .ssh/aws-keypair.pub
You can also inspect the contents of the .ssh folder and the files inside it using the File Explorer (or Finder in Mac devices). But be careful, by default, folders and files that start with a . (like .ssh) are hidden in most file explorers and if you want to be able to see them, you'll have to enable the option to show hidden files. Check this tutorial to see how to do it on your operating system. Another thing to keep in mind is that files extensions (that is the part of the file name that comes after the last ., for example .pdf in whatever.pdf) are also usually hidden, that means that on your File Explorer you may be seeing two files named aws-keypair when in reality one is aws-keypair and the other is aws-keypair.pub. Here is a tutorial on how to show file extensions on your operating system.
You don't have to worry about any of this if you're using the terminal, the terminal will show you the files and their extensions as they are. But to see hidden files and folders (those starting with a .) you'll have to use the ls -a command.
We have now created an SSH key pair that can be used to connect to remote machines. Next up, we are going to be setting up a remote machine on AWS which we can connect to. But first, we need to import our public key to AWS.
Step 3: Importing the public key to AWS
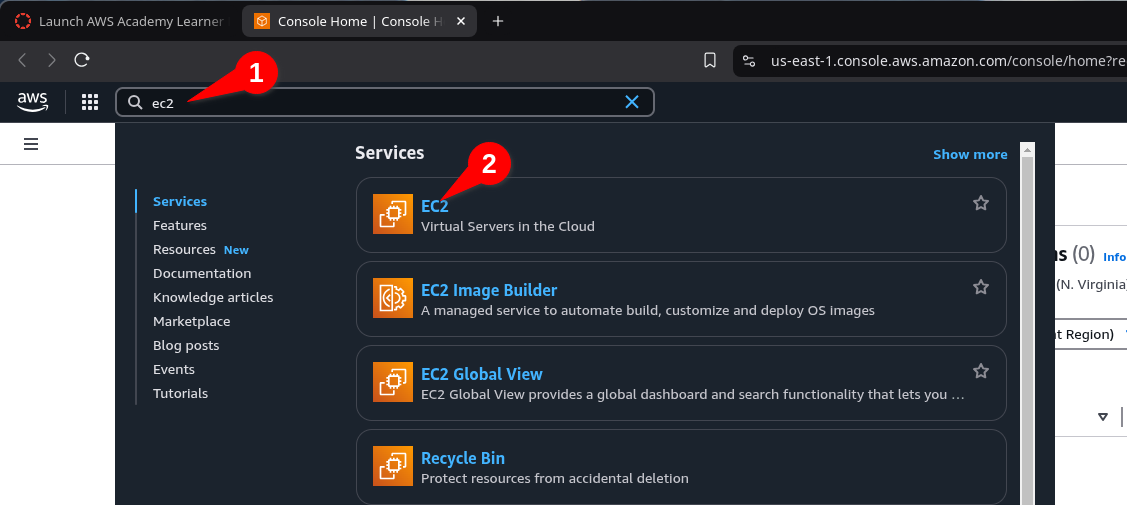
To import the public key to AWS, we need to go back to the AWS Dashboard, which is where we eneded up after finishing Step 2. We are now going to use the search bar to look for the EC2 service. Type EC2 in the search bar and click on the EC2 service as shown below:
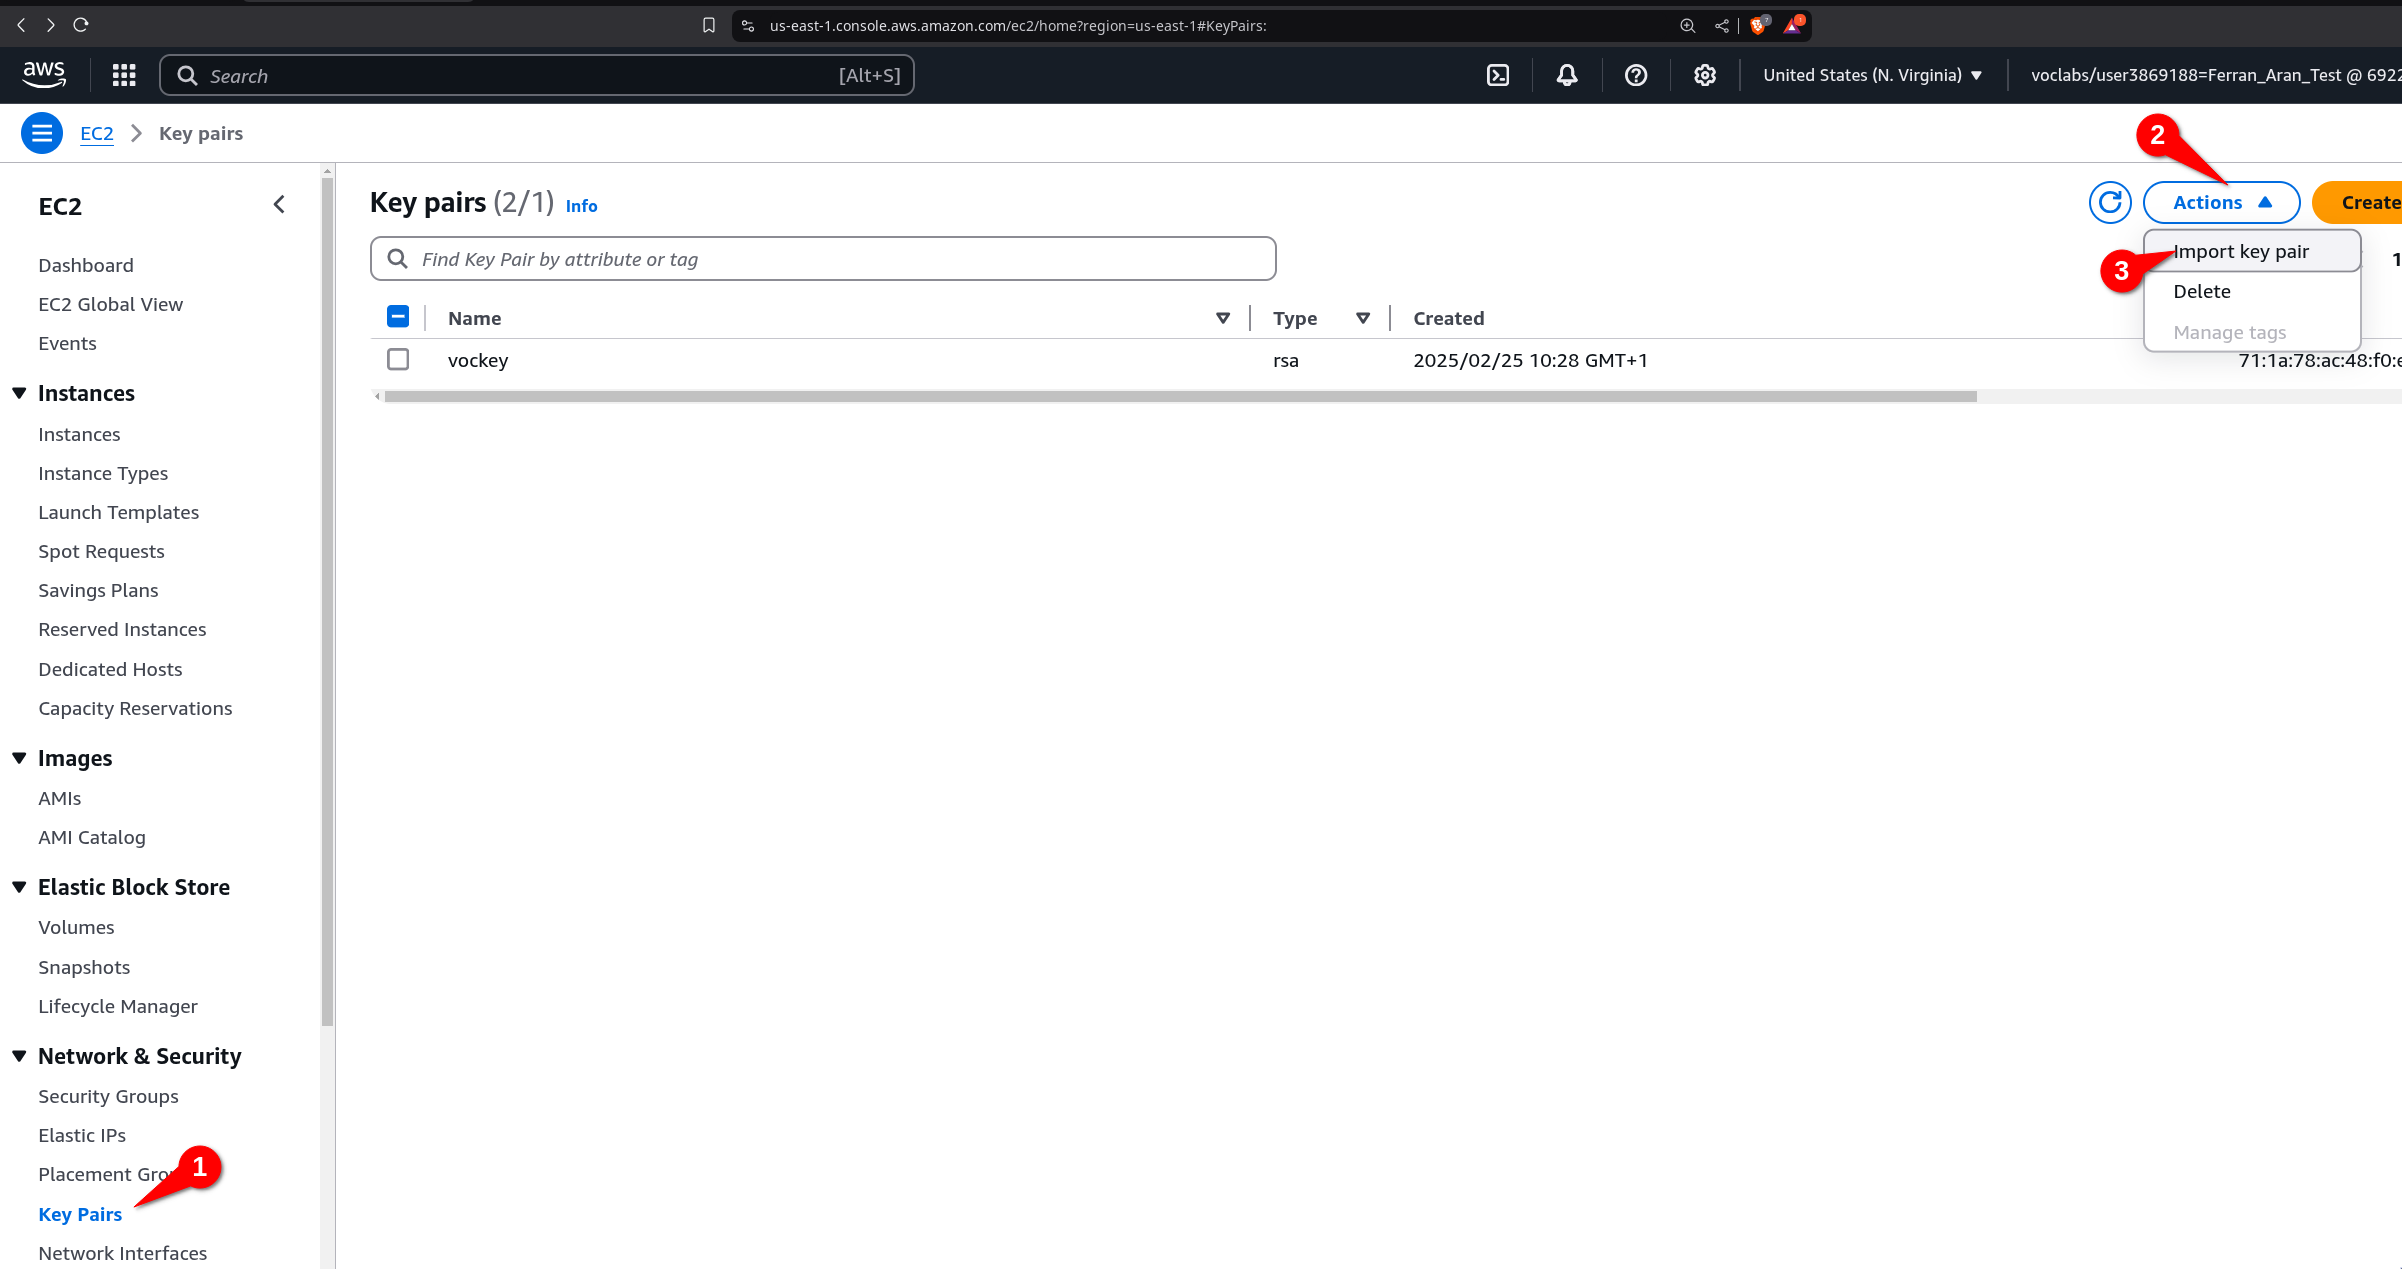
You will now see the EC2 Dashboard. On the left side of the screen, you will see a list of options. Click on Key Pairs > Actions > Import Key Pair as shown below:
You now have to give the key a name. You can name it whatever you want, but I suggest you name it aws-keypair to keep things simple. You will see a text field where you can type, copy the contents of the public key file you created earlier. You can do this by using cat .ssh/aws-keypair.pub and copying the output (it may be the case that in order to copy from the terminal you have to use Ctrl+Shift+C instead of Ctrl+C, or just right click and select Copy). Paste the contents of the public key file in the text field and click on Import Key Pair as shown below:
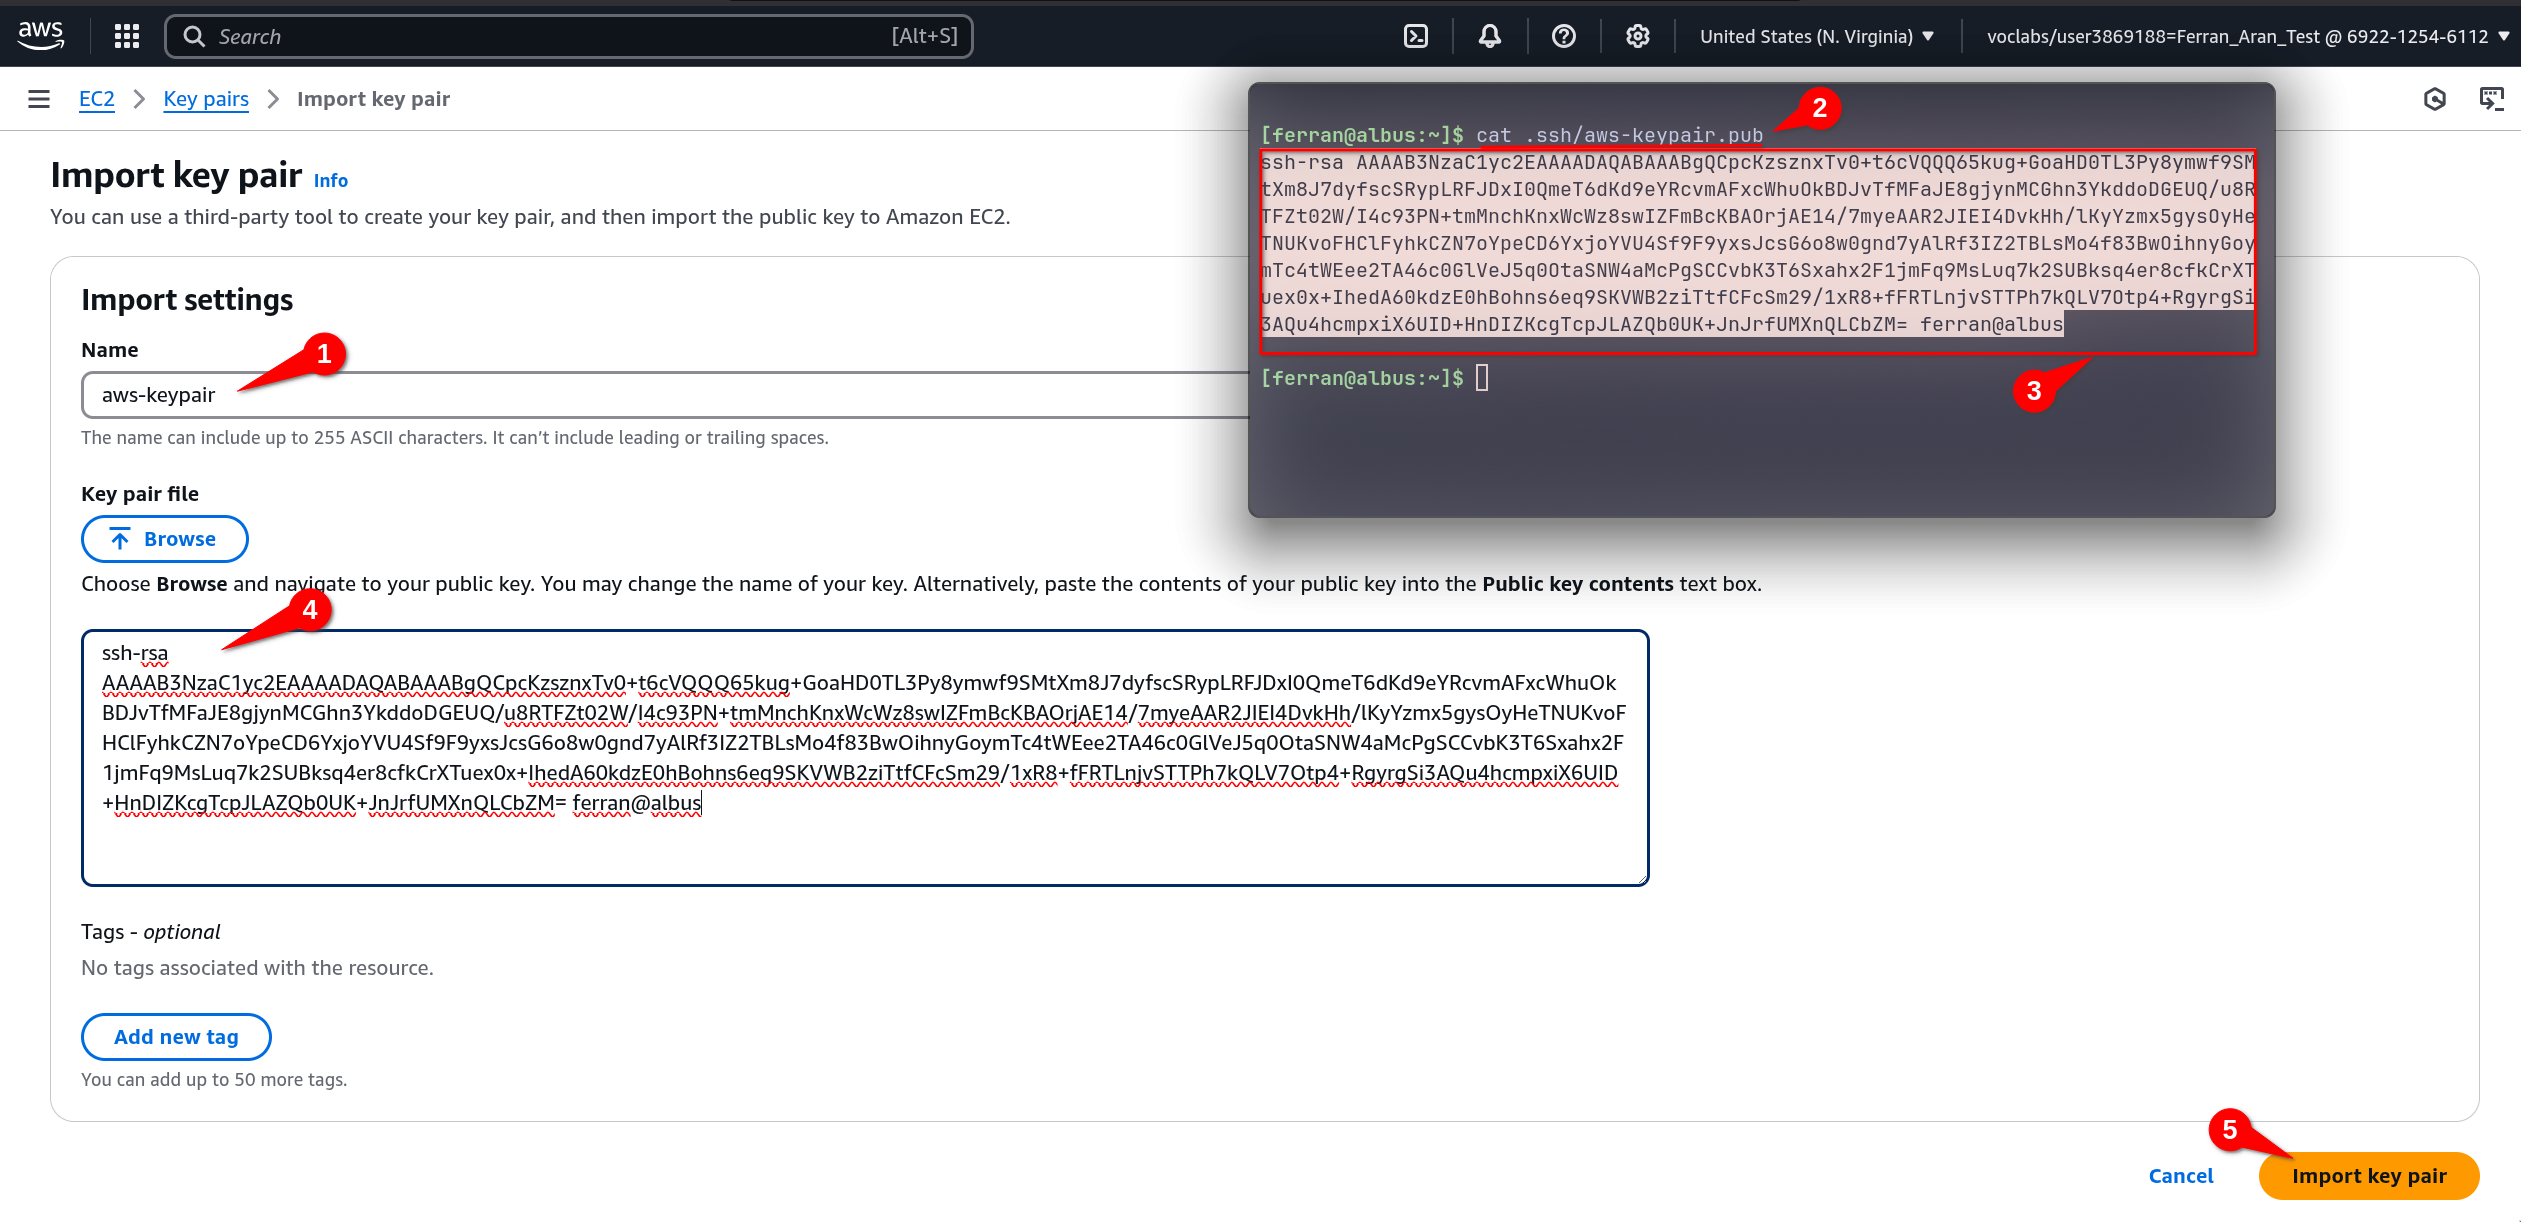
You can also click on the Browse button to select the public key file from your computer. Just click on Browse, navigate to the .ssh folder and select the aws-keypair.pub file. But remember, the file must be the public key file, not the private key file. That is, the file must have the .pub extension. Once you have selected the file, click on Import Key Pair.
Keep in mind that as explained on the previous note, you may not see the .ssh folder in the file explorer and you may not see the .pub extension of the file. If you're having trouble with this, I suggest you use the terminal to copy the contents of the file as shown in the screenshot above.
You should now see the key pair you just imported in the list of key pairs. There will probably be another key pair there, that's fine, you can ignore it. Perfect! You have now imported the public key to AWS. Next up, we are going to create an EC2 instance and configure it to use the key pair we just imported.
Step 4: Creating an EC2 instance
The first step will be to head to the EC2 Dashboard. You can do this by typing EC2 in the search bar and clicking on the EC2 service as we did on the begginning of Step 3:
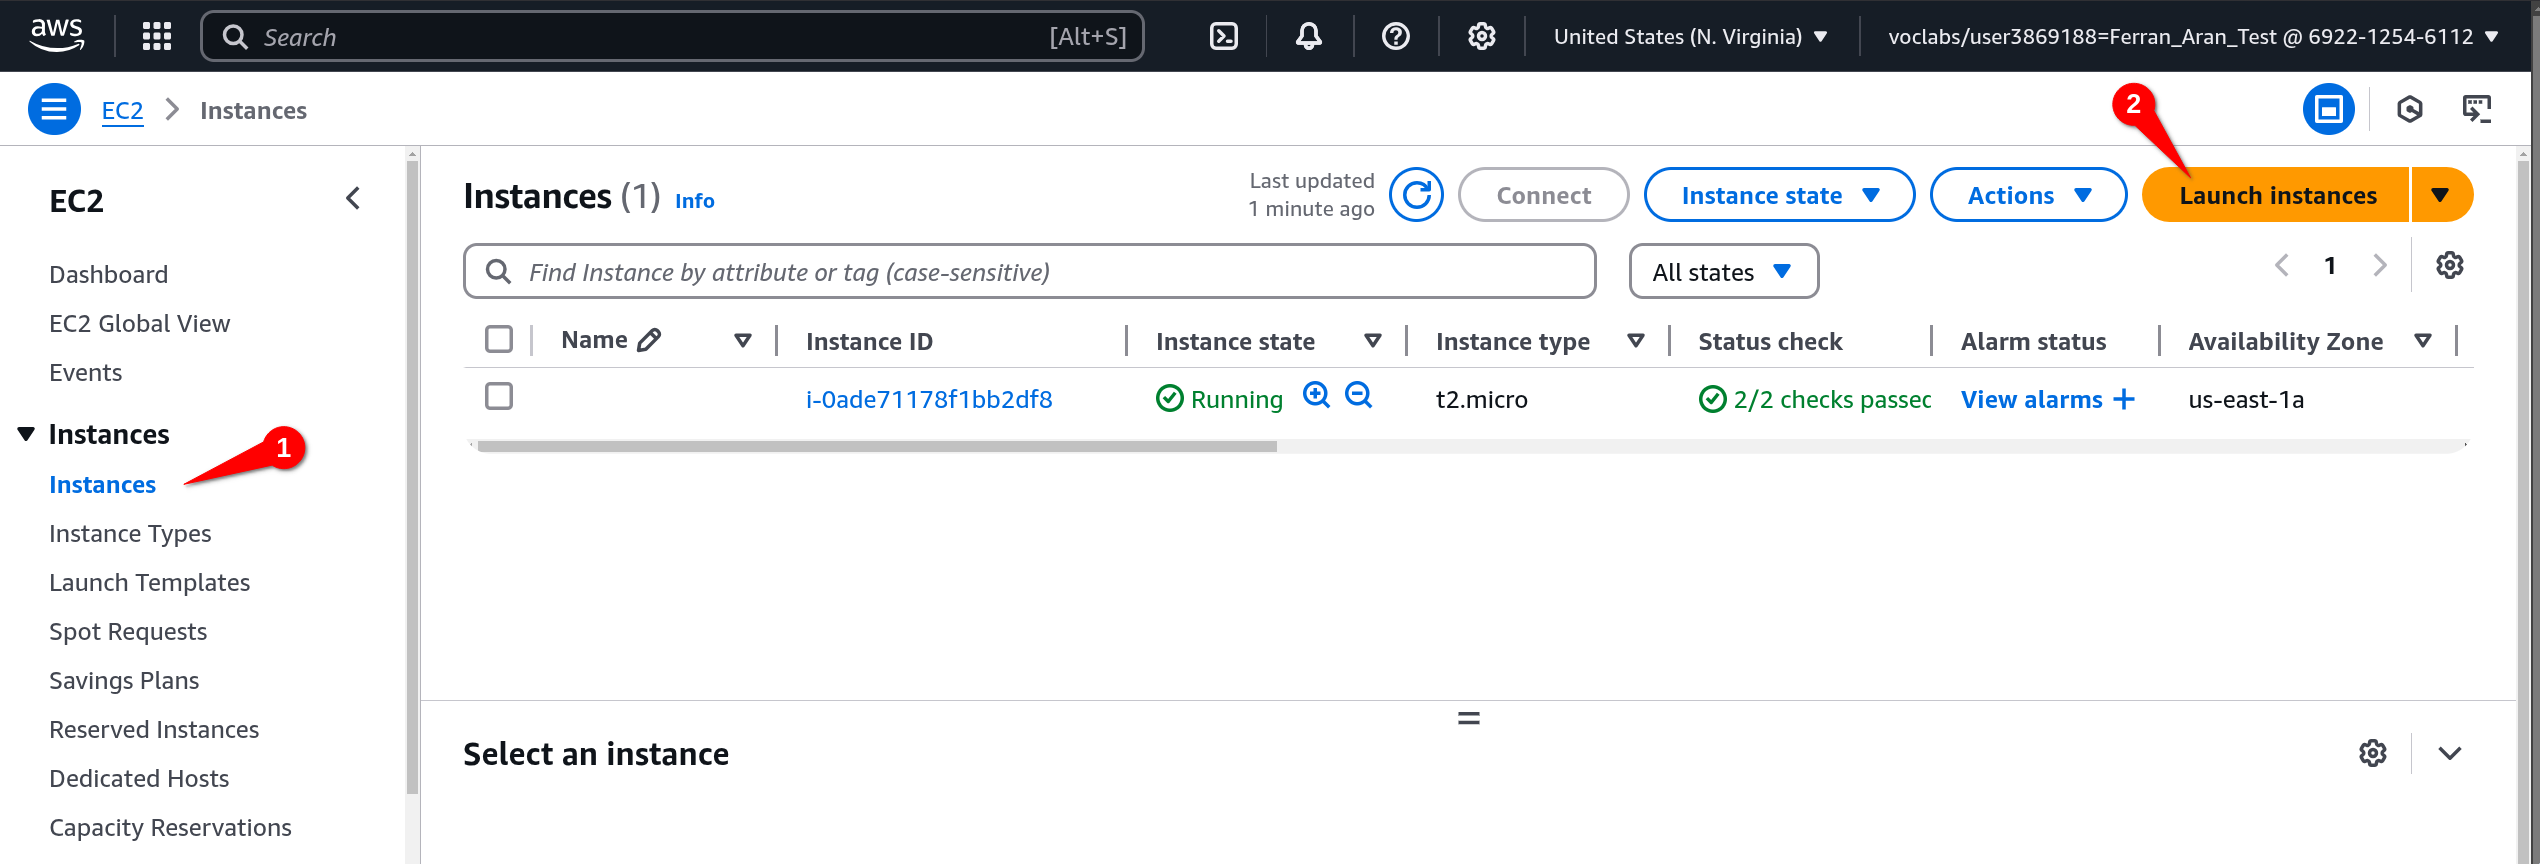
Once you are in the EC2 Dashboard, click on Instances > Launch Instance as shown below:
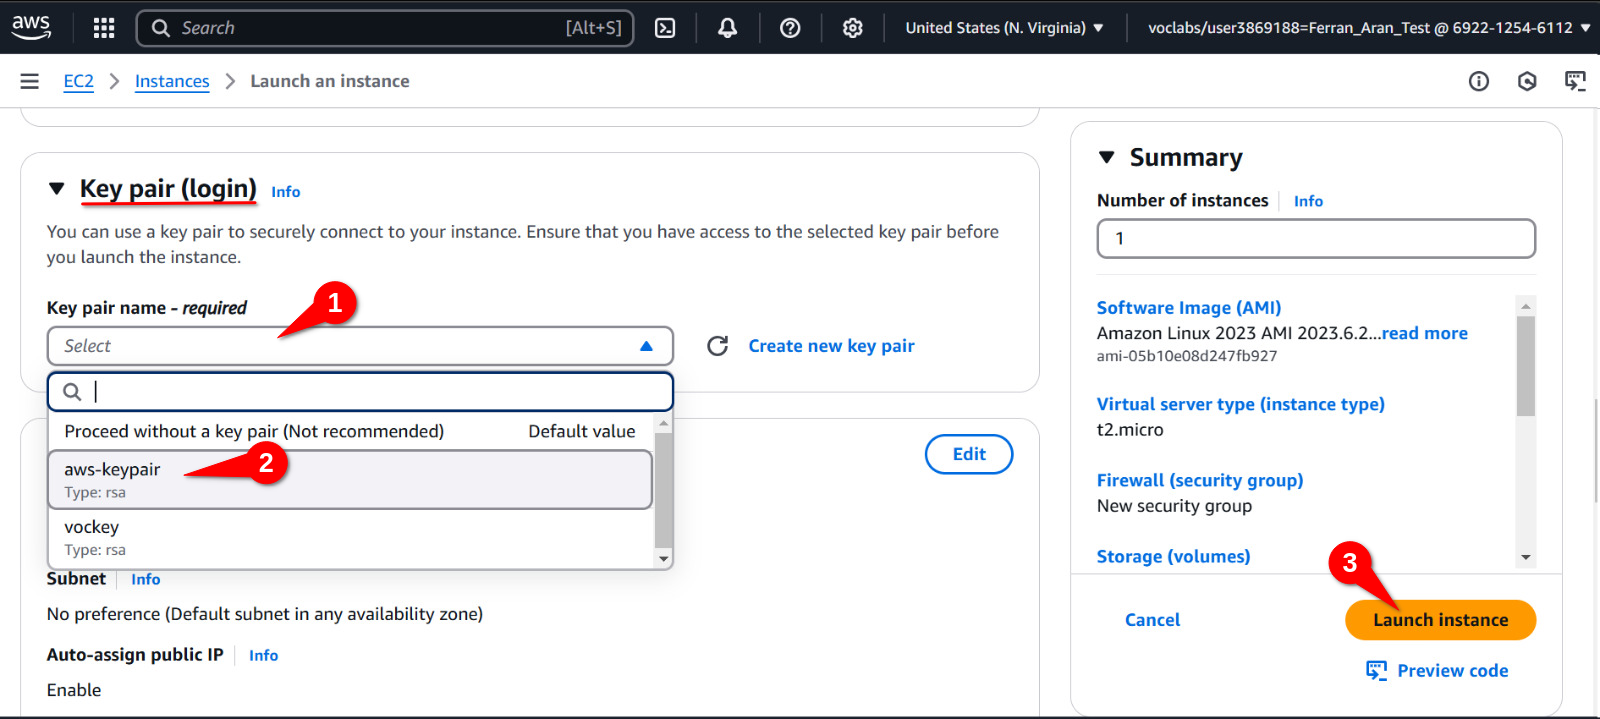
Leave everything as it is except for the Key pair (login) option (you'll have to scroll down to find it). Click on the dropdown menu and select the key pair you imported earlier. In this case, it should be aws-keypair. Click on Launch instance as shown below:
We now have an EC2 instance running with our public key imported. Which means we have a remote machine on AWS that we can connect to from our local computer using SSH. Let's see how to do that.
Step 5: Connecting to the EC2 instance
Before connecting to the remote machine, I want you to try the a couple commands on your local machine which we are then going to repeat once we are connected to the remote machine. One of the commands is pwd which stands for print working directory as alredy discussed earlier. This command will show you the path to the directory you are currently in. The other command is whoami which will show you the username of the user you are currently logged in as. Try these commands on your local machine and remember the output. We are going to repeat them once we are connected to the remote machine.
Below is the output I get on my local machine:
PS C:\Users\fnao> pwd

Path
----
C:\Users\fnao


PS C:\Users\fnao> whoami
gft\fnao
PS C:\Users\fnao>
My local machine happens to be a Windows laptop, notice that your output will be different. Specially if you are on a Mac or Linux machine.
To connect to the EC2 instance, we are going to use the terminal on our local machine. So as we did on the begginning Step 3, open a terminal on your local machine. We are going to use the ssh command to connect to the remote machine. The command will look like this:
ssh -i .ssh/aws-keypair ec2-user@<public-ip>
You will have to replace <public-ip> with the public IP of the EC2 instance. To find the public IP, go back to the EC2 Dashboard and click on Instances on the left side of the screen. You will see a list of instances, click on the instance you just created. You will see the public IP on the bottom of the screen as shown below:
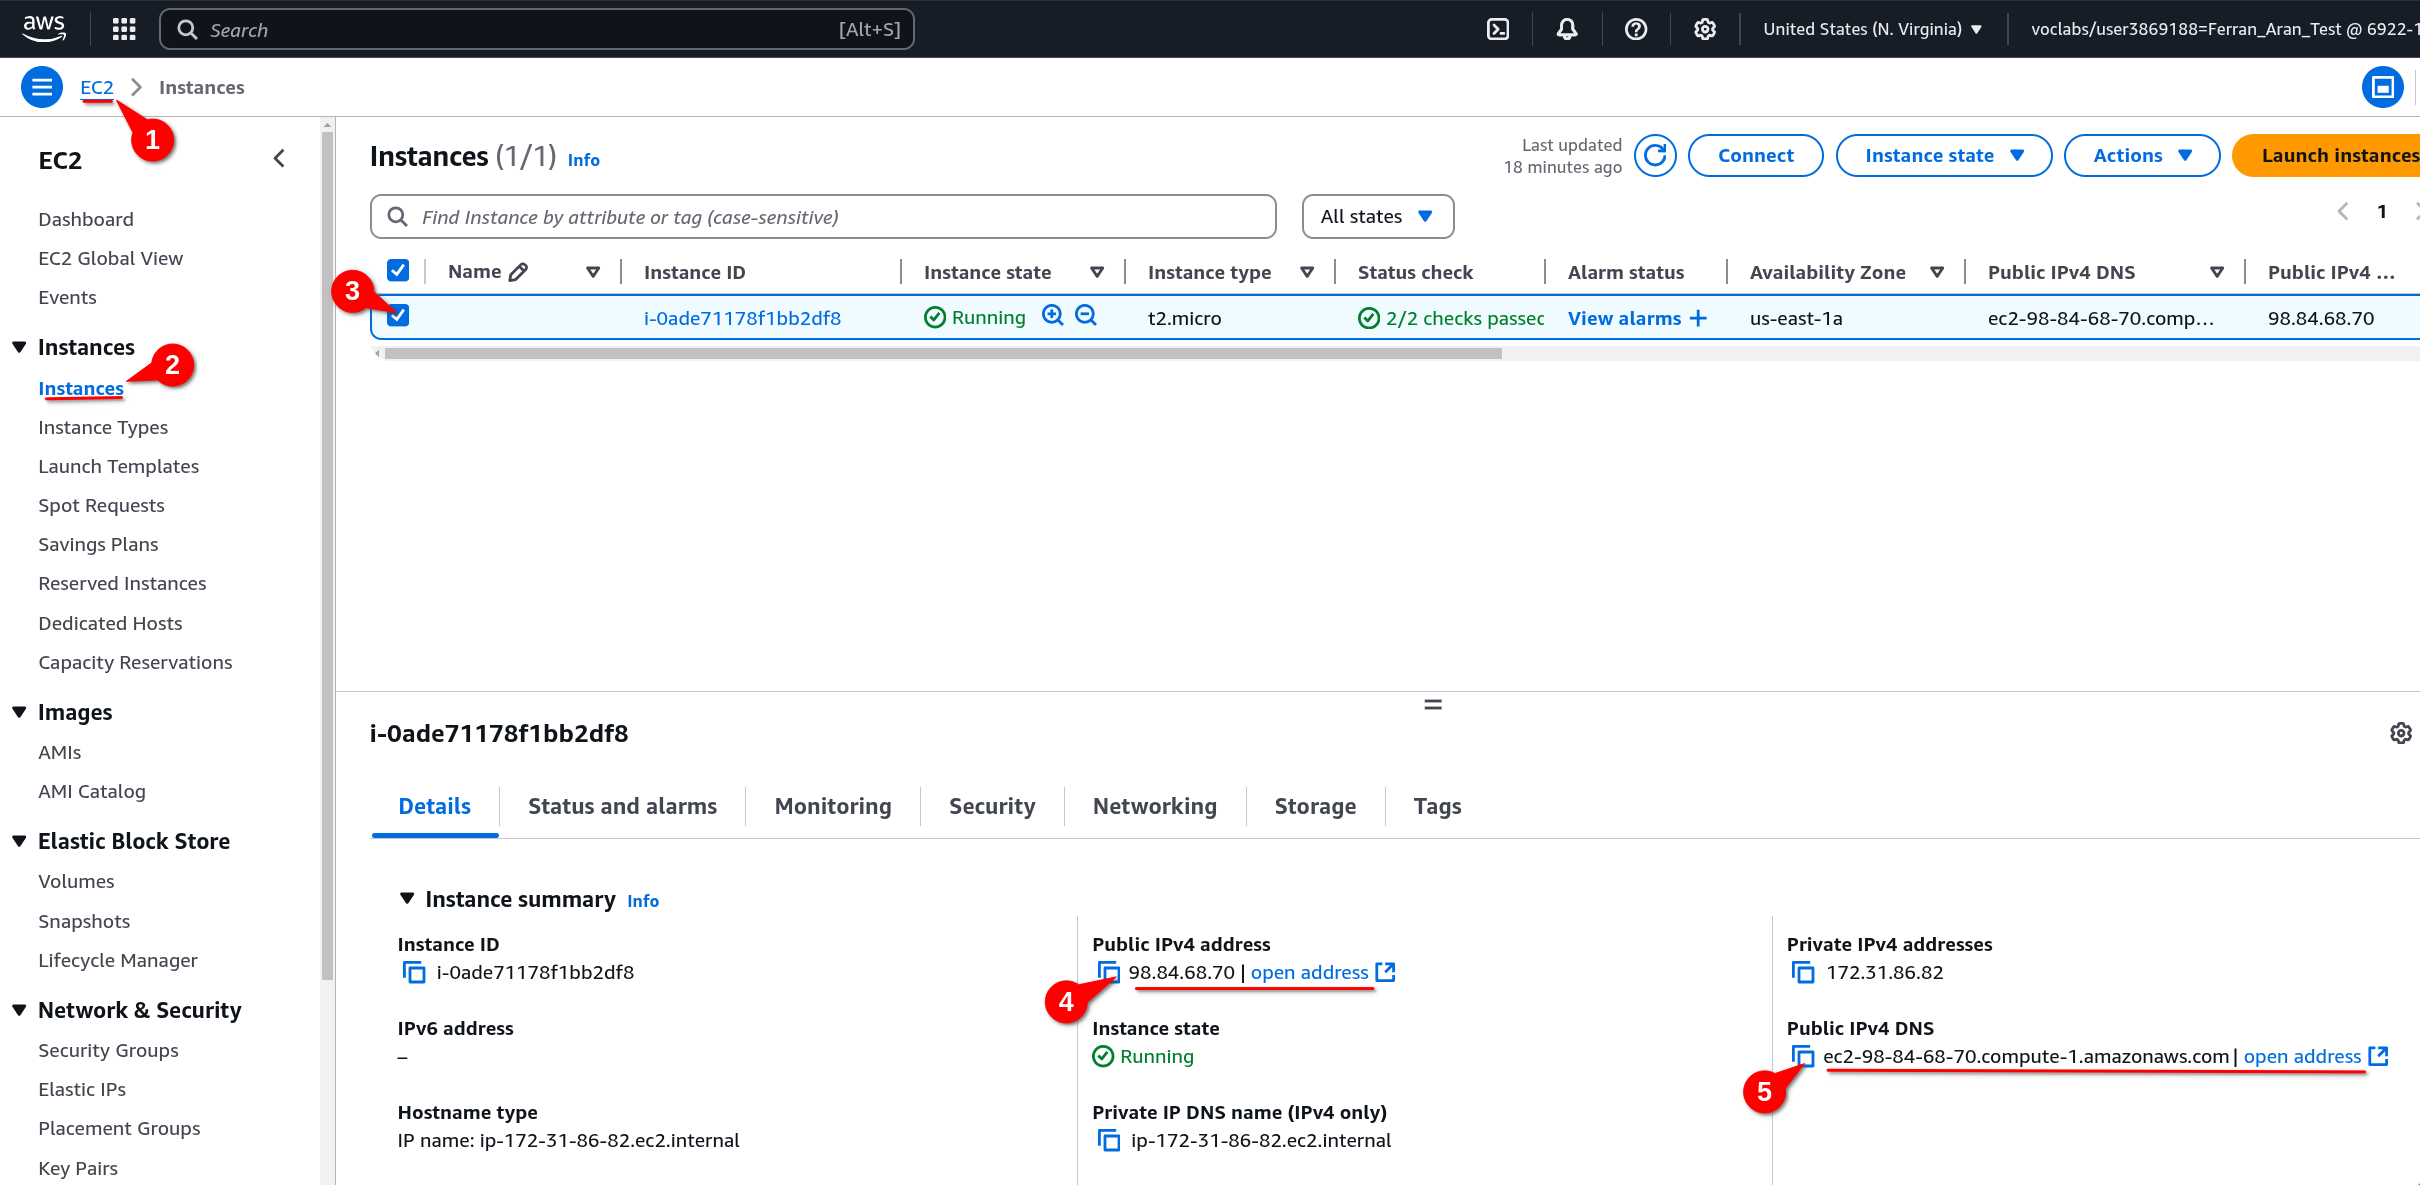
Both the Public IPv4 address and the Public IPv4 DNS can be used as the <public-ip> in the ssh command. Copy whichever you prefer and paste it in the ssh command. The command should look something like this if using the IP address:
ssh -i .ssh/aws-keypair ec2-user@98.84.68.70
or like this if using the DNS:
ssh -i .ssh/aws-keypair ec2-user@ec2-98-84-68-70.compute-1.amazonaws.com
We are going to get a warning the first time we connect to the remote machine. This is normal, just type yes and press Enter. You should now be connected to the remote machine. You will see a prompt similar to the one below:
   ,     #_
   ~\_  ####_        Amazon Linux 2023
  ~~  \_#####\
  ~~     \###|
  ~~       \#/ ___   https://aws.amazon.com/linux/amazon-linux-2023
   ~~       V~' '->
    ~~~         /
      ~~._.   _/
         _/ _/
       _/m/'
Last login: Sun Mar  2 09:50:33 2025 from 79.156.58.43
[ec2-user@ip-172-31-86-82 ~]$
Fantastic! We are now connected to the remote machine. It is important to understand that from now on, the commands we type will be executed on the remote machine, not on our local machine. To check this, type the pwd and whoami commands as we did on our local machine. You should see the output is different. Below is the output I get on the remote machine:
[ec2-user@ip-172-31-86-82 ~]$ pwd
/home/ec2-user
[ec2-user@ip-172-31-86-82 ~]$ whoami
ec2-user
[ec2-user@ip-172-31-86-82 ~]$
This time the output you get should be the same as mine. Notice that the prompt [ec2-user@ip-172-31-86-82 ~]$ is indeed different but that is not part of the outputs of the commands. The outputs of the commands are pwd and whoami which are home/ec2-user and ec2-user respectively. The prompt is just a way to show you where you are in the file system and who you are logged in as.
What's next?
You have now successfully set up AWS for the first time. You have created an AWS Academy account, accessed the AWS Dashboard, created an SSH key pair, imported the public key to AWS, created an EC2 instance and connected to it. All of this and more was covered during Session 3, this guide is ment to help you get to the point where you have an EC2 instance running and you are connected to it for the first time. Once this guide is successfully completed, you should follow this guide to set up your AWS environment each of the next times you want to work with AWS (for example when following Session 4 or working on Hands-On Lab 2).
Guide 2 - Setting up AWS for each subsequent session
Once you have followed the first guide to set up your AWS account, use this guide to set up your AWS environment for each session. That is for each time you want to work on your project and you start your AWS Learner Lab.
Table of contents
- Prerequisites
- Introduction
- Step 1: Log in to your AWS account
- Step 2: Accessing the AWS Dashboard
- Step 3: Connect to your EC2 instance
- Step 4: Configure AWS credentials on the EC2 machine
- Step 5: Configure AWS credentials on your local machine
- What's next?
Prerequisites
- AWS Academy account created
- An SSH key pair on your local machine
- An EC2 instance created with your key pair configured
Introduction
Use this guide each time you want to work on your project and you need to start your AWS Learner Lab. If you successfully follow this guide you will end up with:
- A remote terminal connected to the EC2 instance
- An EC2 instance running with AWS credentials configured and updated
- AWS credentials configured and updated on your local machine
Step 1: Log in to your AWS account
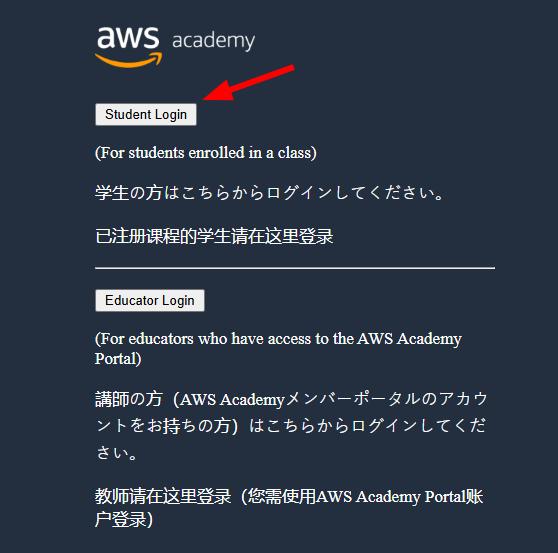
To log in to your AWS account, visit the AWS Academy website, click on Student Login and log in with your credentials.
Your browser may have kept your session open. If you end up in the AWS Academy dashboard you are good to go and can skip to Step 2.
It may ask for a verification code sent to your email. If so, check your email and enter the code. The email will look like this:
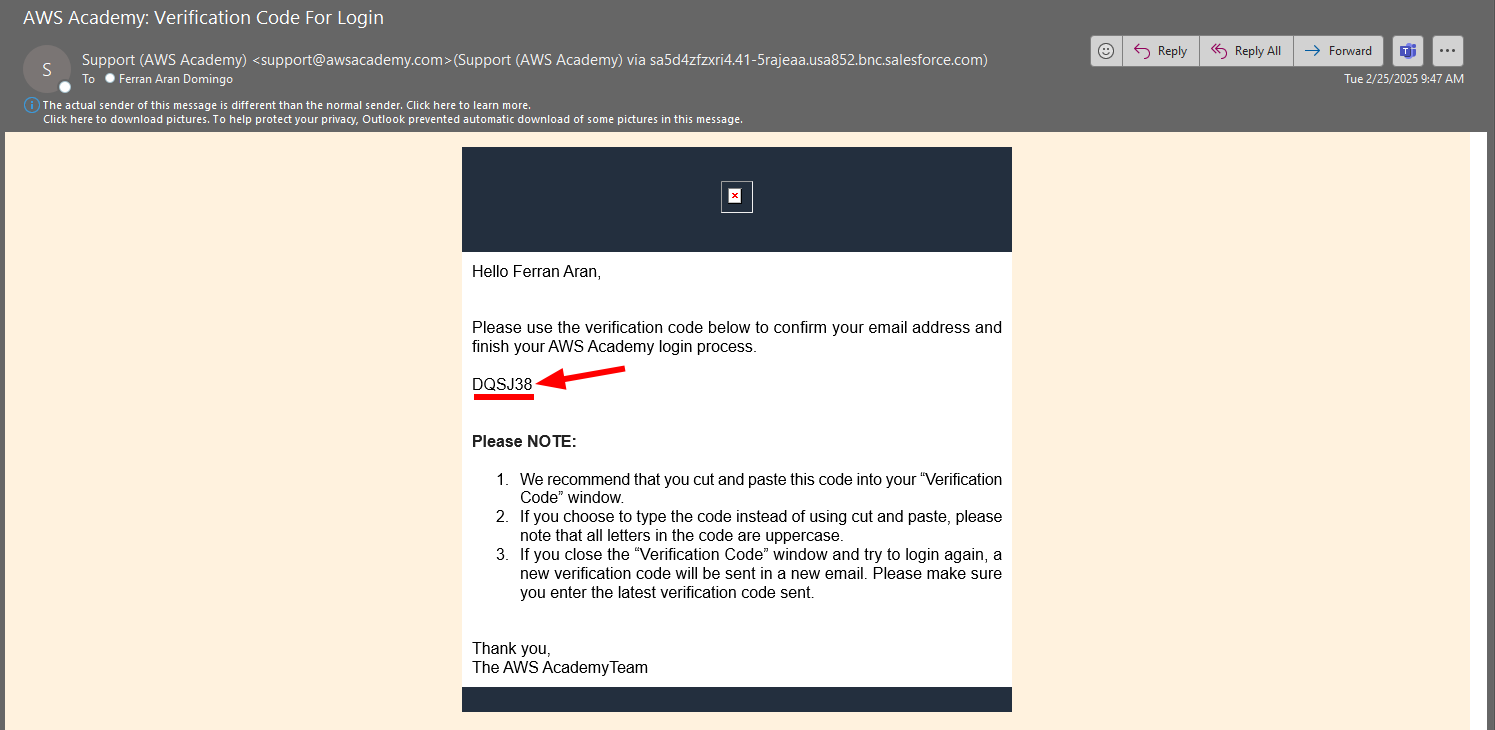
You should now see the AWS Academy dashboard.
Step 2: Accessing the AWS Dashboard
Exactly as we did on Guide 1's Step 2, we now have to access the AWS Dashboard. Below are the steps to do so:
The first thing you have to do is to click on the Courses tab on the left side of the screen. You will see a list of courses available to you. Click on the course AWS Academy Learner Lab as shown in the screenshot below:
Now we have to look for the Modules tab on the left side of the screen. Click on it and you will see a list of modules available to you. Click on the module AWS Academy Learner Lab as shown below:
You need to now click on the Start Lab button.
Now give it a couple minutes to load. You'll see this animation while the lab is being prepared for you:
Finally, when the lab is ready, you'll see that the dot next to AWS is green. You'll also se a timer counting down from 4 hours. This is the time you have to work on the lab. To the left of the timer you'll see how's your budget going. You have a budget of $50 to spend on AWS services. Click on AWS to access the AWS Dashboard as shown below.
If you exceed the $50 budget, you will no longer have acces to the AWS Dashboard and will loose your work. Make sure to keep an eye on the budget and if you see that you're getting close to the limit, let me know so I can create a new lab for you.
Great! You have now accessed the AWS Dashboard. You will see a screen similar to the one below:
Step 3: Connect to your EC2 instance
Exactly as we did on Guide 1's Step 5 we're now going to go to the EC2 service and look for the machine we want to connect to. As you may remember, we're going to use the search bar to look for the EC2 service. Click on the search bar and type EC2. Click on the first result that appears.
When the lab session ends bacause the 4 hours have passed, all your EC2 instances will be stopped (similarly to how one shuts down a computer). The next time you start a lab session, all your EC2 instances will automatically start again.
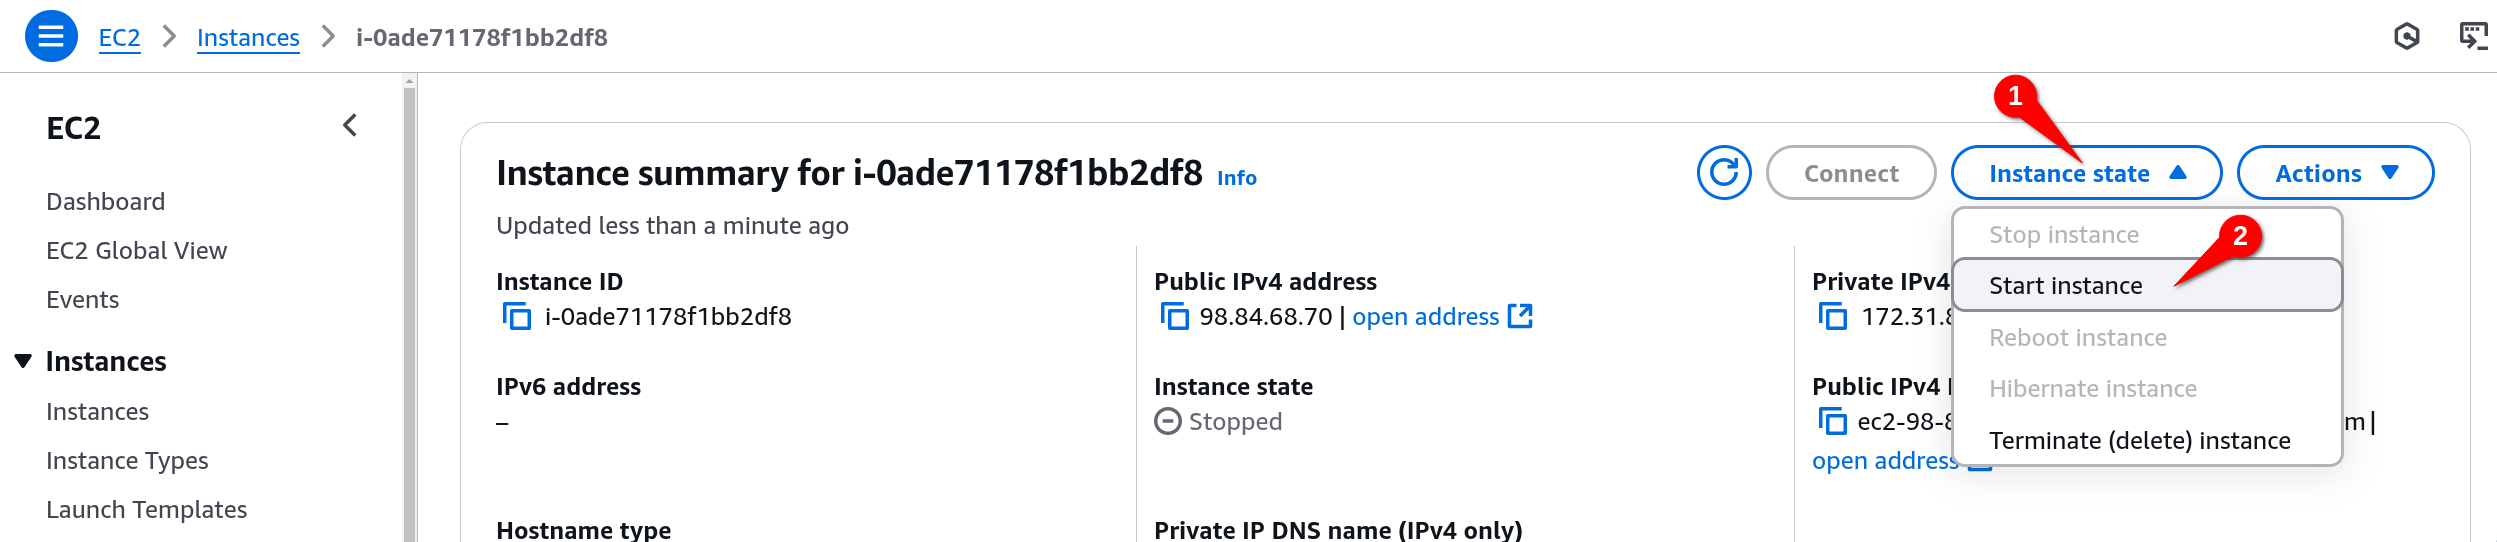
If you instead have stopped the lab by clicking on the Stop Lab button, you will have to manually start the EC2 instances you want to work with. To do so, you'll have to click on the instance you want to start and then on Instance State and finally on Start instance as shown below:
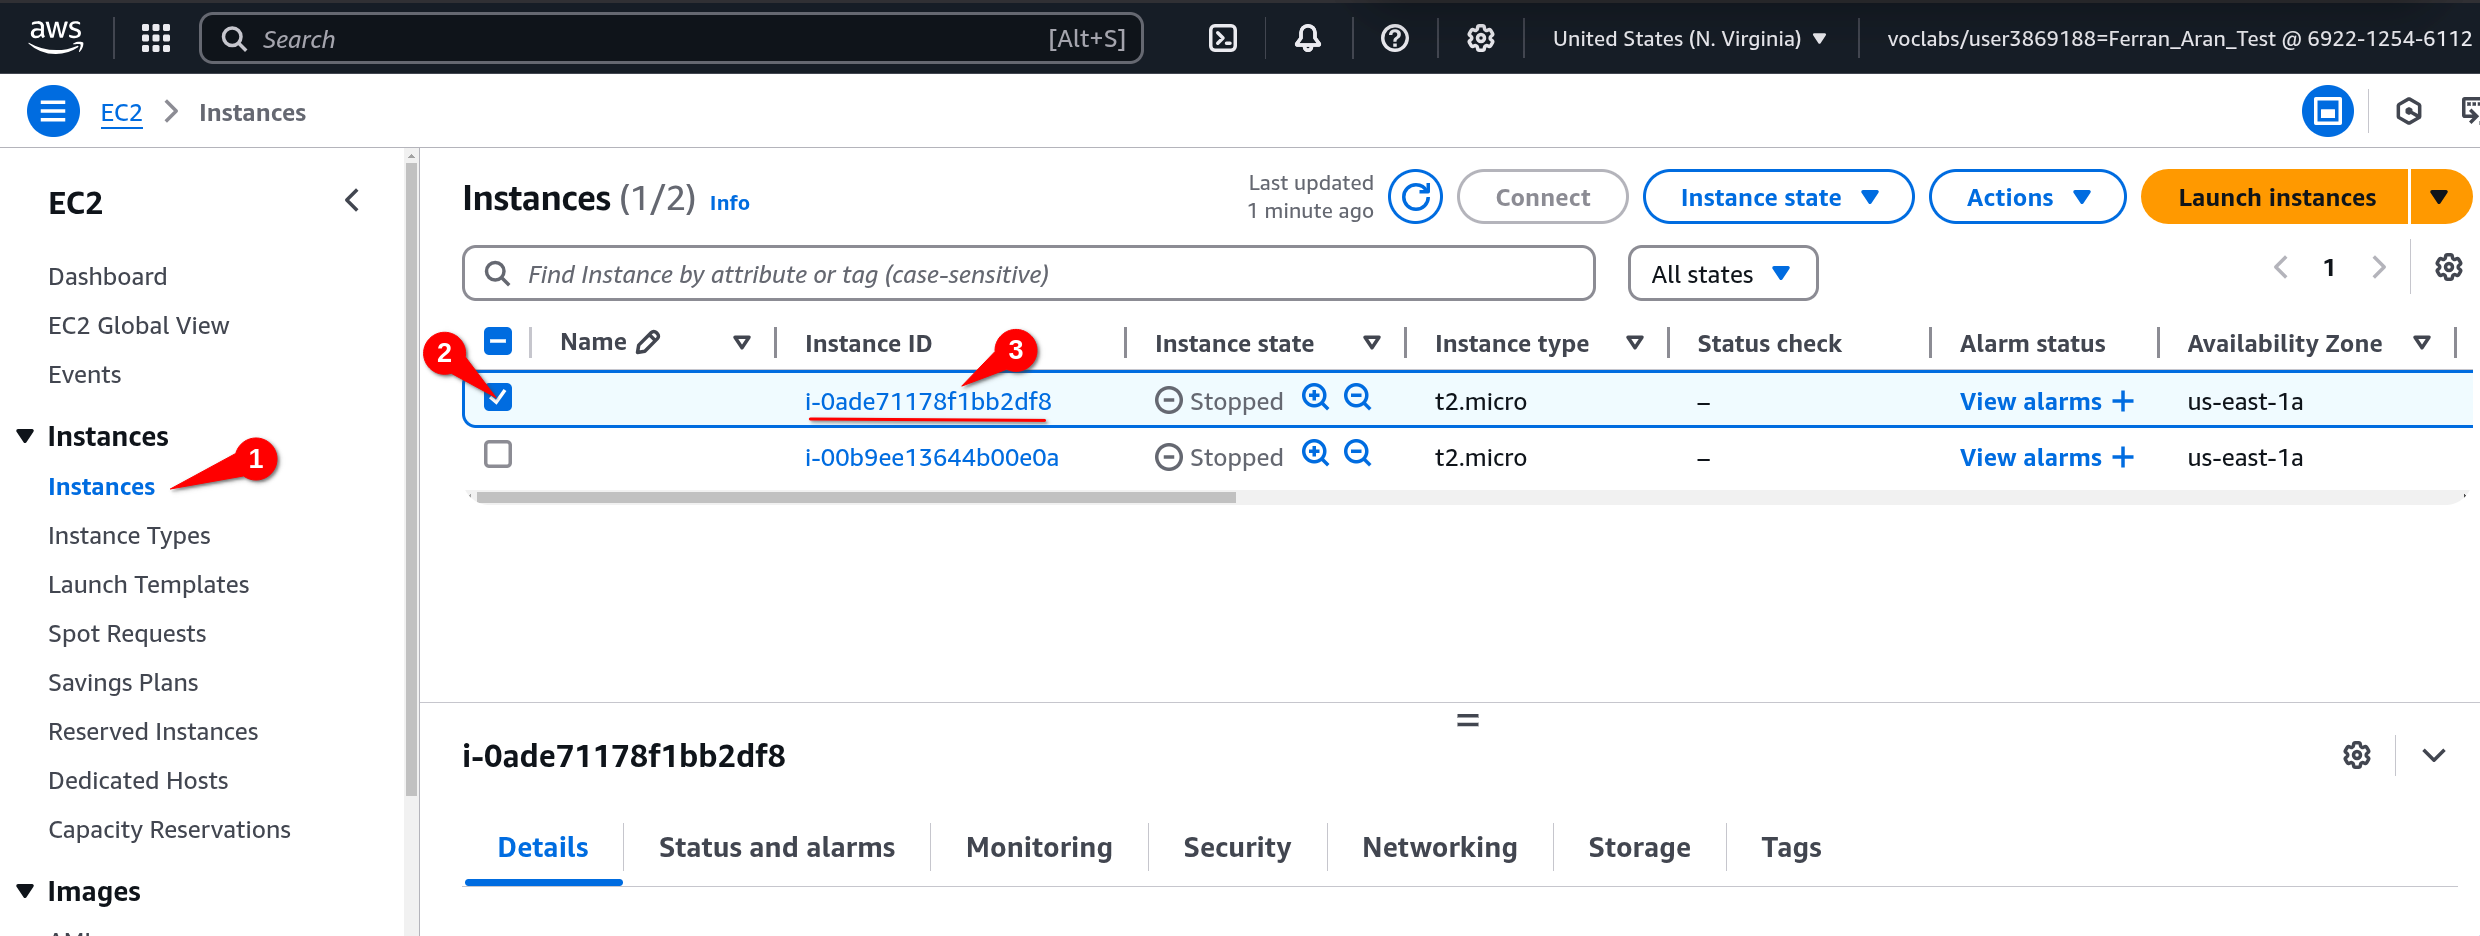
As said before, if the lab session ended naturally and not because you clicked on the Stop Lab button, the instances will have started automatically and this steps are not necessary.
Now go to the instances tab on the left, select the instance you want to connect to and copy the Public IPv4 address or Public IPv4 DNS (choose whichever you prefer as they both work).
We have to repeat this step each time we start a new lab session because the IP address (and DNS) of EC2 instance changes each time they are restarted. And they are restarted each time we start a new lab session.
Once the IP address is copied, open a terminal on your local machine and connect to the EC2 instance using the following command:
ssh -i .ssh/aws-keypair ec2-user@<public-ip>
Both the Public IPv4 address and the Public IPv4 DNS can be used as the <public-ip> in the ssh command. Copy whichever you prefer and paste it in the ssh command.
The command should look something like this if using the IP address:
ssh -i .ssh/aws-keypair ec2-user@98.84.68.70
or like this if using the DNS:
ssh -i .ssh/aws-keypair ec2-user@ec2-98-84-68-70.compute-1.amazonaws.com
You should now be connected to the remote machine. You will see a prompt similar to the one below:
   ,     #_
   ~\_  ####_        Amazon Linux 2023
  ~~  \_#####\
  ~~     \###|
  ~~       \#/ ___   https://aws.amazon.com/linux/amazon-linux-2023
   ~~       V~' '->
    ~~~         /
      ~~._.   _/
         _/ _/
       _/m/'
Last login: Sun Mar  2 09:50:33 2025 from 79.156.58.43
[ec2-user@ip-172-31-86-82 ~]$
Fantastic! We are now connected to the remote machine. It is important to understand that from now on, the commands we type will be executed on the remote machine, not on our local machine.
Step 4: Configure AWS credentials on the EC2 machine
From now on we are going to work on steps that where not covered on Guide 1. We are going to configure AWS credentials on the remote machine. This is important because we are going to use the AWS CLI to interact with AWS services.
The AWS CLI is a tool that allows you to interact with AWS services from the command line. It is a powerful tool that can be used to automate tasks and manage your AWS resources. For example, on Session 4 we are going to use the AWS CLI to interact with the S3 service. You can find more information about the AWS CLI here.
When on an EC2 machine, AWS CLI comes already installed. You can check if it is installed by running the following command:
[ec2-user@ip-172-31-86-82 ~]$ aws

usage: aws [options] <command> <subcommand> [<subcommand> ...] [parameters]
To see help text, you can run:

  aws help
  aws <command> help
  aws <command> <subcommand> help

aws: error: the following arguments are required: command

[ec2-user@ip-172-31-86-82 ~]$
This is the base command which by itself doesn't do anything. What we are going to do now is to configure the AWS CLI with our credentials so we can later run commands that can access other AWS resources like S3.
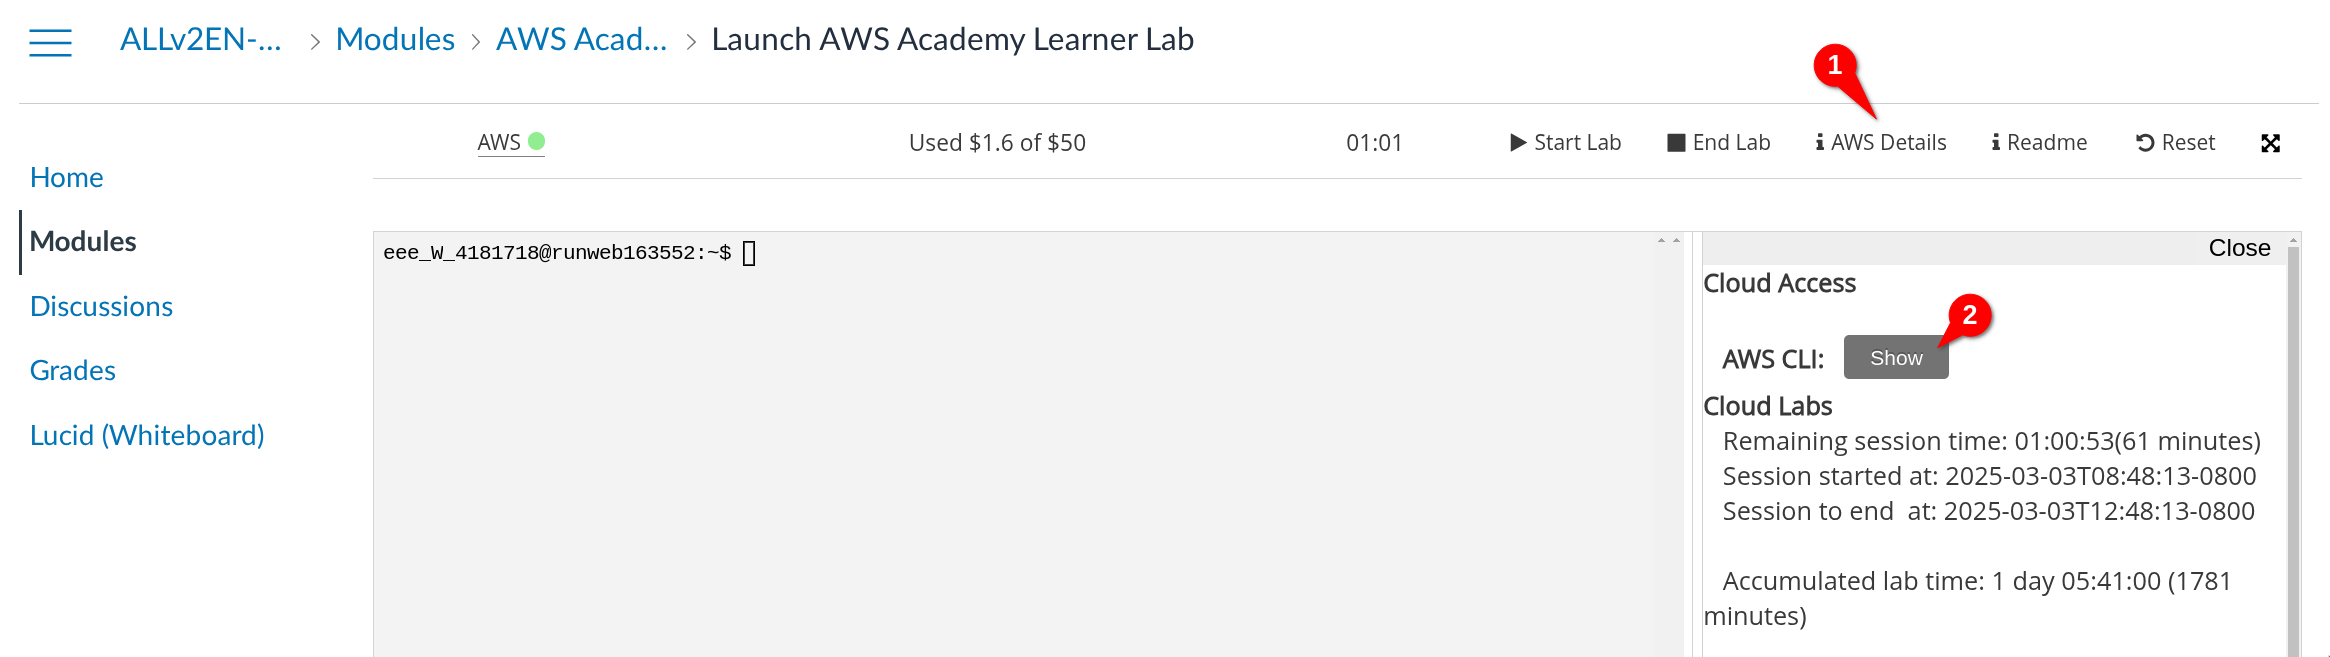
To configure the AWS CLI, we'll need to copy some access keys to a file on the EC2 machine. We'll see now what this means but let's first locate the access keys. We'll have to visit the AWS Academy website (not to be confused with the AWS Dashboard). Specifically we'll visit the page where we started the lab, in case you have closed it, below are the steps to get there:

We should now see the page where we launched the lab as shown below:
Now click on AWS Details and then on Show.
Some text will show up. Do you see it says we have to write that text on a file called credentials inside the .aws folder? We're going to do just that.
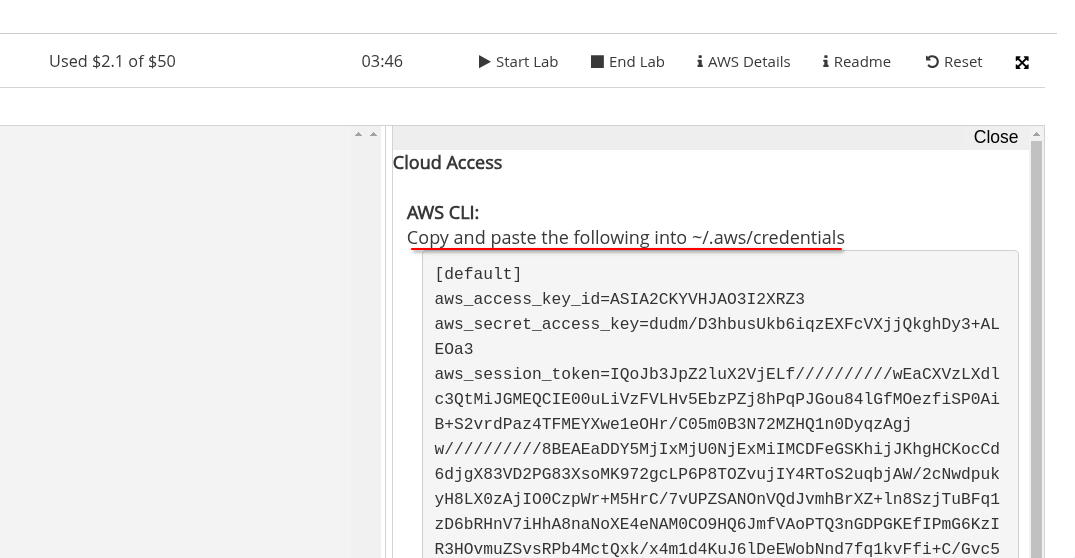
This text will change each time a new lab session is started, that is why we'll have to update the contents of the credentials file each time we start a new lab session.
First step will be to make sure the .aws folder exists. Run the following command:
mkdir .aws
As when we where creating the .ssh folder when generating a key pair, the command may fail due to the folder already existing. If that's the case, don't worry about it. Now we are going to create the credentials file inside the .aws folder. Run the following command:
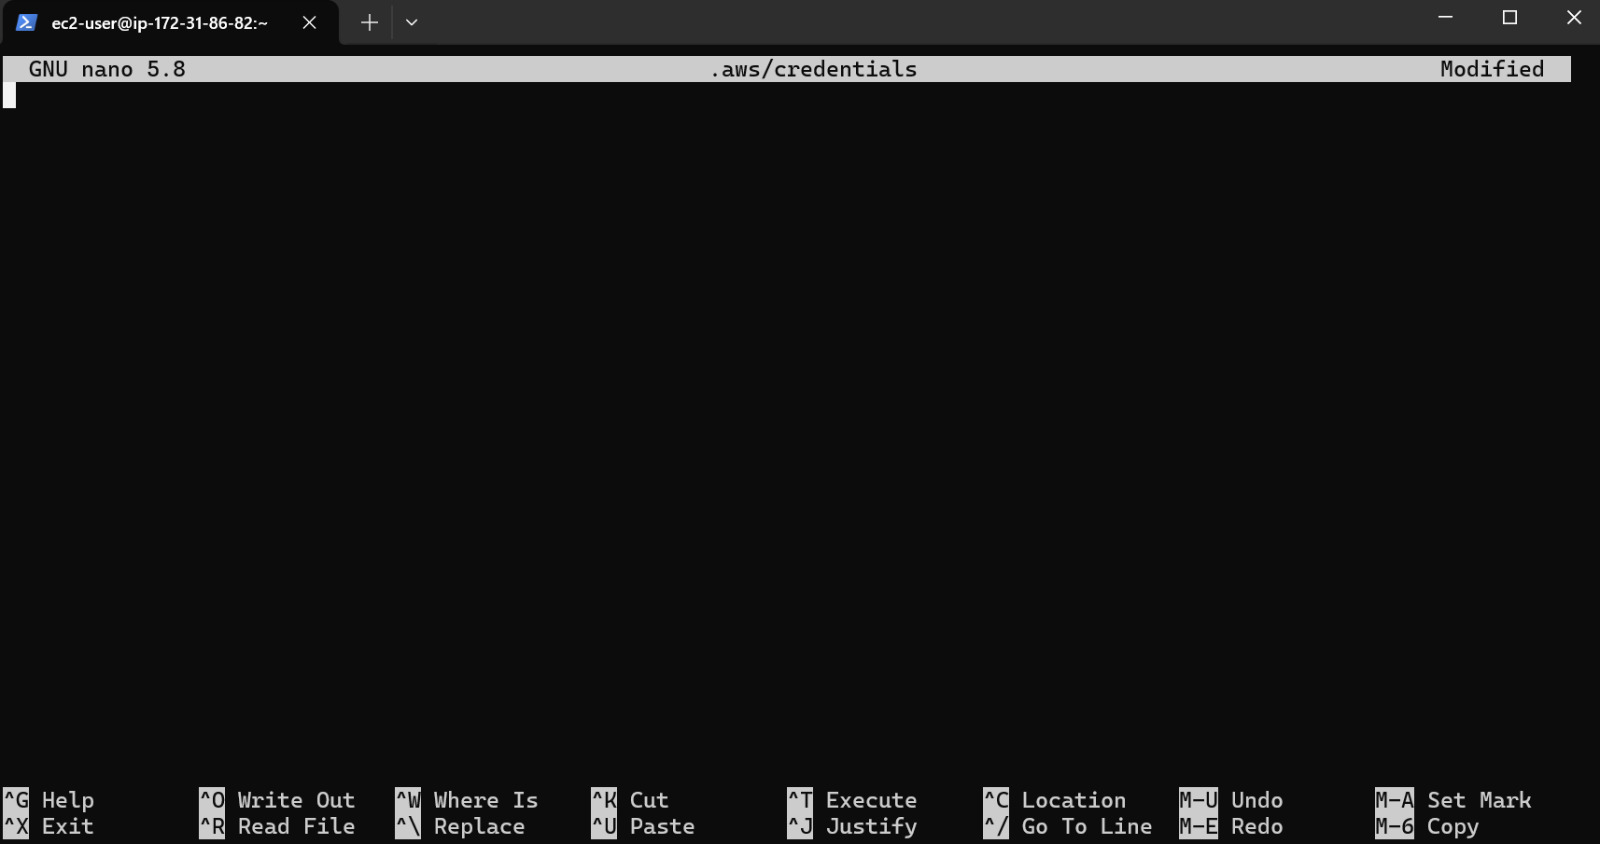
nano .aws/credentials
We are now getting into tricky terminal territory here. This is not something you need to fully understand, but I promise it will be helpful for you to know the basics and gain some experience with the terminal. Check out the video below if you're courious about editing files from the terminal.
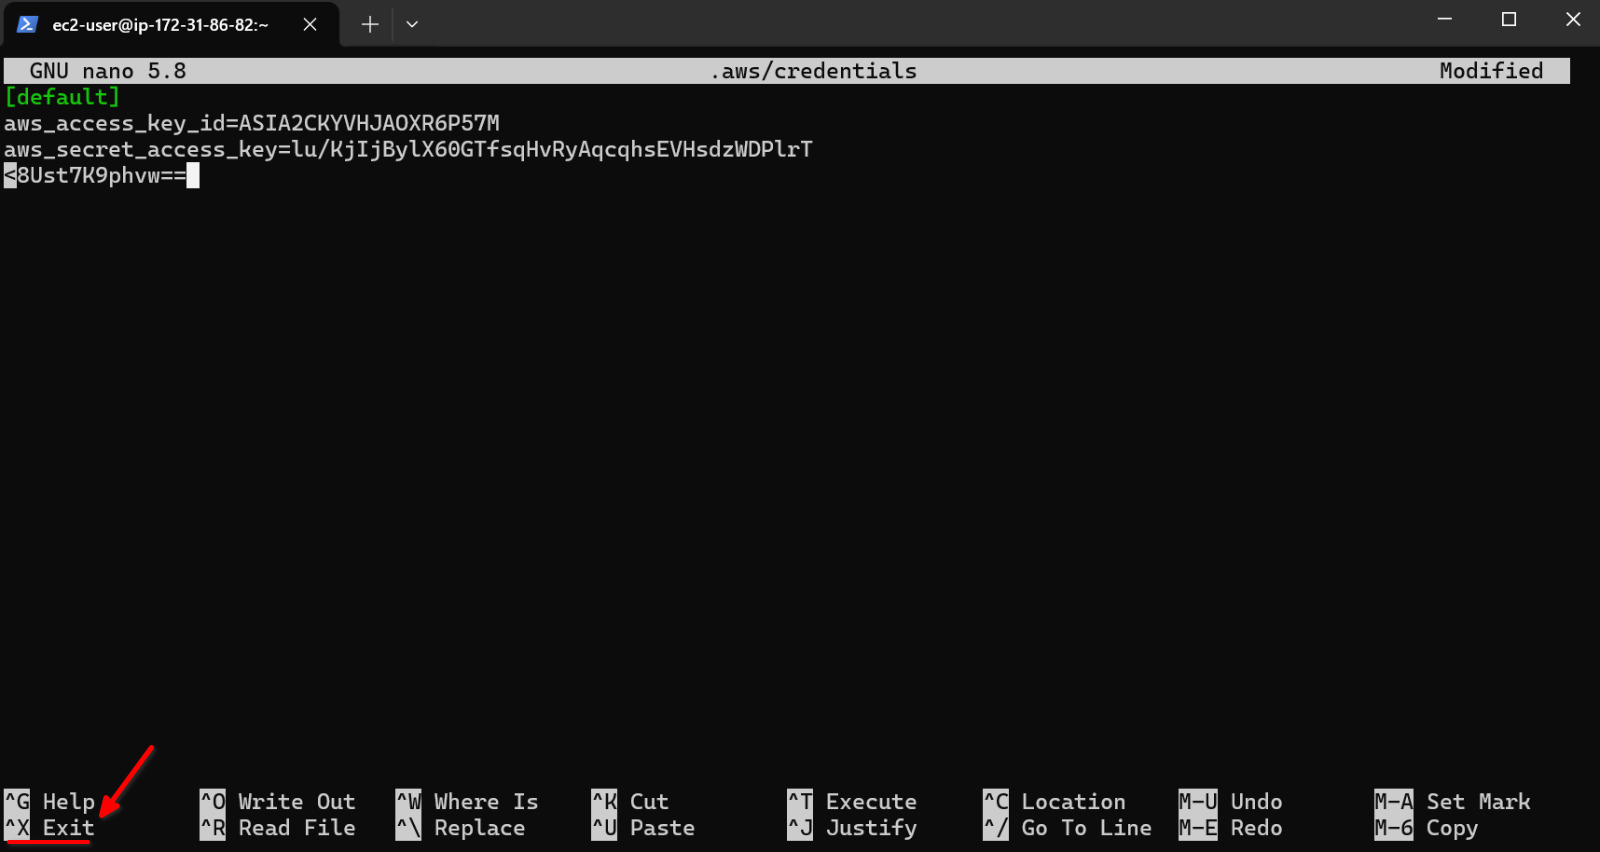
The above command will open a text editor called nano. This means you are now editing the contents of the credentials file. I know this may be a bit confusing but try to imagine you are just editing a text file with Microsoft Word, the difference is we are going to do it only using the terminal, which means there isn't a graphical user interface and we can only use our keyobard. You should see something like this:
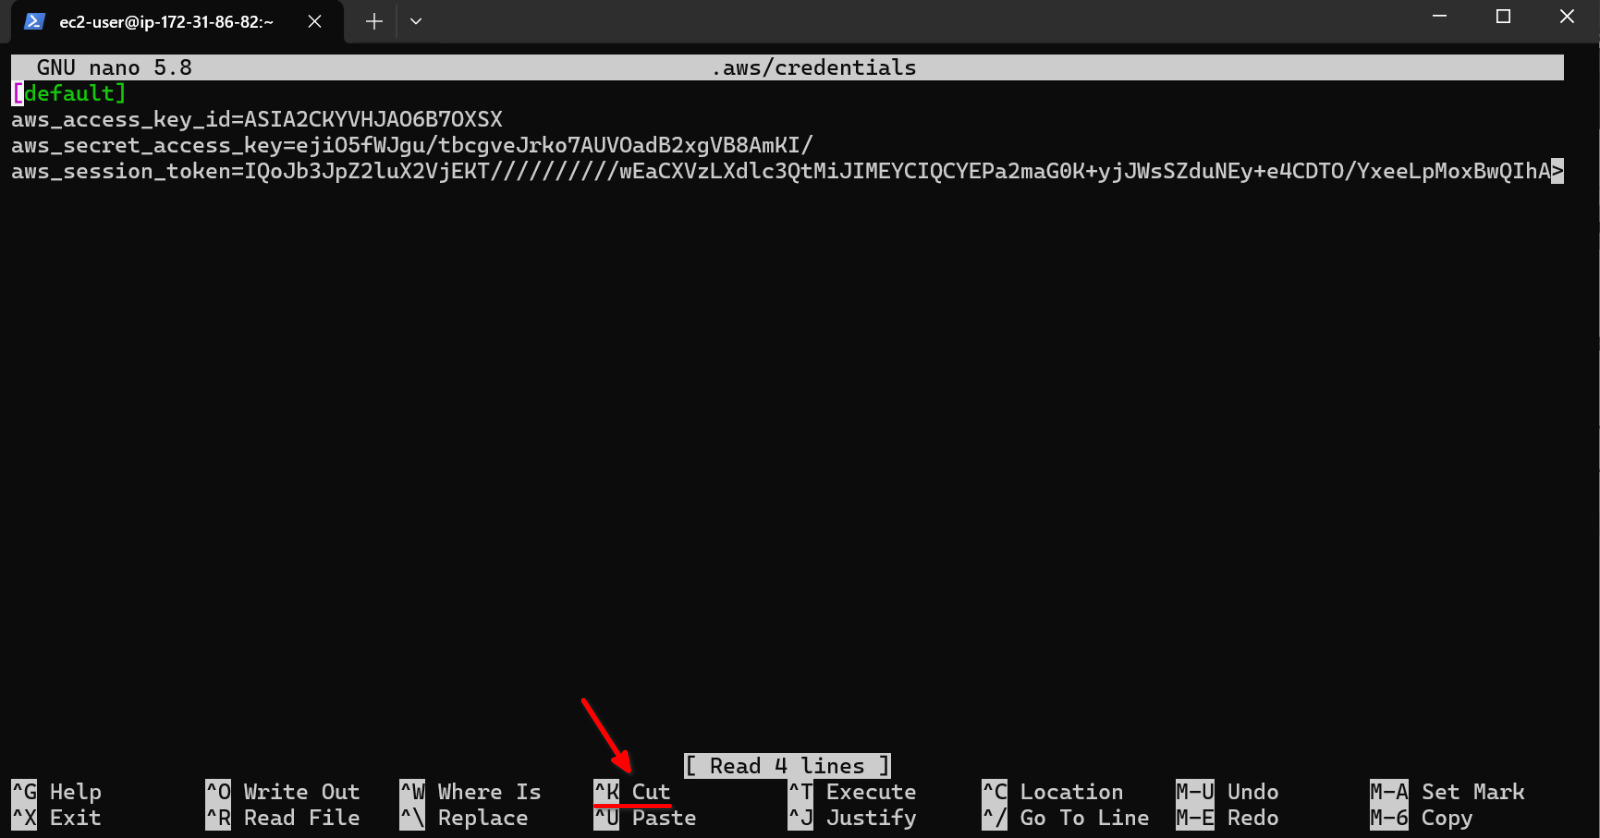
If it is not the first time you are editing this file, you will see some text already written as shown below. There are multiple ways to erase the contents of the file and write your new credentials, an easy one is to repeatedly press Ctrl + K until all the text is erased (each time you press it a line is deleted). Once the file is empty, you can start writing your new credentials.
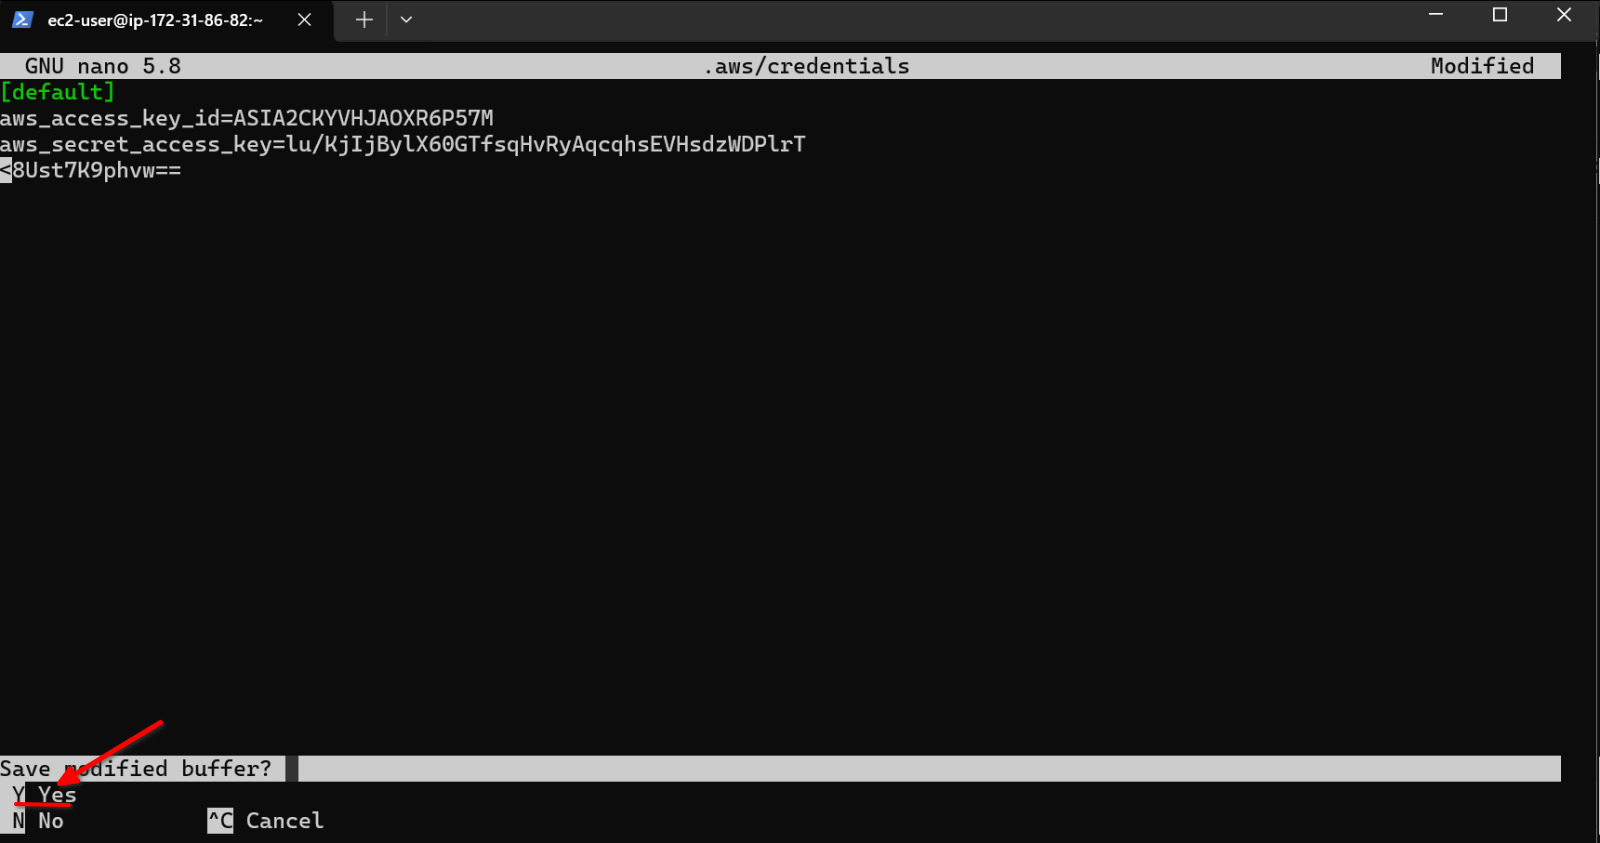
Next we'll go back to ther terminal where we are editing the credentials file and paste the text with Ctrl + V (try Ctrl + Shift + V if Ctrl + V doesn't work). The copied text is now where we want it and we can proceed so save the file and exit. To do so, press Ctrl + X as indicated in the cheatsheet at the bottom of nano.
You will be asked if you want to save the changes. Press Y to save the changes.
Finally we'll be asked for the file name to write the changes to. Just press Enter to confirm the file name since it is already correct.
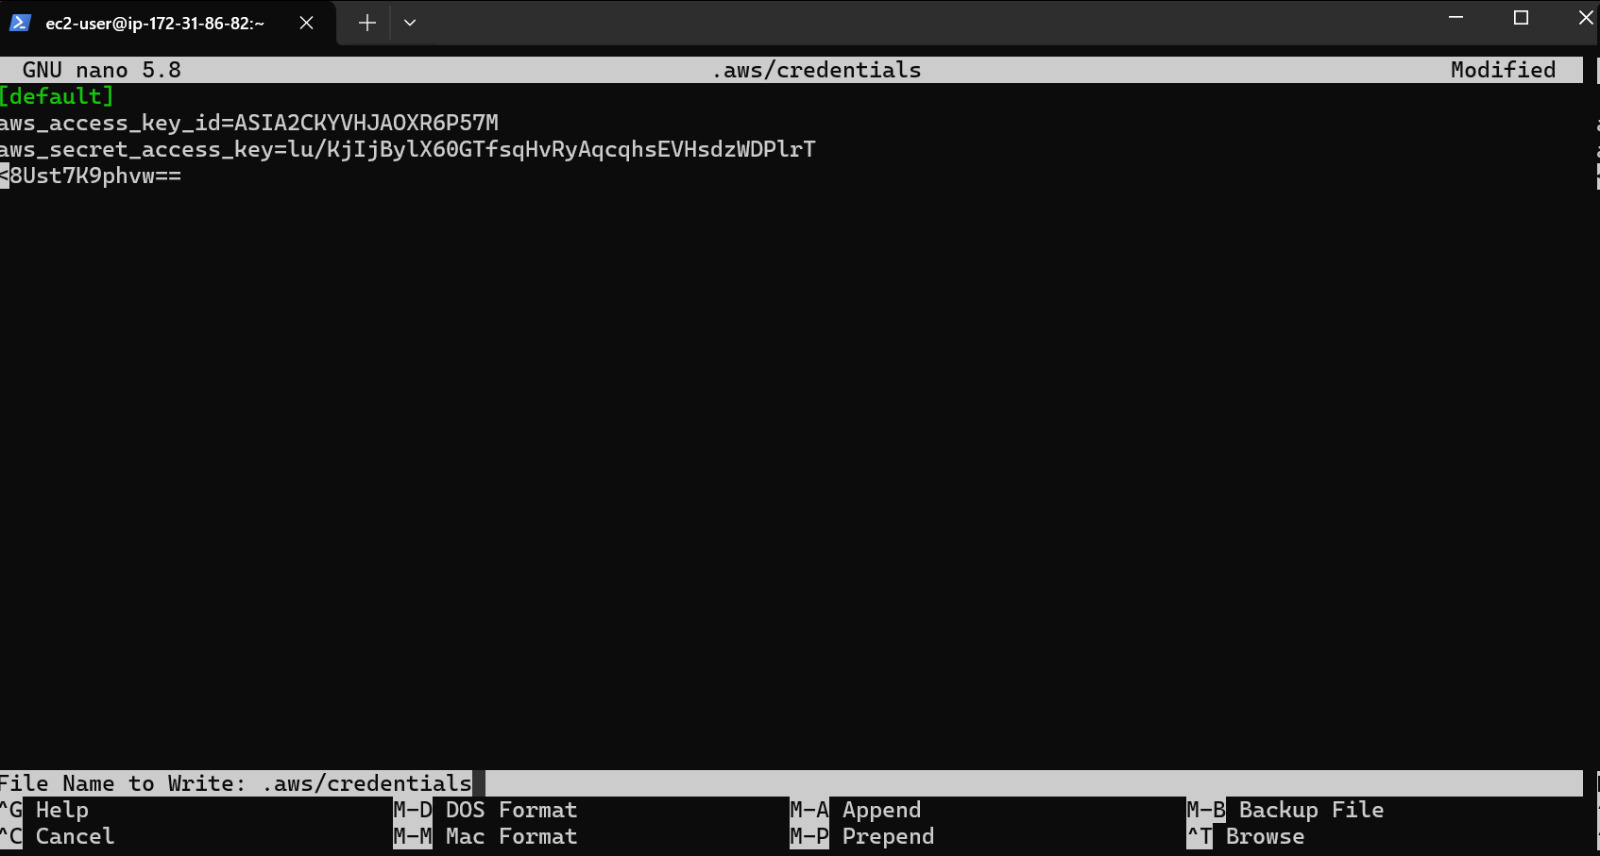
Great! We've written a file just using the terminal. We can now check the contents of the file using cat:
[ec2-user@ip-172-31-86-82 ~]$ cat .aws/credentials
[default]
asdfaaaws_access_key_id=ASIA2CKYVHJAOXR6P57M
aws_secret_access_key=lu/KjIjBylX60GTfsqHvRyAqcqhsEVHsdzWDPlrT
aws_session_token=IQoJb3JpZ2luX...
[ec2-user@ip-172-31-86-82 ~]$
To test if the configuration was successful, run aws sts get-caller-identity and you should see something like this:
[ec2-user@ip-172-31-86-82 ~]$ aws sts get-caller-identity
{
    "UserId": "AROA2CKYVHJALK46ZMHVM:user3869188=Ferran_Aran_Test",
    "Account": "692212546112",
    "Arn": "arn:aws:sts::692212546112:assumed-role/voclabs/user3869188=Ferran_Aran_Test"
}
[ec2-user@ip-172-31-86-82 ~]$
Perfect! We have now configured the AWS CLI on the remote machine and we are now able to run commands to interact with AWS services.
Step 5: Configure AWS credentials on your local machine
Let's now configure the AWS CLI on your local machine.
Start by opening a new terminal on your machine, NOT on the remote one. To check if the AWS CLI is installed, run aws --version and you should see something like this:
aws --version
aws-cli/2.24.15 Python/3.12.9 Windows/10 exe/AMD64
If the command instead outputs an error that means we have to install the AWS CLI on our local machine. Follow the steps on the AWS CLI installation guide to do so.
Now we are going to configure the AWS CLI on your local machine. The steps are very similar as when we did it on the remote EC2 machine, in fact if you are on MacOS you can just follow the exact same steps of Step 4 because you'll be able to use the nano command. For Windows users, you can follow the steps below:
Make sure the .aws folder exists on your local machine by running:
mkdir .aws
Remember if it throws an error there's nothing to worry about, it just means the folder already exists. Now we are going to create the credentials file inside the .aws folder. Run the following command:
notepad .aws/credentials.
This will open a text editor where you can write the credentials. You'll be asked if you want to create a new file, if it is the first time you are configuring the AWS CLI on your local machine, press Yes as shown below. If it is not the first time you are configuring the AWS CLI on your local machine, you will see some text already written. Just erase it.
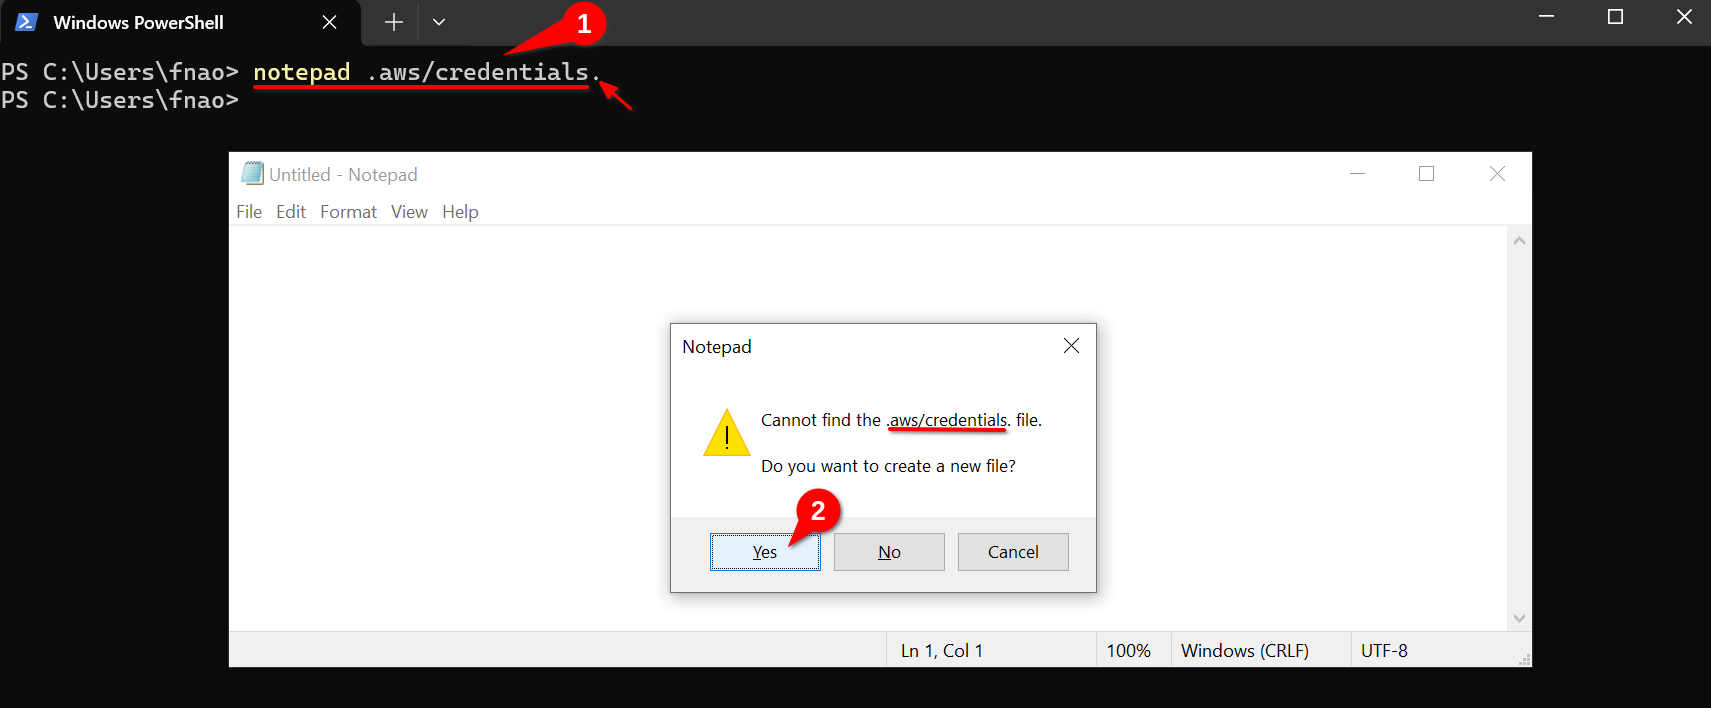
Notice we are writing credentials. and not credentials (we are adding a dot at the end of the file name). This is because we want the file to be named just credentials and Windows would automatically add a .txt extension if we just wrote credentials. By adding a dot at the end of the file name we are telling Windows to not add any extension to the file name. Below is a screenshot of what would have happened if we just wrote credentials:
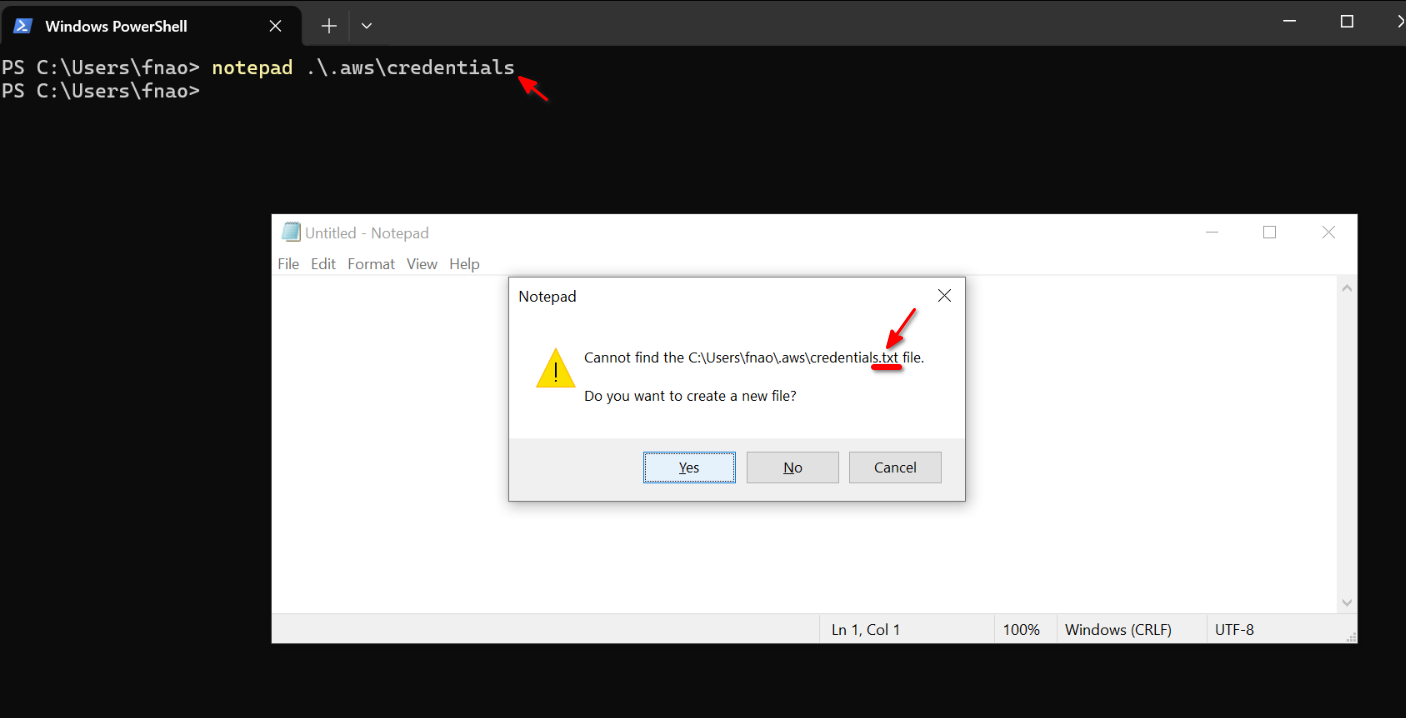
We do not want this. We want the file to be named just credentials. That is why we write .aws/credentials. and not .aws/credentials after the notepad command.
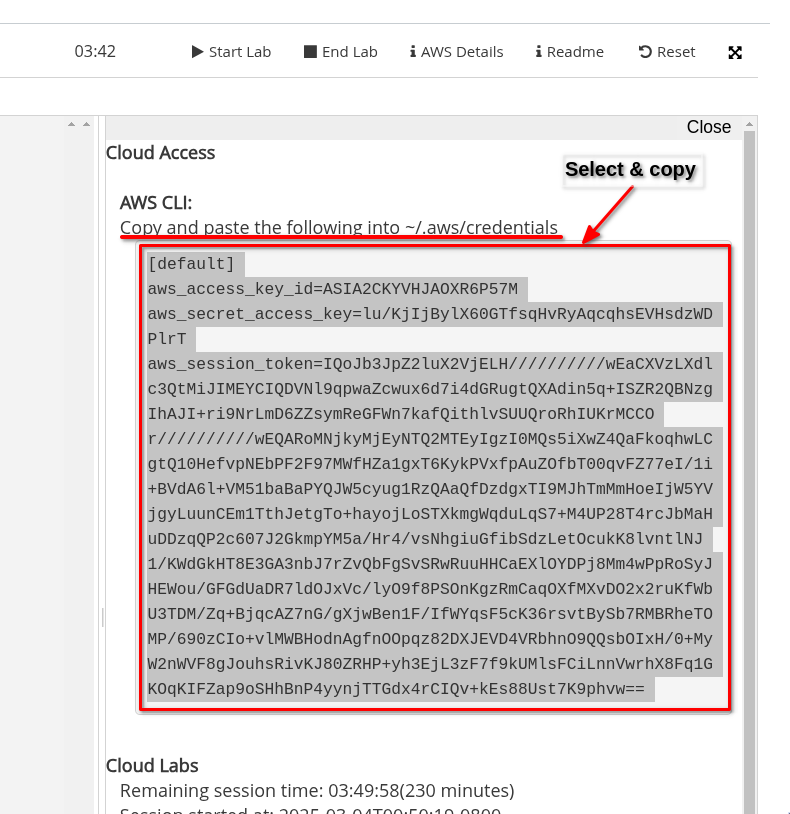
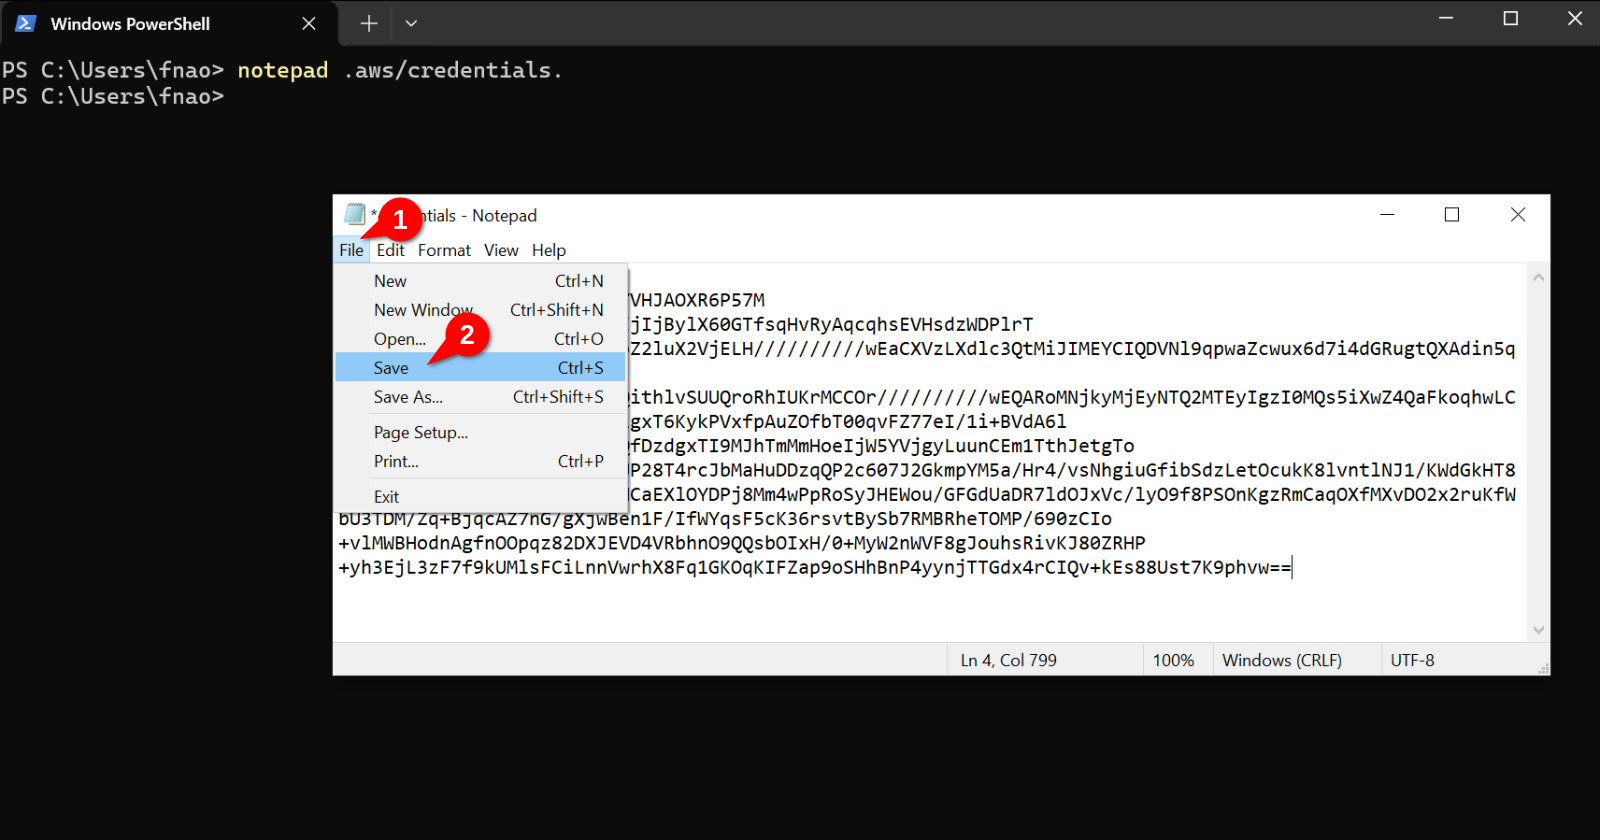
Now we are going to select and copy the text from the AWS Academy website as we did before.
And we now paste it onto the text editor. Once that is done save the file by pressing Ctrl + S or by clicing on File and then Save as shown below:
You can now close the text editor and check the contents of the file using cat:
PS C:\Users\fnao> cat .aws\credentials
[default]
aws_access_key_id=ASIA2CKYVHJAOXR6P57M
aws_secret_access_key=lu/KjIjBylX60GTfsqHvRyAqcqhsEVHsdzWDPlrT
aws_session_token=IQoJb3JpZ2...
PS C:\Users\fnao>
To test if the configuration was successful, run aws sts get-caller-identity and you should see something like this:
PS C:\Users\fnao> aws sts get-caller-identity
{
    "UserId": "AROA2CKYVHJALK46ZMHVM:user3869188=Ferran_Aran_Test",
    "Account": "692212546112",
    "Arn": "arn:aws:sts::692212546112:assumed-role/voclabs/user3869188=Ferran_Aran_Test"
}

PS C:\Users\fnao>
Great! We can now run AWS CLI commands both on our local machine and on the remote EC2 machine.
What's next?
You have now successfully started a new session of your AWS Academy Learner Lab. You have connected to your EC2 instance and configured (or updated if its not the first time) the AWS CLI on both the remote machine and your local machine. You are now ready to keep working on your projects. Remember this guide is intended to be followed each time one wants to start working on AWS and has to start the Learner Lab.
All of this and more was covered during Session 4, this guide is ment to help you out if you got stuck during class and to hopefully make it easier for you to get your AWS Lab set up and running.
HOL 01 - Deploying your personal website
Objectives
This hands-on lab aims to introduce you to the basics of cloud computing by deploying a personal website using Jekyll and GitHub Pages. Additionally, you will explore and write a blog entry on a cloud application in biomedicine.
Introduction
Github pages hide the complexity of setting up a web server and allow you to host a website for free. This PaaS (Platform as a Service) will enable you to host static websites directly from your GitHub repository. You are responsible for creating the website and pushing it to your repository, and GitHub takes care of the rest.
We are going to use a website template created by Dean Attali, his instructions on how to use the tempalte are here, but don't worry about that, we are going to use a simplification to make things easier.
Prerequisites
- GitHub account (create one at https://github.com if you don't have one)
Tools
- Jekyll (a static site generator) - https://jekyllrb.com
- GitHub Pages (a static site hosting service) - https://pages.github.com
Task 1: Setting up your personal website
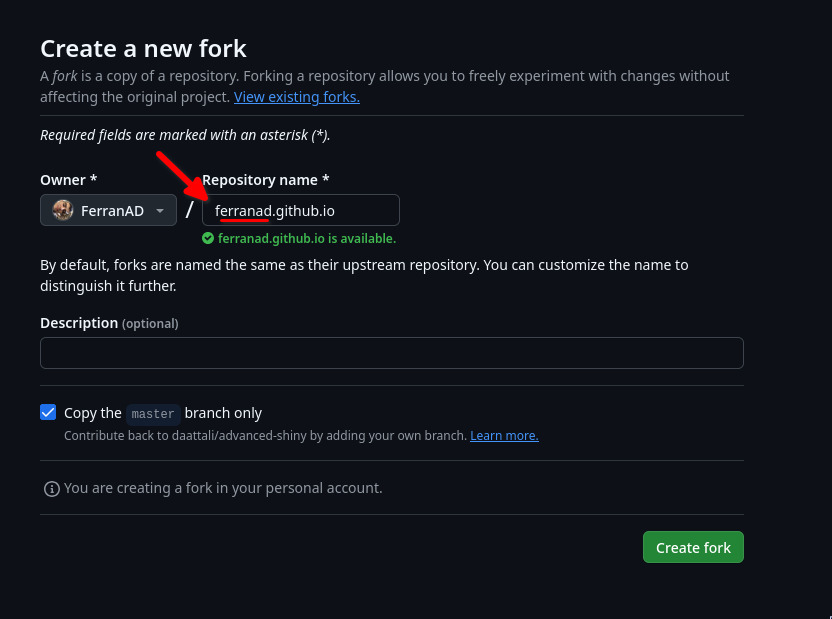
- Fork https://github.com/ferranad/website-template to your GitHub account by clicking on the "Fork" button at the top right corner of this page.

- Rename the repository to
username.github.io, whereusernameis your GitHub username.
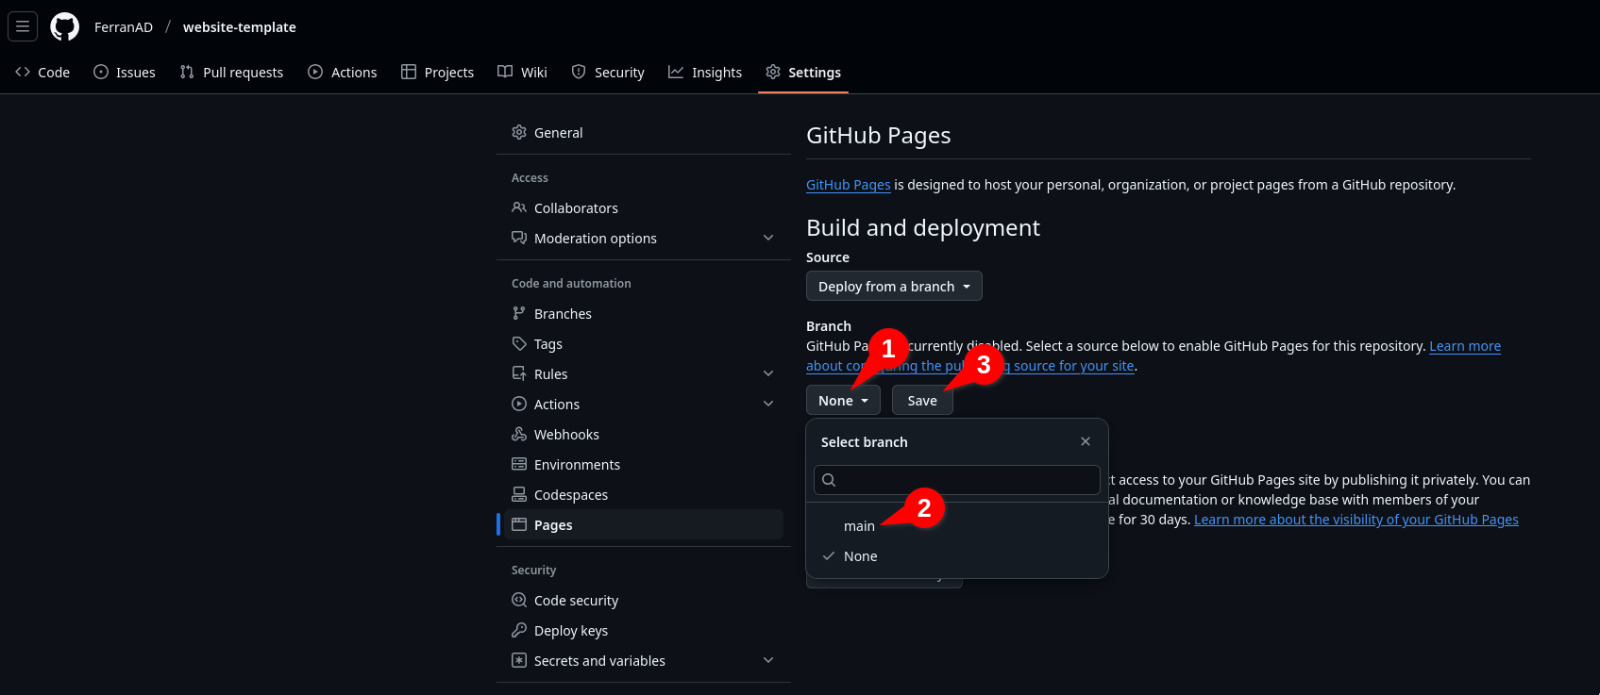
- Go to the repository settings and find the GitHub Pages section.

- Enable GitHub Pages by selecting the
mainbranch as the source. Click on the "Save" button and go back to your repository main page.
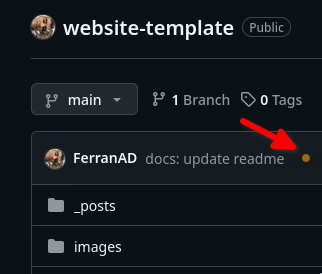
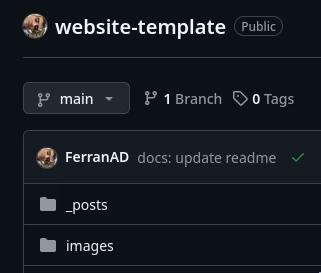
- Wait for a couple minutes until your website is deployed. When the deployment is done you'll see a green checkmark next to your last commit. You'll see an orange dot while the deployment is in progress (try refreshing the page if you don't see the green checkmark after a few minutes).
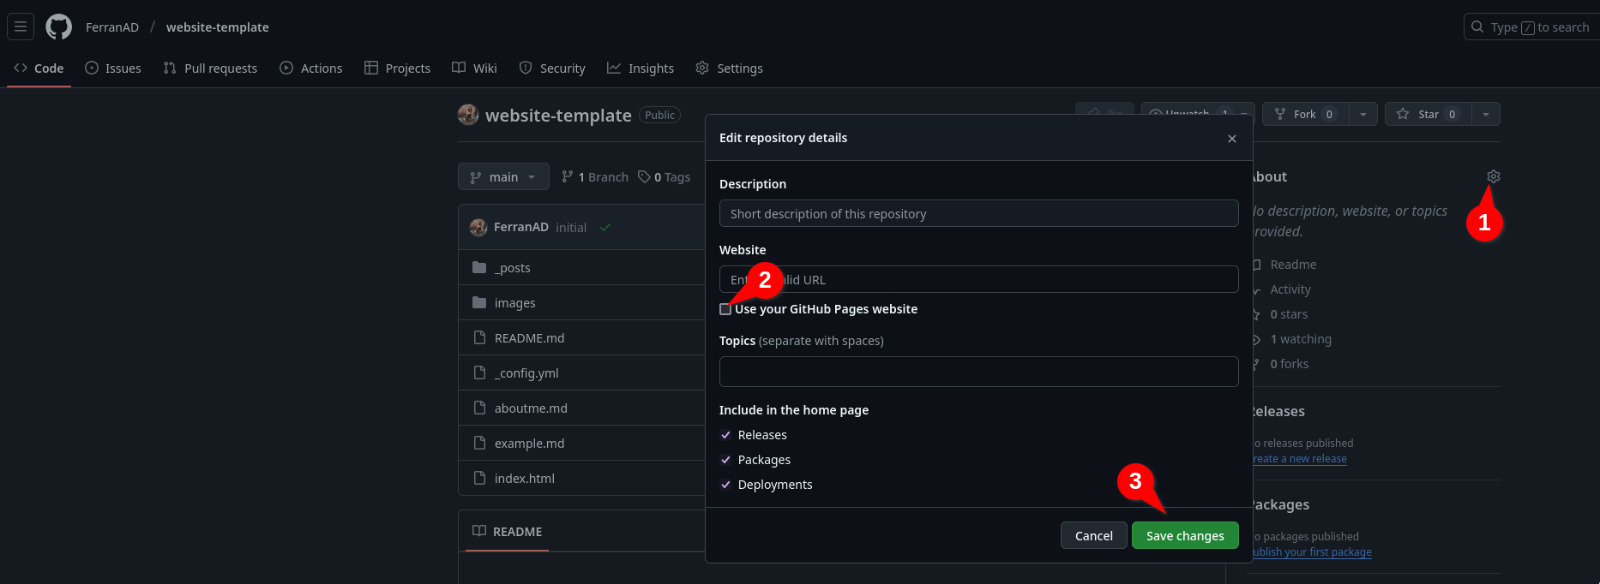
- You can optionally edit the repository description so it contains the URL of your website. This will make it easier for you and others to access your website from the GitHub repository page.
- Test your website by visiting
https://username.github.ioin your web browser (replaceusernamewith your github username). You'll notice that the website is already populated with some example content.
Task 2: Customizing your personal website
- Edit the
_config.ymlfile to customize your website. You can use the GitHub web interface to edit the file directly as shown on the video below. Once you commit the changes to the main branch, the website deployment will be automatically triggered again and in a couple minutes you'll have your website updated.
Instead of editing the file using the Github web interface, you can clone the repository to your local machine and edit the file using a text editor if you feel more comfortable. This is more advanced and requires your computer to have git installed and configured to work with your GitHub account. More information here.
-
Edit the
aboutme.mdfile to add your personal information, feel free to write whatever you want. Repeat the same process as in the previous but now editing theaboutme.mdfile. -
Change the avatar image by editing
_config.ymland replacing the path. Notice it is just a string with the path to a file present in the repository, in this case, theimages/ferran.jpegfile. You can upload any image you want to the repository by navigating to theimagesdirectory and clicking the "Add file -> Upload files" button. If, for example, you uploaded a file calledmyavatar.jpg, you should change the path in_config.ymltoimages/myavatar.jpg. If you don't want to use an avatar image, you can remove the lineavatar: "/images/ferran.jpegfrom the_config.ymlfile.
![]()
Task 3: Writing a Blog Entry
Now that we have the website tuned up, let's write a blog entry. You may have noticed that on the website home page there is a blogpost called Sample blog post... which you can click to fully read. This is a template blog post which you can use to learn the different syntaxes and styles you can use to write your own blog post. That file is located at _posts/2020-02-26-example-post.md. You can always refer to that file to see how to write a blog post. In case you don't want it to show on your website, just delete it and refer to the one in the repository you forked.
To write a new blogpost, just create a new file inside the _posts directory with the following name format: YYYY-MM-DD-title.md. If you don't follow this format, the blog post won't show up on your website. You can create a new file by navigating to the _posts directory and clicking the "Add file -> Create a new file" button. Now that we know how to create a new blog post, let's write one!
- I want you to explore a cloud application in the field of biomedicine that you are interested in. Use Google Scholar, PubMed, or any other scientific database to find an interesting article.
- Write a blog about the cloud application you explored on your personal website.
Note: Citations and references should be included in the blog entry for the article selected.
Task 4: Sharing your personal website
This website you are using right now is also hosted on Github Pages, you may have noticed alrady noticed given the URL is https://hdbc-17705110-mdbs.github.io/HandsOnLabs/. If you take a look at the about page of the website (which is also the home page), you'll see that there is a list of all websites the students have created, I want you to share your own website there by following the steps below:
- Click here to edit the about page of this website.
- You'll be asked to create a fork of the repository, do so by clicking on the "Fork this repository" button.
- A file will be opened, add a line at the end to include your name and a link to your personal website by following the format
[Your Name](https://your-username.github.io). - Commit the changes by clicking on the "Commit changes.." button and then "Propose changes".
- Click on the "Create pull request" button to submit your changes and finally click once again on the "Create pull request" button.
If you are interested in understanding more about git and GitHub, I recommend you check GitHub Guides.
HOL 02 - Deploying a hybrid infrastructure for researchers in AWS
This activity was presented during Session 8, more information on the session can be found here.
Introduction
Jupyter Notebooks have become an essential tool for analyzing data and disseminating findings in data science. This hands-on lab guides you through setting up a public Jupyter Notebook server on AWS for your research team which is going to save images to an S3 bucket monitored by a Lambda that processes them and saves the final result on another bucket. Furthermore, we will deploy a private FileGator file server using Docker to share sensitive data between your team which will be accessible only through a VPN connection.
Prerequisites
- AWS Academy account. (Check out this guide for help).
- Access to the AWS Management Console.
- Knowing how to setup the AWS CLI Credentials. (Check out this guide for help).
- Basic knowledge of AWS services, including EC2, S3, Lambda, and VPC. (Check out the different sessions in the course for help, a summary of each session can be found on its page on this website, check the index on the home page).
Architecture Diagram
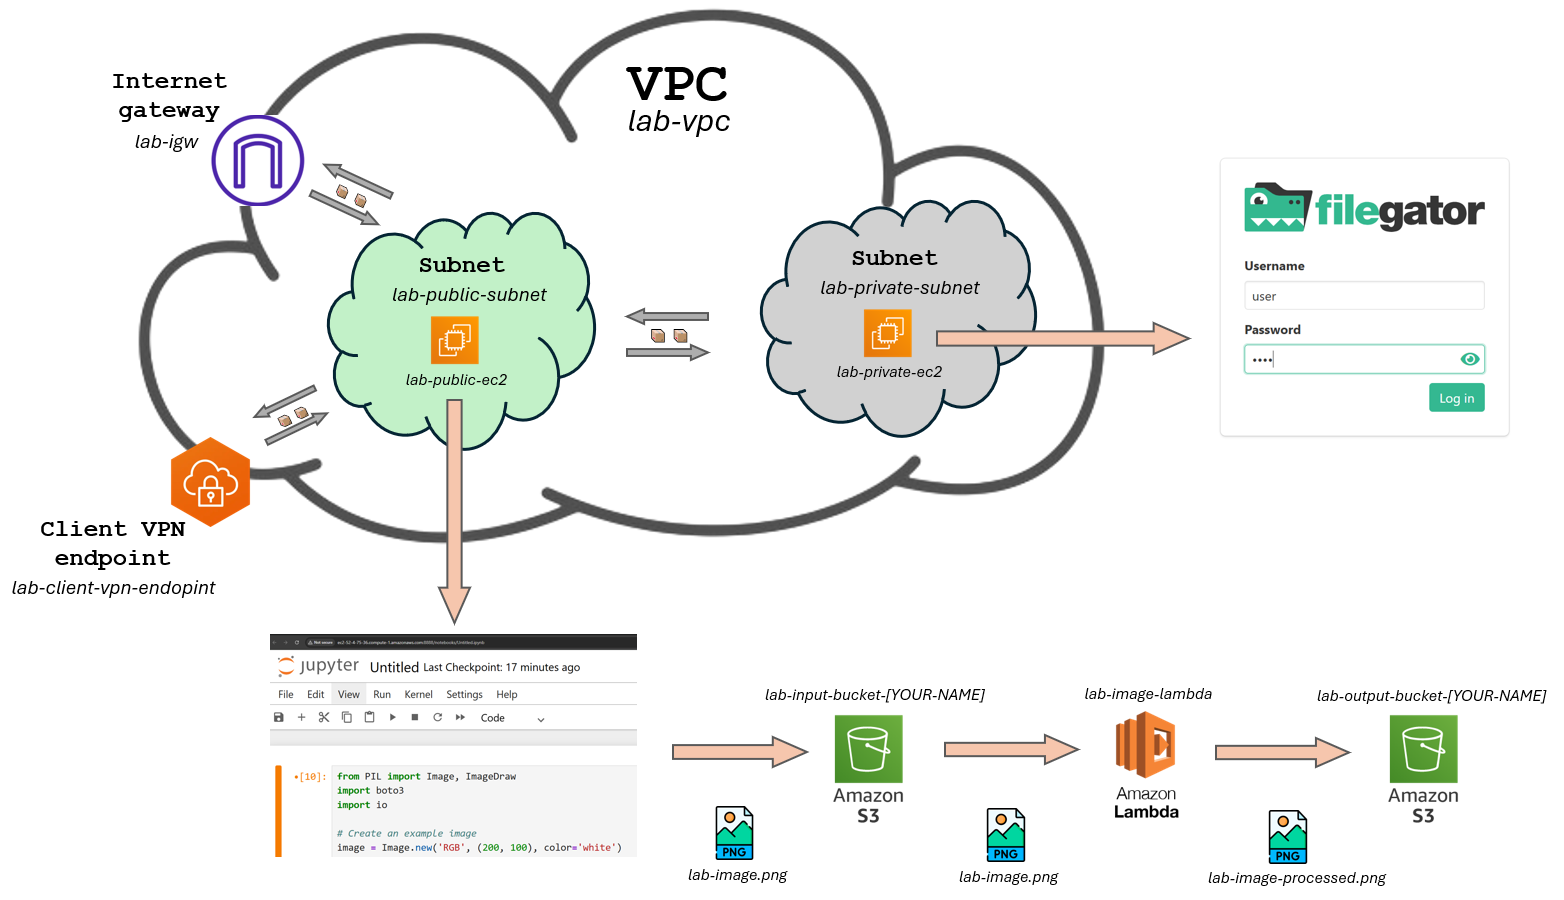
The figure below provides a visual representation of the proposed infrastructure. It depicts a Virtual Private Cloud (VPC) on AWS, segmented into two subnets: Public and Private. The Public Subnet hosts an EC2 instance named lab-public-ec2, which is Internet-accessible. The Private Subnet accommodates an EC2 instance named lab-private-ec2, accessible via VPN. The VPC also contains a Client VPN endpoint, which allows us to simulate we are on the public subnet and makes it possible to access resources on the private subnet.
The public EC2 instance will be interacting with an S3 bucket using boto3 library for python which is going to trigger a Lambda. The idea is to run a piece of Python code on a Jupyter Notebook that generates an example image and uploads it to the input S3 bucket, then a lambda is triggered and saves that image to the output bucket with a different name.
The private EC2 instance will just be serving the file server and will need to temporarily have internet access to install the required software by using a NAT Gateway. The VPN endpoint will be used both to connect to the private EC2 instance by SSH and configure the file server, and once the file server is up and running, to access it through the browser on our local machine.
This lab is going to be divided into two tasks that should be implemented in order. Everything related to the Client VPN endpoint is going to be on the second task, I suggest you only go for Task 2 once Task 1 is complete since the Client VPN endpoint is a substantially expensive service. By leaving Task 2 for the end we can make it easier for your budget to not run out before you have completed the lab.
Moreover, Task 1 is going to be 80% of this assignment grade while Task 2 will be the remaining 20%. I prefer you to fully complete Task 1 before attempting Task 2. Once Task 1 is done, keep an eye on you budget (an email is going to automatically be sent to you once 50%, 90% and 95% of your budget is exceeded). If you see you are soon going to run out of budget just stop the lab and email me at ferran.aran@udl.cat, I'll set up a fresh account for you. Running out of budget means losing everything on your account!!
Task 1
This task's goal is to set up the infrastructure for the public Jupyter Notebook server, the S3 buckets and the Lambda function. Below is the order in which I would recommend to proceed:
- Create the VPC and the public subnet.
- Add the Internet Gateway to the VPC and attach it to the public subnet.
- Create a Route Table for the public subnet and associate it with the Internet Gateway.
- Create an EC2 instance in the public subnet and configure the security group to allow SSH (port 22) and HTTP access on port 8888.
- Connect to the EC2 instance through SSH, setup python (whichever version you want) and install the required libraries (
boto3,jupyter,pillow). - Create the S3 buckets and the Lambda function. Configure the Lambda function to trigger when a new image is uploaded to the input bucket and the code (which I will provide below) to make it process the image and upload it to the output bucket.
- Configure AWS CLI Credentials on the EC2 instance, launch the Jupyter Notebook server and run the code (which I will provide below) to upload the image to the input bucket.
- Check if the Lambda function is triggered and the image is processed and uploaded to the output bucket.
Services
Here are the services you will need to create in the AWS Management Console:
The list below does not contain all the parameters you need to fill in, just the ones that could vary from what we saw in class. You'll need to find out the rest of the parameters by yourself (just look at the slides, everything is there 😉)
For this task I would recommend to visit Session 3, Session 4 and Session 5 of the course.
-
VPC:
- Name: lab-vpc
- CIDR: 10.0.0.0/16
-
Subnets:
- Name: lab-public-subnet
- CIDR: 10.0.1.0/24
- Name: lab-public-subnet
-
Internet Gateway:
- Name: lab-igw
-
Route Table:
- Name: lab-public-to-internet
- Association: lab-public-subnet
- Routes: 0.0.0.0/0 -> lab-igw
-
EC2 Instances:
- Name: lab-public-ec2
- Subnet: lab-public-subnet
- AMI: Amazon Linux 1 # TODO Check if it is 2 or 1 by default
- Name: lab-public-ec2
-
S3 Buckets:
- Name: lab-input-bucket-[YOUR-NAME]
- Name: lab-output-bucket-[YOUR-NAME]
-
Lambda Function:
- Name: lab-lambda-function
- Runtime: Python 3.13
Additional resources
Below are the code snippets you will need for the first task, remember to replace the bucket names with your own.
Here is the python code to use for the Lambda function:
import boto3
import json
import os
import urllib.parse

s3 = boto3.client('s3')

def lambda_handler(event, context):
    # Extract bucket and image info from the S3 event
    bucket = event['Records'][0]['s3']['bucket']['name']
    key = urllib.parse.unquote_plus(event['Records'][0]['s3']['object']['key'])
    original_name = os.path.splitext(os.path.basename(key))[0]
    download_path = f'/tmp/{os.path.basename(key)}'
    s3.download_file(bucket, key, download_path)

    # Upload it to the "output" bucket with a different name
    result_image_name = f"{original_name}-processed.png"
    result_bucket = 'lab-output-bucket-[YOUR-NAME]' # Replace with your bucket name
    s3.upload_file(download_path, result_bucket, result_image_name)

    return {
        'statusCode': 200,
        'body': json.dumps(f"Processed {key}")
    }
And here is the python code to use for the Jupyter Notebook:
from PIL import Image, ImageDraw
import boto3
import io

# Create an example image
image = Image.new('RGB', (200, 100), color='white')
draw = ImageDraw.Draw(image)
draw.text((50, 40), "Hello!", fill='black')
buffer = io.BytesIO()
image.save(buffer, format='PNG')
buffer.seek(0)

# Upload to S3
bucket_name = 'lab-input-bucket-[YOUR-NAME]'   # <-- Replace with your bucket name

s3 = boto3.client('s3')
object_key = 'lab-image.png'
s3.upload_fileobj(buffer, bucket_name, object_key)

print(f"Image uploaded to s3://{bucket_name}/{object_key}")
Task 2
This task's goal is to set up the infrastructure for the private FileGator server. Below is the order in which I would recommend to proceed:
- Create the private subnet.
- Create an EC2 instance on the private subnet and configure the security group to allow SSH (port 22) and HTTP access on port 8080.
- Temporarily give internet access to the private EC2 instance by adding a NAT Gateway and modifying the route table of the private subnet.
- Generate server and client certificates and import them to AWS.
- Add the Client VPN endpoint to the VPC and associate it with the public subnet.
- Configure the Route Table and the Authorization Rules for the Client VPN endpoint.
- Download the VPN configuration file ending with
.ovpnand edit it to include the client certificate and key. - Download and install the AWS Client VPN software on your local machine and import the configuration file.
- Connect to the VPN and SSH into the private EC2 instance.
- Install Docker and run the FileGator server on the private EC2 instance.
- Remove the NAT Gateway and modify the route table of the private subnet to remove the internet access.
- Make sure the FileGator server is accessible only when you are connected to the VPN.
Services
Here are the services you will need to create in the AWS Management Console:
Once again, the list below does not contain all the parameters you need to fill in, just the ones that could vary from what we saw in class.
For this task I would recommend to visit Sessions 6, 7 and 8 of the course.
-
Subnets:
- Name: lab-private-subnet
- CIDR: 10.0.2.0/24
- Name: lab-private-subnet
-
EC2 Instances:
- Name: lab-private-ec2
- Subnet: lab-private-subnet
- AMI: Ubuntu
-
NAT Gateway (will have to be deleted once the EC2 instance is configured):
- Name: lab-nat-gateway
-
Route Table (will have to be deleted once the EC2 instance is configured):
- Name: (no name) it is the default route table of the VPC
- Routes: 0.0.0.0/0 -> lab-nat-gateway
-
Client VPN Endpoint:
- Name: lab-client-vpn-endpoint
- Client CIDR: 10.83.0.0/16
Deliverables
- A PDF report to be submitted on the Moodle (here). The report should just contain screenshots that demonstrate each of the task steps defined above. Screenshots can be accompanied by a short description of what is being shown and any other relevant information.
Minimum requirements
The minimum requirements to pass (get 5/10 points) the assignment are:
-
The public EC2 instance is up and running, with the Jupyter Notebook server running.
-
The input S3 bucket is created and running the provided python code on the Jupyter Notebook server uploads an image to the input bucket.