Guide 2 - Setting up AWS for each subsequent session
Once you have followed the first guide to set up your AWS account, use this guide to set up your AWS environment for each session. That is for each time you want to work on your project and you start your AWS Learner Lab.
Table of contents
- Prerequisites
- Introduction
- Step 1: Log in to your AWS account
- Step 2: Accessing the AWS Dashboard
- Step 3: Connect to your EC2 instance
- Step 4: Configure AWS credentials on the EC2 machine
- Step 5: Configure AWS credentials on your local machine
- What's next?
Prerequisites
- AWS Academy account created
- An SSH key pair on your local machine
- An EC2 instance created with your key pair configured
Introduction
Use this guide each time you want to work on your project and you need to start your AWS Learner Lab. If you successfully follow this guide you will end up with:
- A remote terminal connected to the EC2 instance
- An EC2 instance running with AWS credentials configured and updated
- AWS credentials configured and updated on your local machine
Step 1: Log in to your AWS account
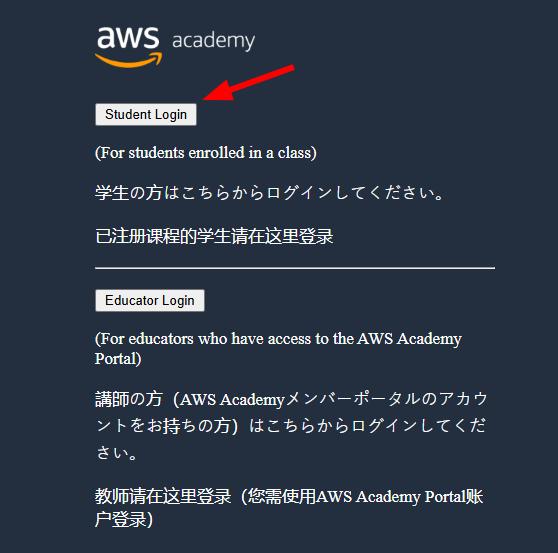
To log in to your AWS account, visit the AWS Academy website, click on Student Login and log in with your credentials.
Your browser may have kept your session open. If you end up in the AWS Academy dashboard you are good to go and can skip to Step 2.
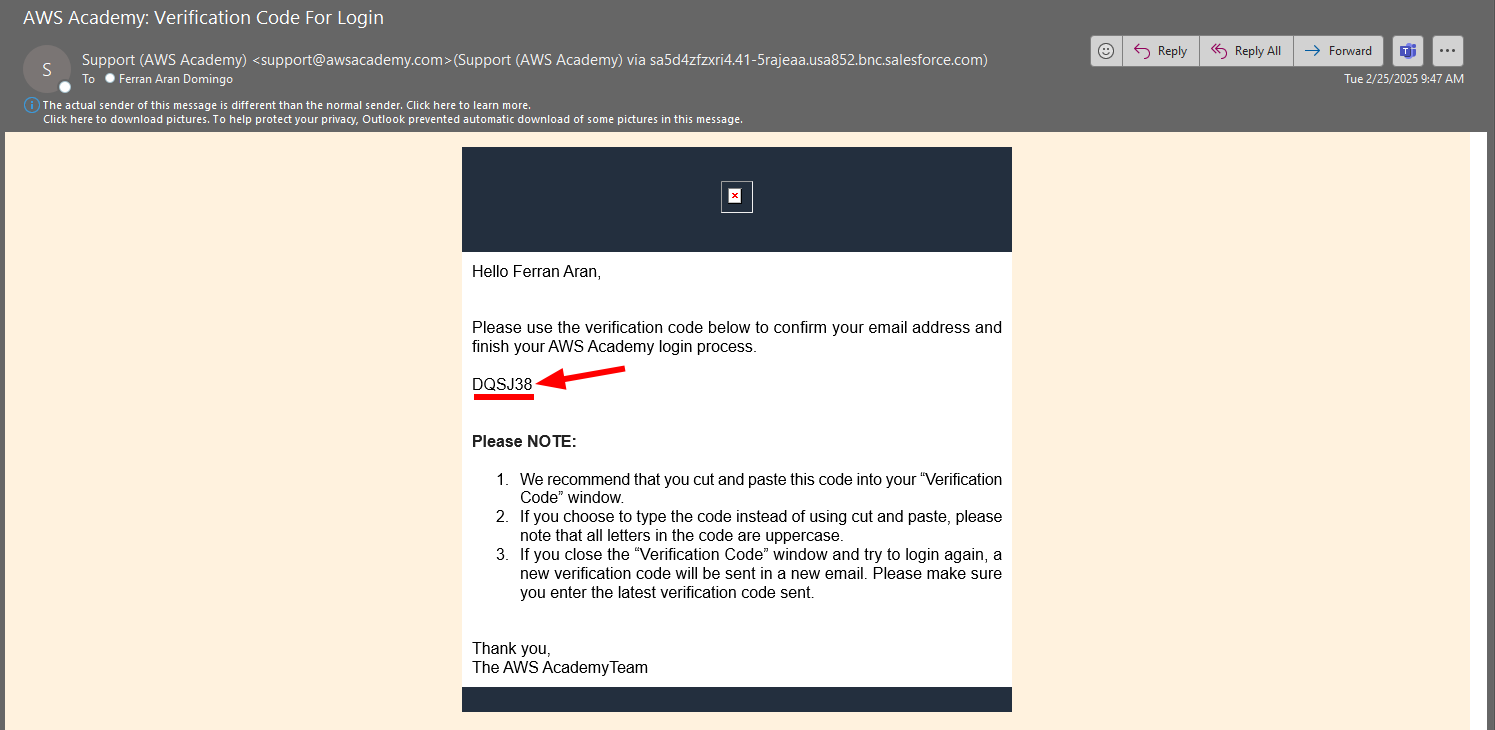
It may ask for a verification code sent to your email. If so, check your email and enter the code. The email will look like this:
You should now see the AWS Academy dashboard.
Step 2: Accessing the AWS Dashboard
Exactly as we did on Guide 1's Step 2, we now have to access the AWS Dashboard. Below are the steps to do so:
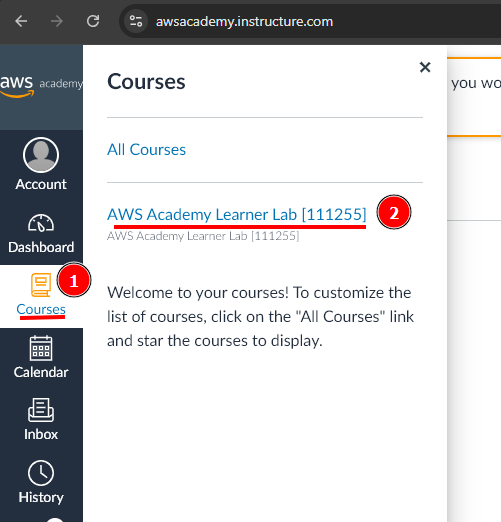
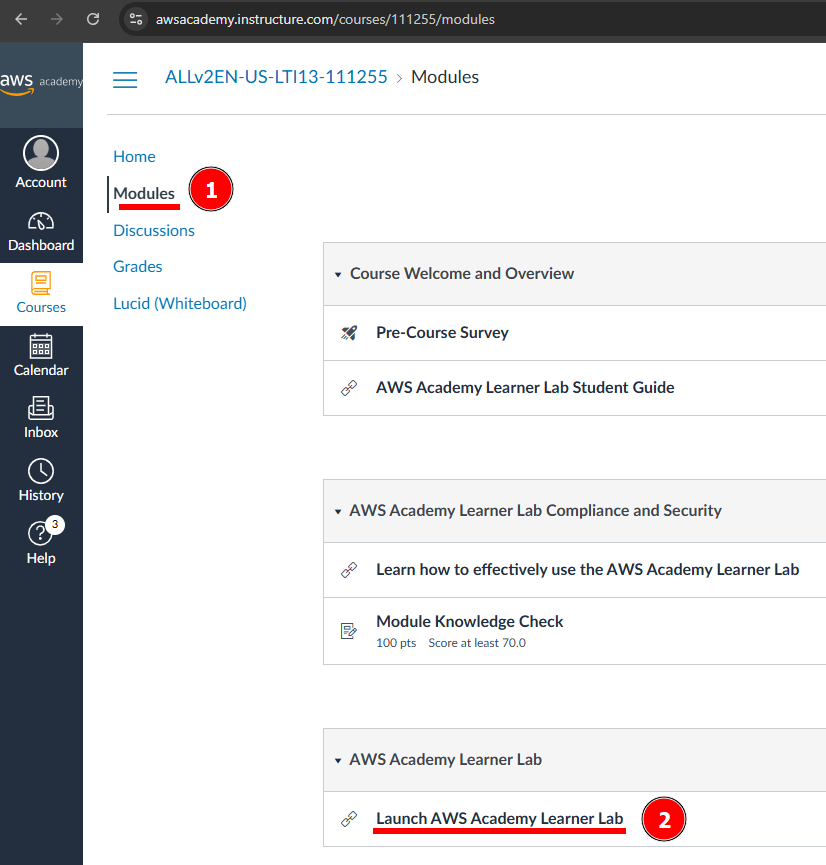
The first thing you have to do is to click on the Courses tab on the left side of the screen. You will see a list of courses available to you. Click on the course AWS Academy Learner Lab as shown in the screenshot below:
Now we have to look for the Modules tab on the left side of the screen. Click on it and you will see a list of modules available to you. Click on the module AWS Academy Learner Lab as shown below:

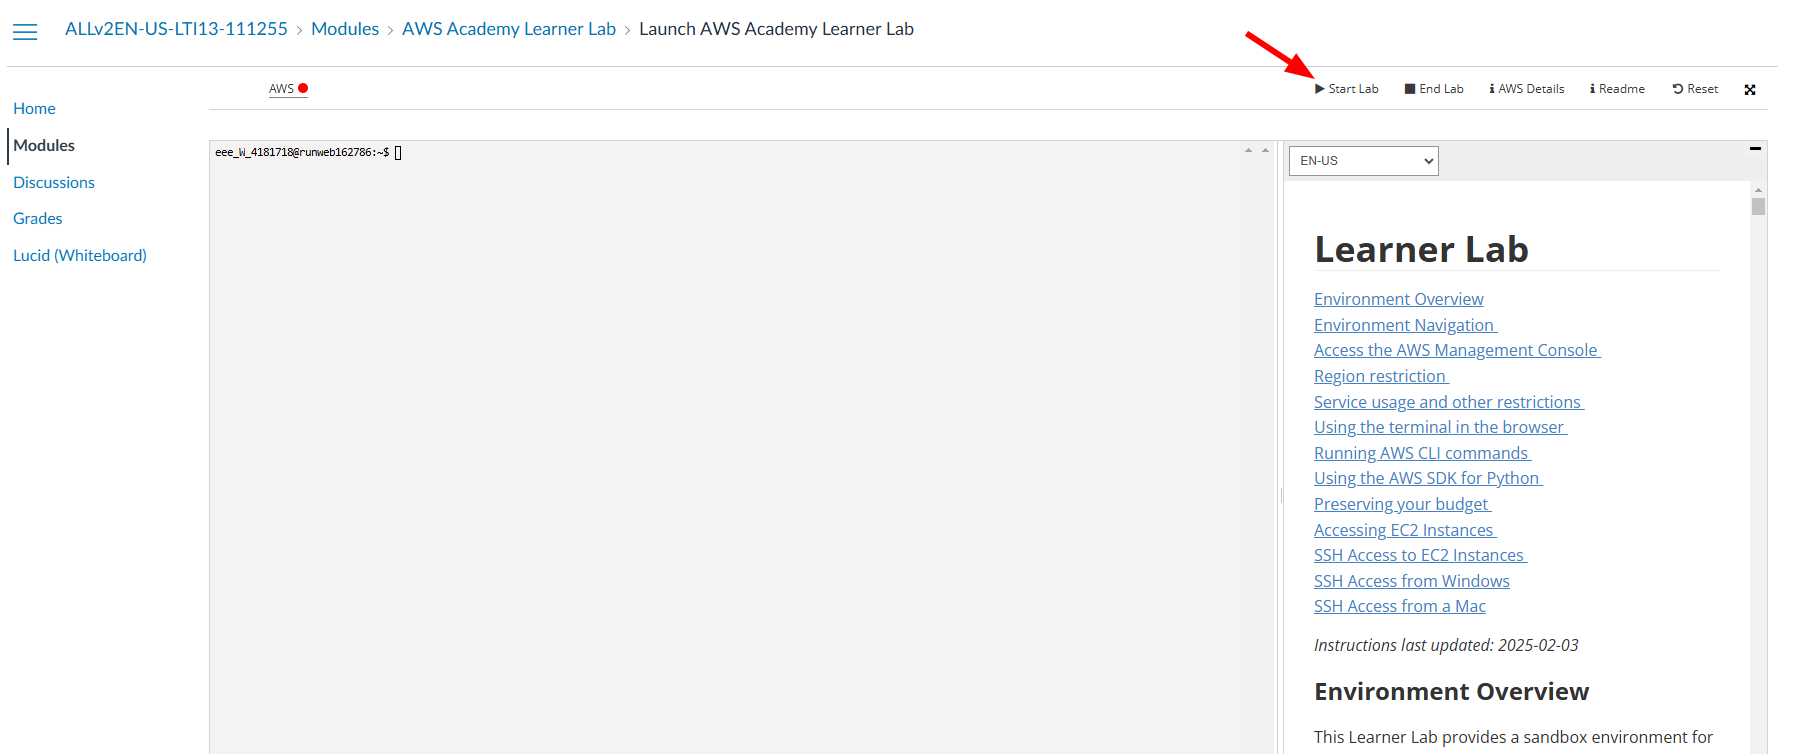
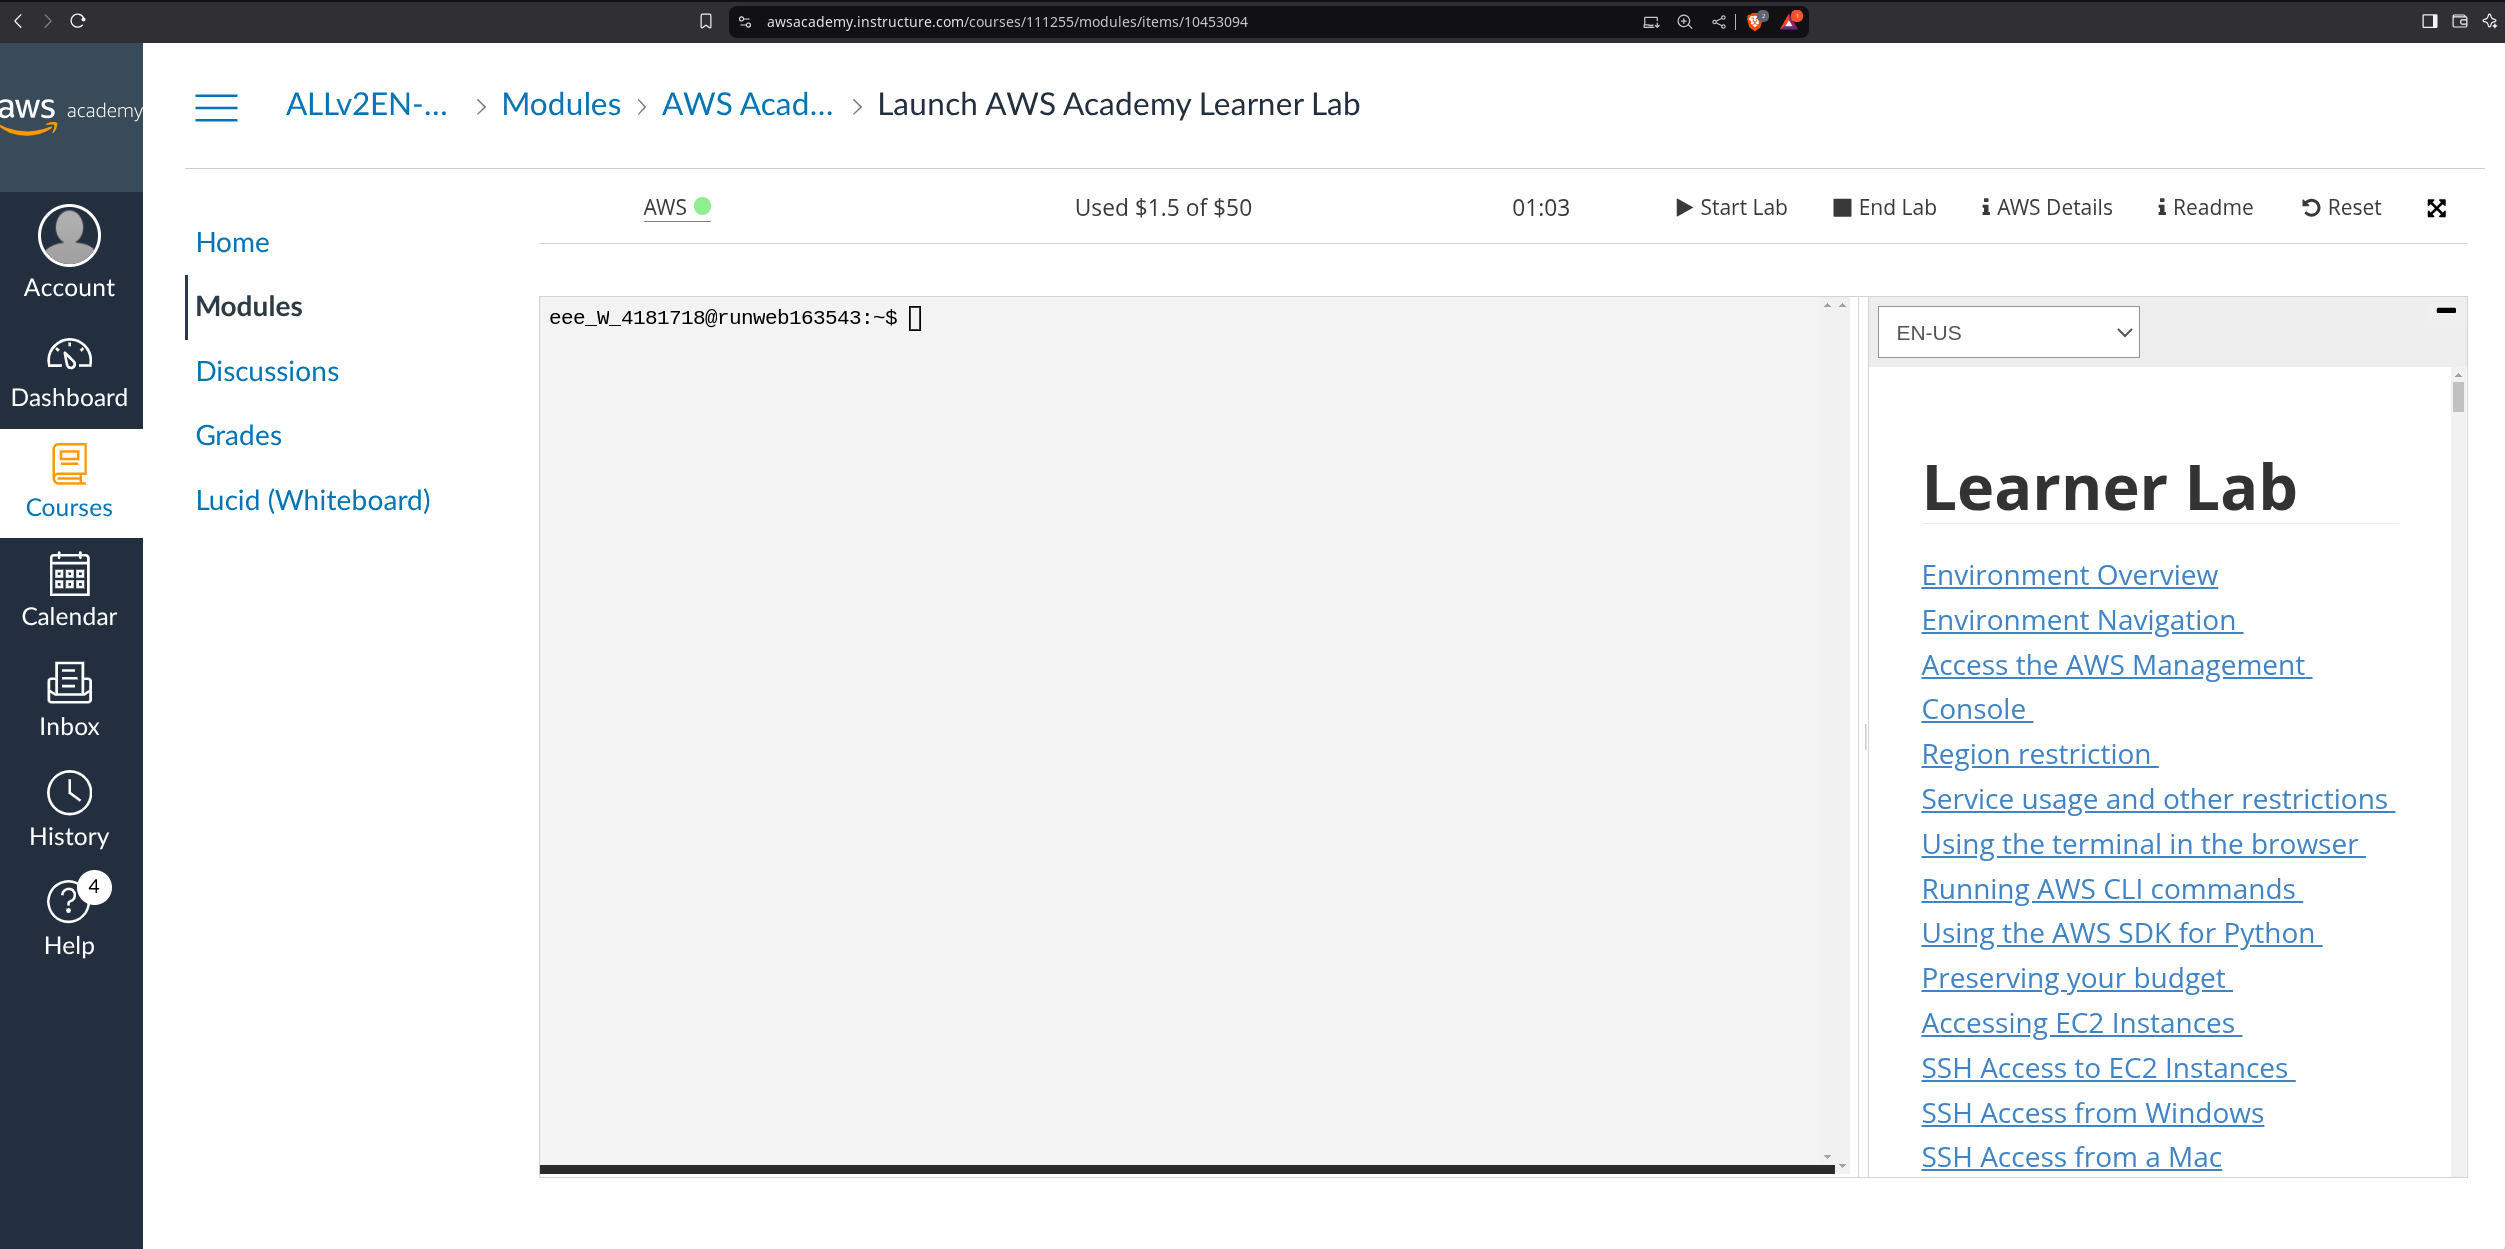
You need to now click on the Start Lab button.
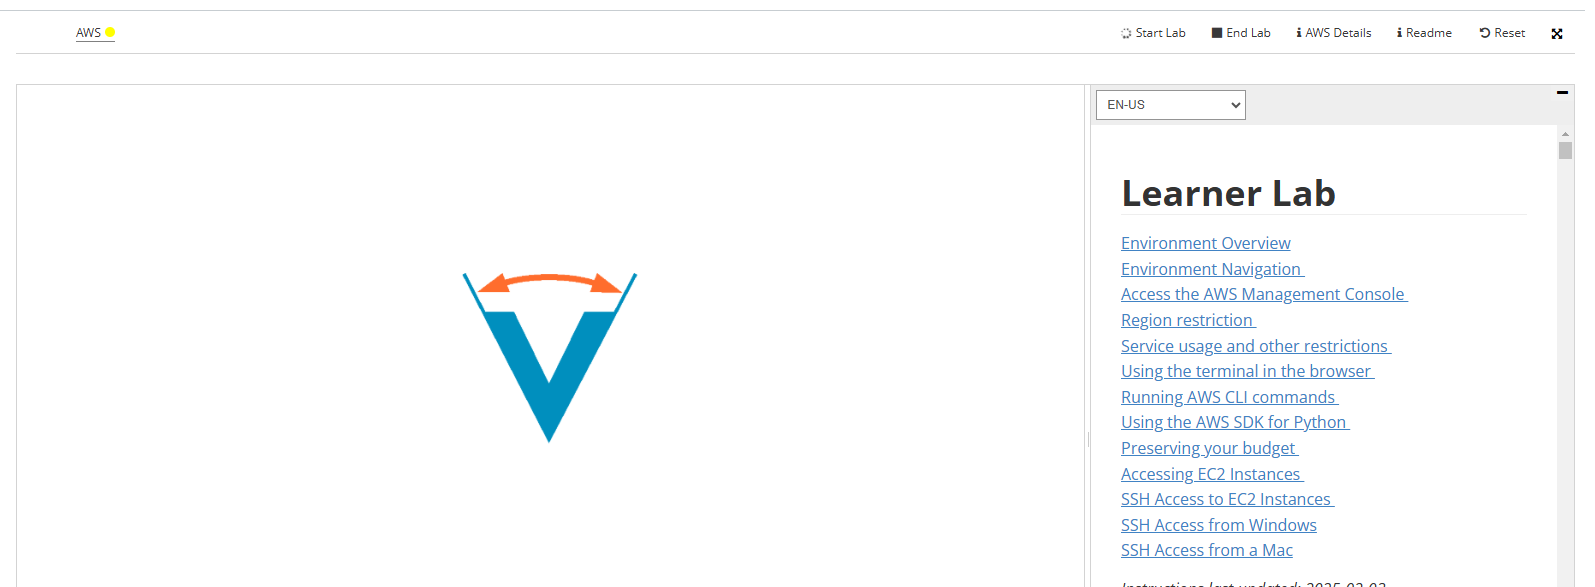
Now give it a couple minutes to load. You'll see this animation while the lab is being prepared for you:
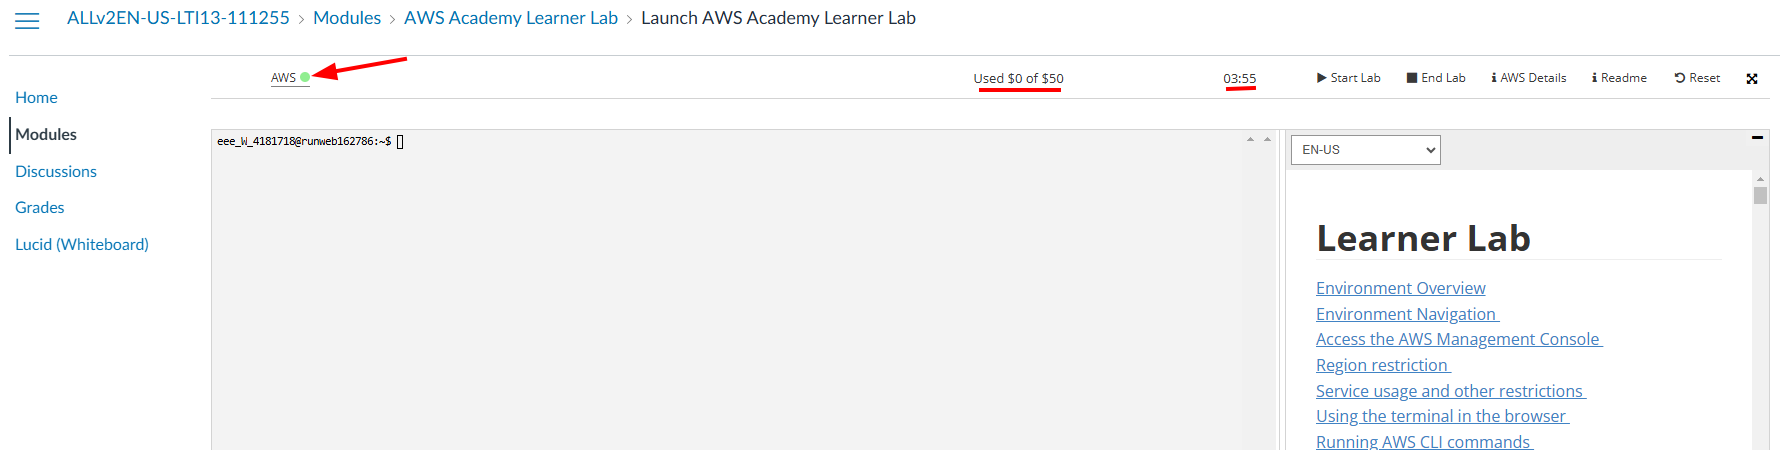
Finally, when the lab is ready, you'll see that the dot next to AWS is green. You'll also se a timer counting down from 4 hours. This is the time you have to work on the lab. To the left of the timer you'll see how's your budget going. You have a budget of $50 to spend on AWS services. Click on AWS to access the AWS Dashboard as shown below.
If you exceed the $50 budget, you will no longer have acces to the AWS Dashboard and will loose your work. Make sure to keep an eye on the budget and if you see that you're getting close to the limit, let me know so I can create a new lab for you.
Great! You have now accessed the AWS Dashboard. You will see a screen similar to the one below:

Step 3: Connect to your EC2 instance
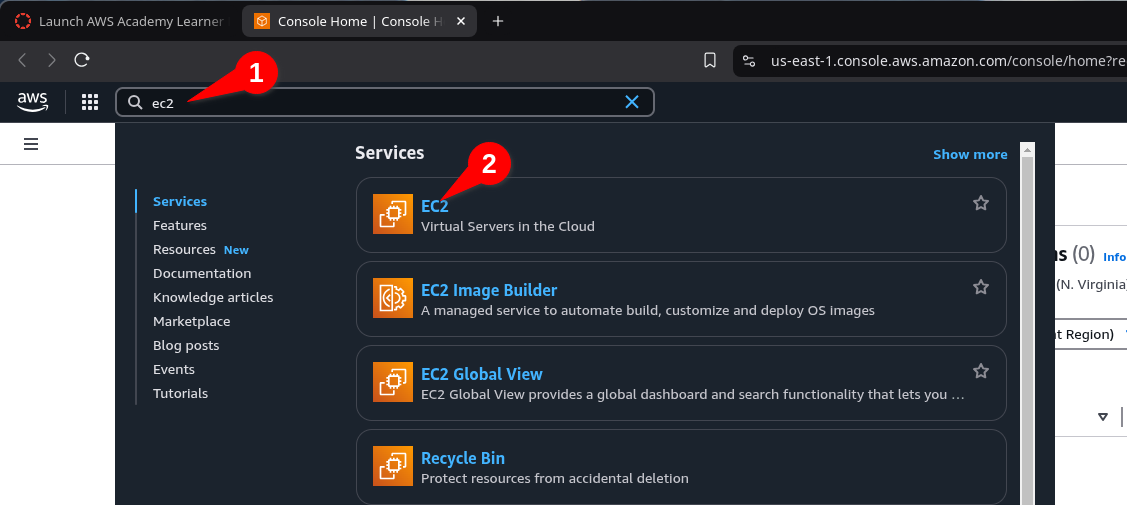
Exactly as we did on Guide 1's Step 5 we're now going to go to the EC2 service and look for the machine we want to connect to. As you may remember, we're going to use the search bar to look for the EC2 service. Click on the search bar and type EC2. Click on the first result that appears.
When the lab session ends bacause the 4 hours have passed, all your EC2 instances will be stopped (similarly to how one shuts down a computer). The next time you start a lab session, all your EC2 instances will automatically start again.
If you instead have stopped the lab by clicking on the Stop Lab button, you will have to manually start the EC2 instances you want to work with. To do so, you'll have to click on the instance you want to start and then on Instance State and finally on Start instance as shown below:
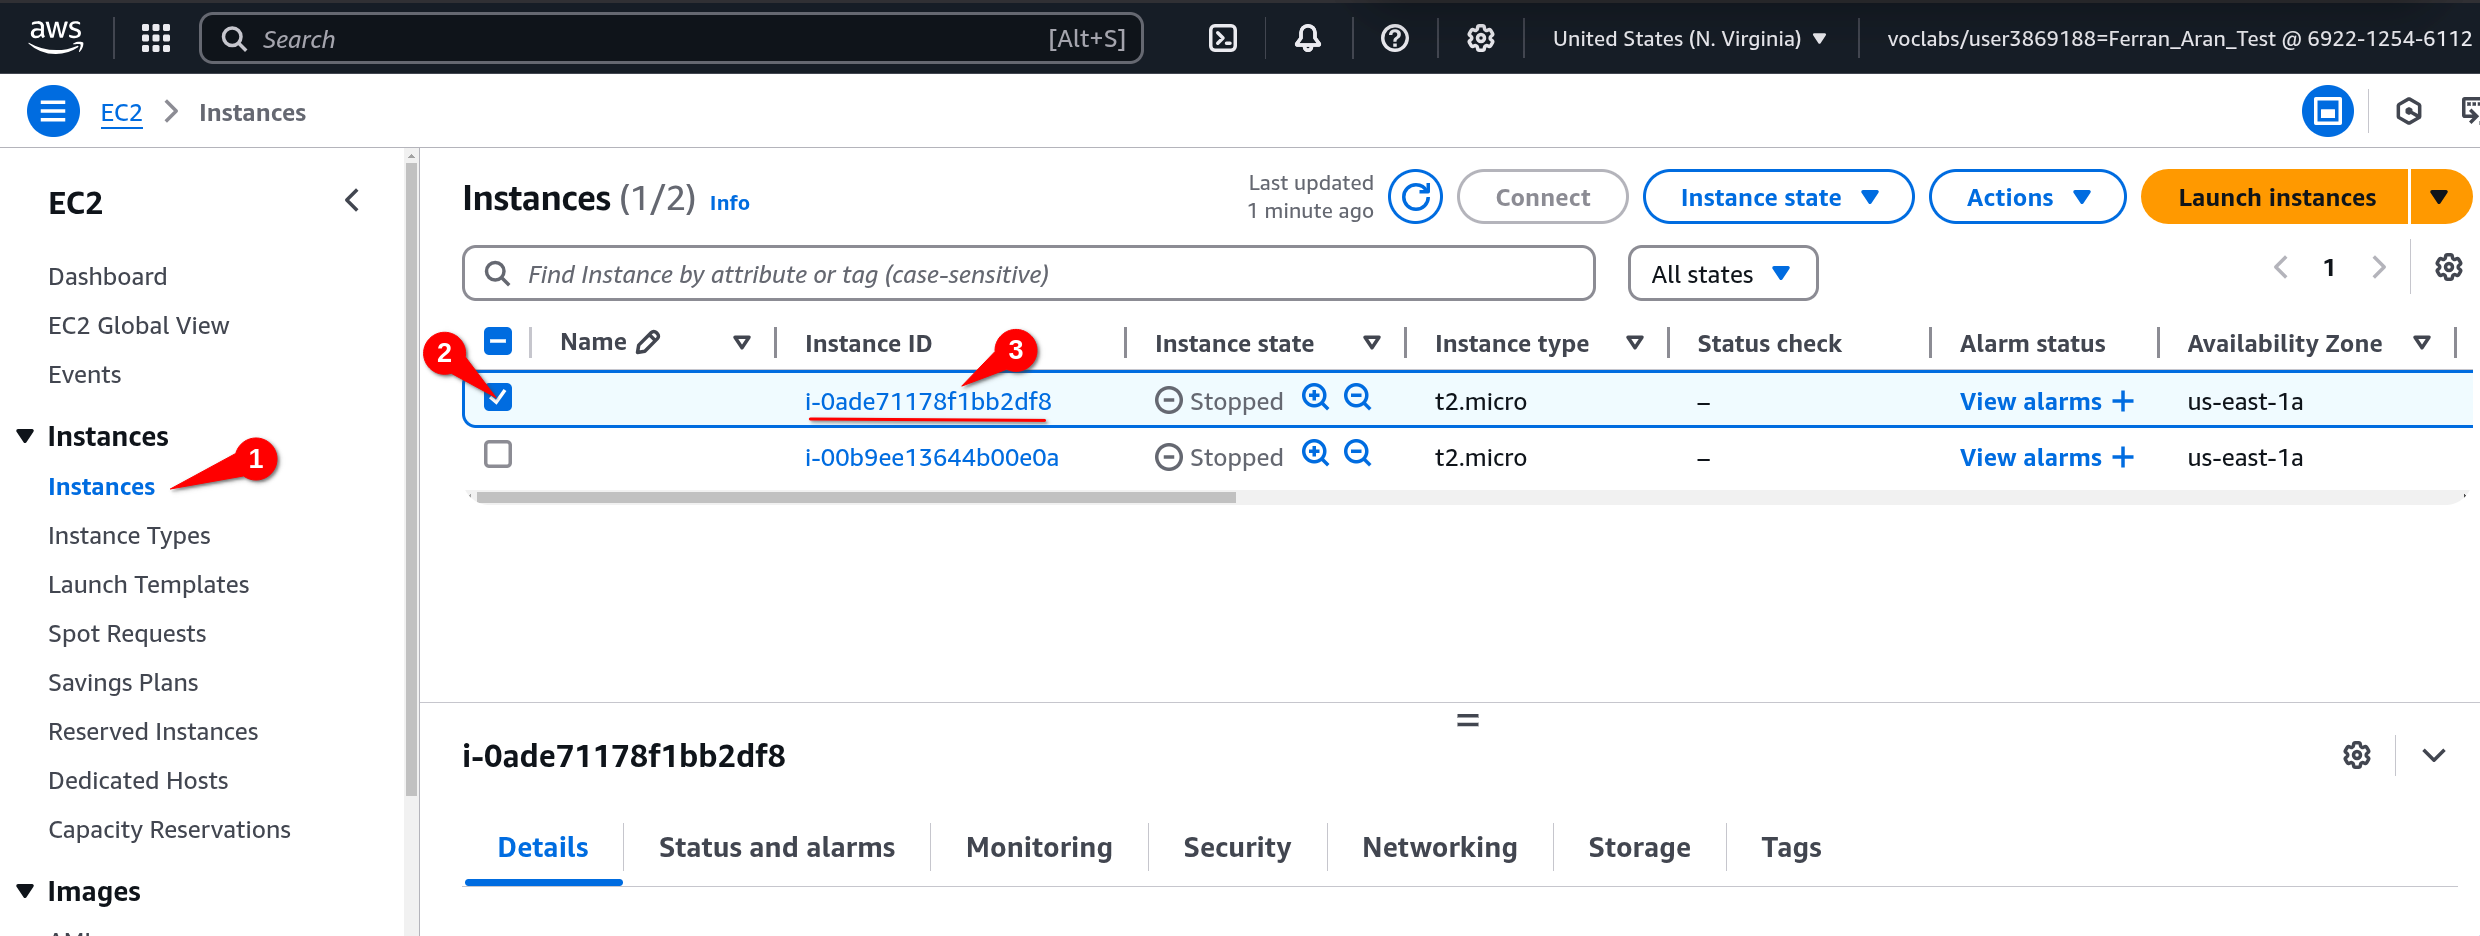
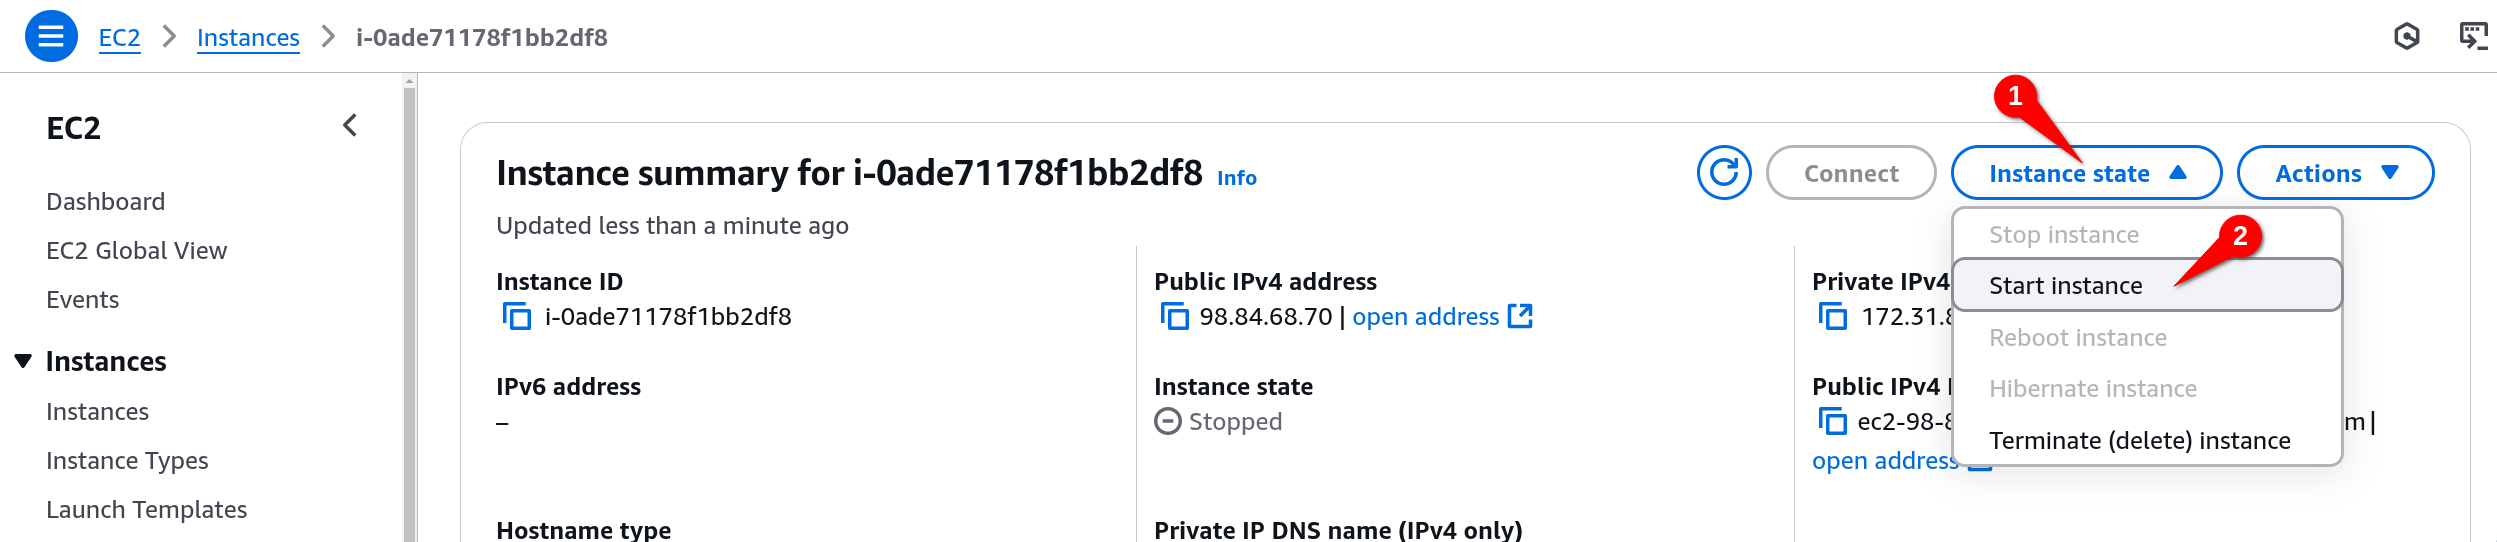
As said before, if the lab session ended naturally and not because you clicked on the Stop Lab button, the instances will have started automatically and this steps are not necessary.
Now go to the instances tab on the left, select the instance you want to connect to and copy the Public IPv4 address or Public IPv4 DNS (choose whichever you prefer as they both work).
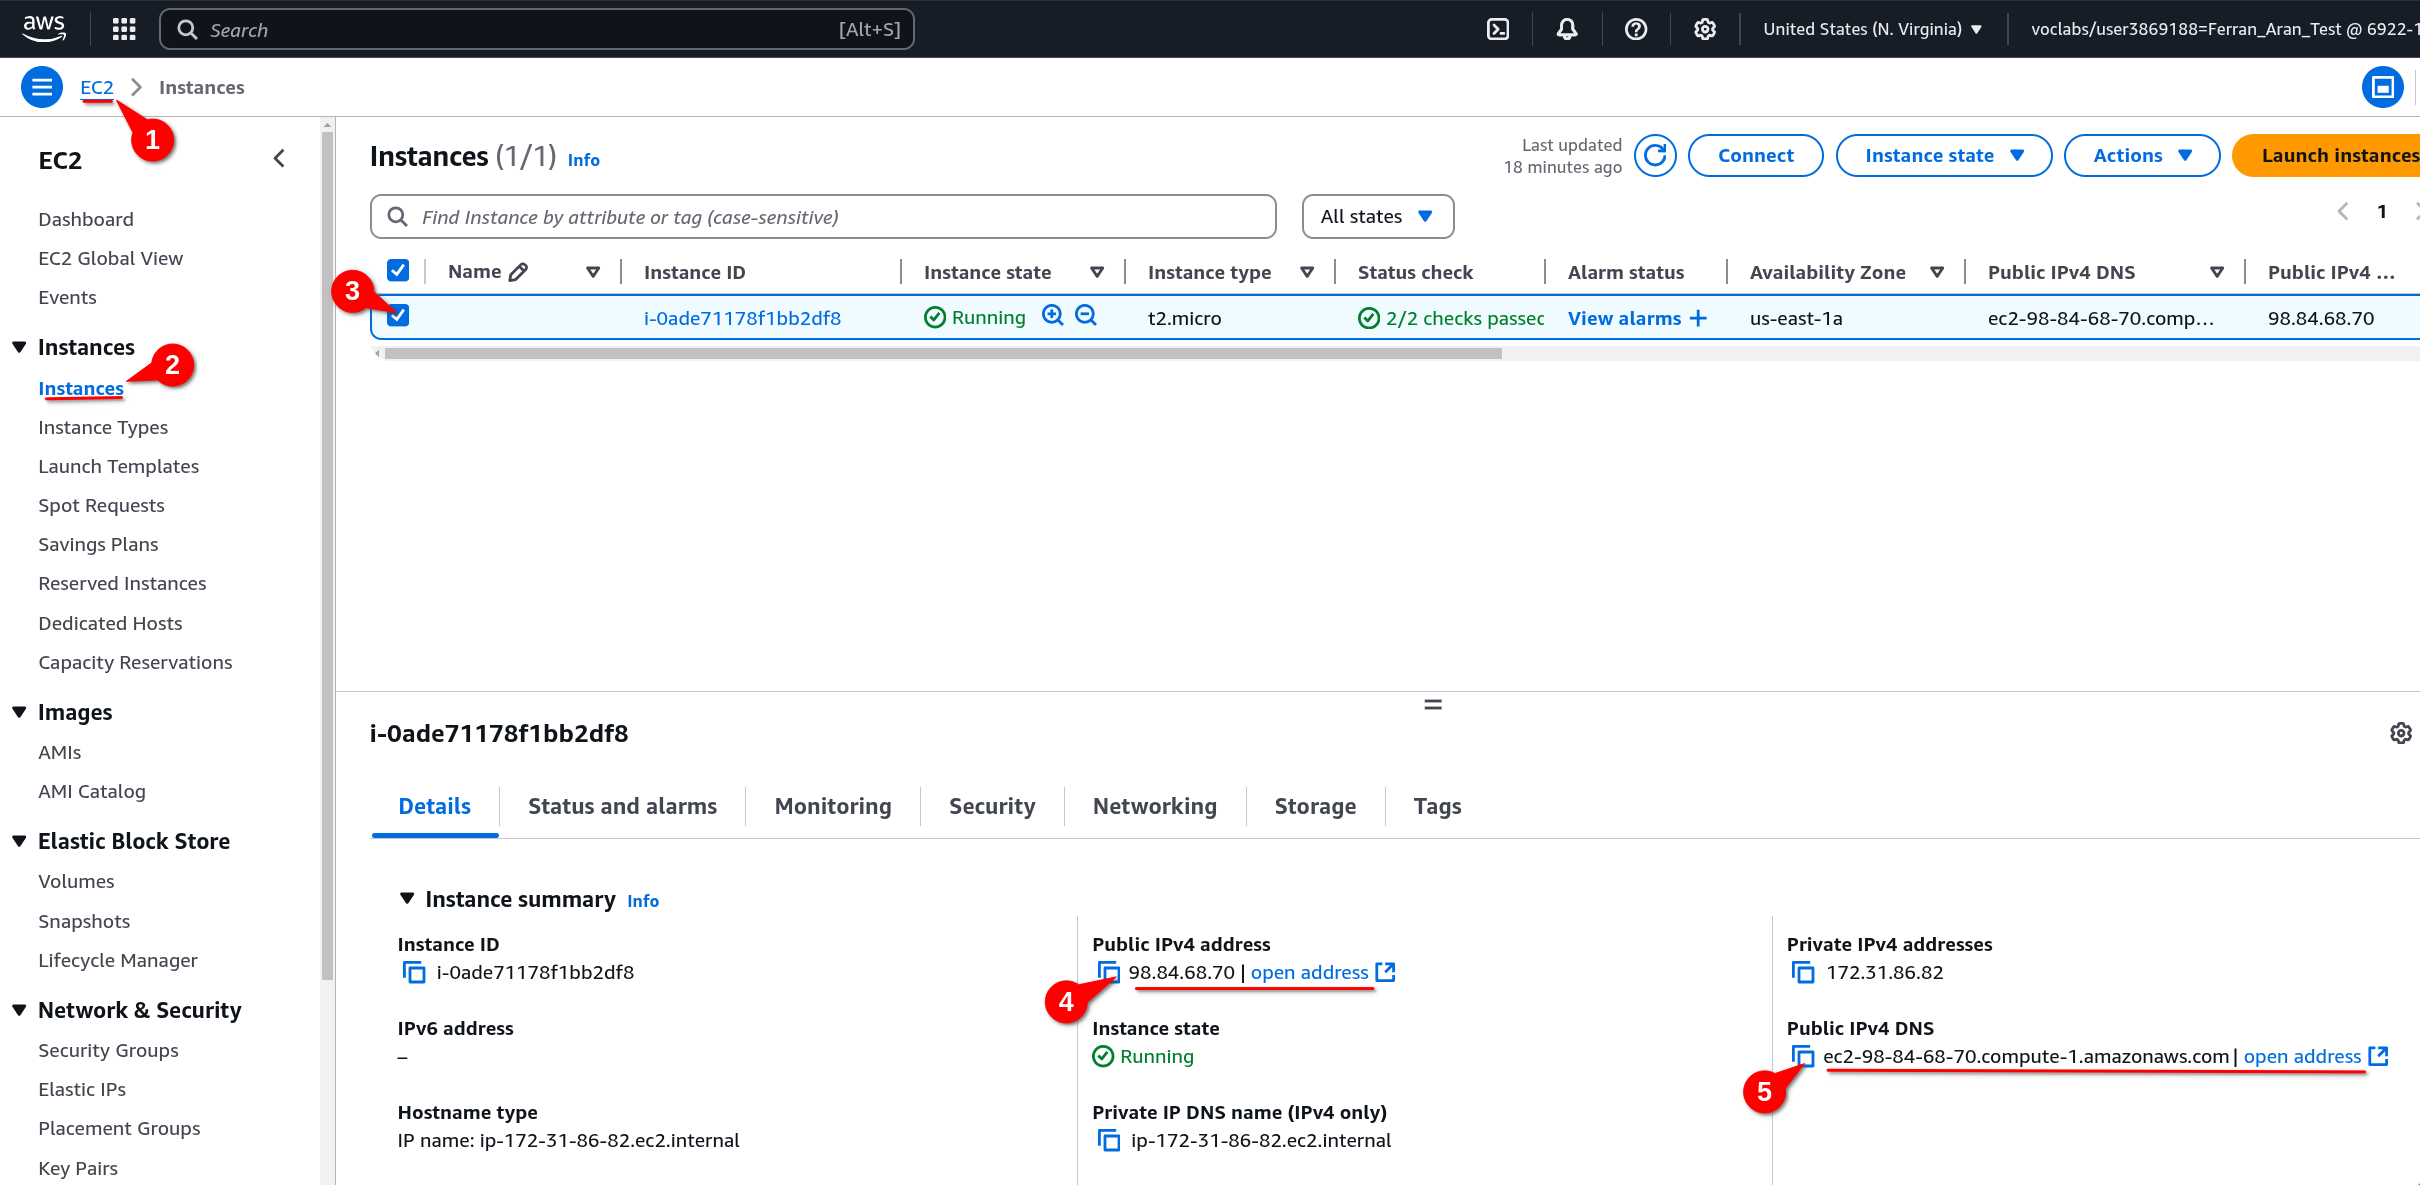
We have to repeat this step each time we start a new lab session because the IP address (and DNS) of EC2 instance changes each time they are restarted. And they are restarted each time we start a new lab session.
Once the IP address is copied, open a terminal on your local machine and connect to the EC2 instance using the following command:
ssh -i .ssh/aws-keypair ec2-user@<public-ip>
Both the Public IPv4 address and the Public IPv4 DNS can be used as the <public-ip> in the ssh command. Copy whichever you prefer and paste it in the ssh command.
The command should look something like this if using the IP address:
ssh -i .ssh/aws-keypair ec2-user@98.84.68.70
or like this if using the DNS:
ssh -i .ssh/aws-keypair ec2-user@ec2-98-84-68-70.compute-1.amazonaws.com
You should now be connected to the remote machine. You will see a prompt similar to the one below:
   ,     #_
   ~\_  ####_        Amazon Linux 2023
  ~~  \_#####\
  ~~     \###|
  ~~       \#/ ___   https://aws.amazon.com/linux/amazon-linux-2023
   ~~       V~' '->
    ~~~         /
      ~~._.   _/
         _/ _/
       _/m/'
Last login: Sun Mar  2 09:50:33 2025 from 79.156.58.43
[ec2-user@ip-172-31-86-82 ~]$
Fantastic! We are now connected to the remote machine. It is important to understand that from now on, the commands we type will be executed on the remote machine, not on our local machine.
Step 4: Configure AWS credentials on the EC2 machine
From now on we are going to work on steps that where not covered on Guide 1. We are going to configure AWS credentials on the remote machine. This is important because we are going to use the AWS CLI to interact with AWS services.
The AWS CLI is a tool that allows you to interact with AWS services from the command line. It is a powerful tool that can be used to automate tasks and manage your AWS resources. For example, on Session 4 we are going to use the AWS CLI to interact with the S3 service. You can find more information about the AWS CLI here.
When on an EC2 machine, AWS CLI comes already installed. You can check if it is installed by running the following command:
[ec2-user@ip-172-31-86-82 ~]$ aws

usage: aws [options] <command> <subcommand> [<subcommand> ...] [parameters]
To see help text, you can run:

  aws help
  aws <command> help
  aws <command> <subcommand> help

aws: error: the following arguments are required: command

[ec2-user@ip-172-31-86-82 ~]$
This is the base command which by itself doesn't do anything. What we are going to do now is to configure the AWS CLI with our credentials so we can later run commands that can access other AWS resources like S3.
To configure the AWS CLI, we'll need to copy some access keys to a file on the EC2 machine. We'll see now what this means but let's first locate the access keys. We'll have to visit the AWS Academy website (not to be confused with the AWS Dashboard). Specifically we'll visit the page where we started the lab, in case you have closed it, below are the steps to get there:

We should now see the page where we launched the lab as shown below:
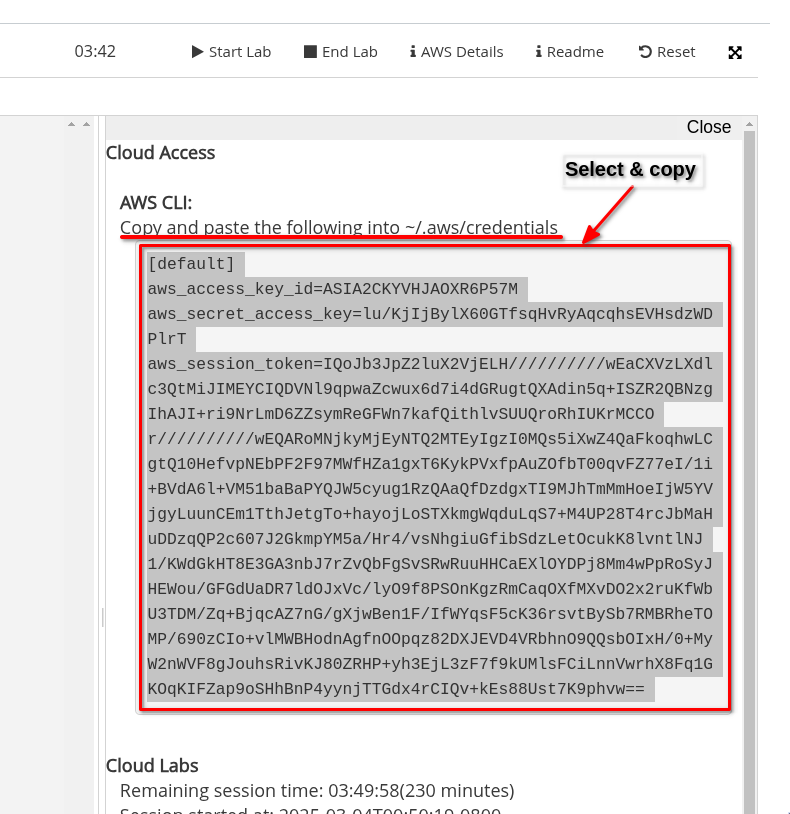
Now click on AWS Details and then on Show.
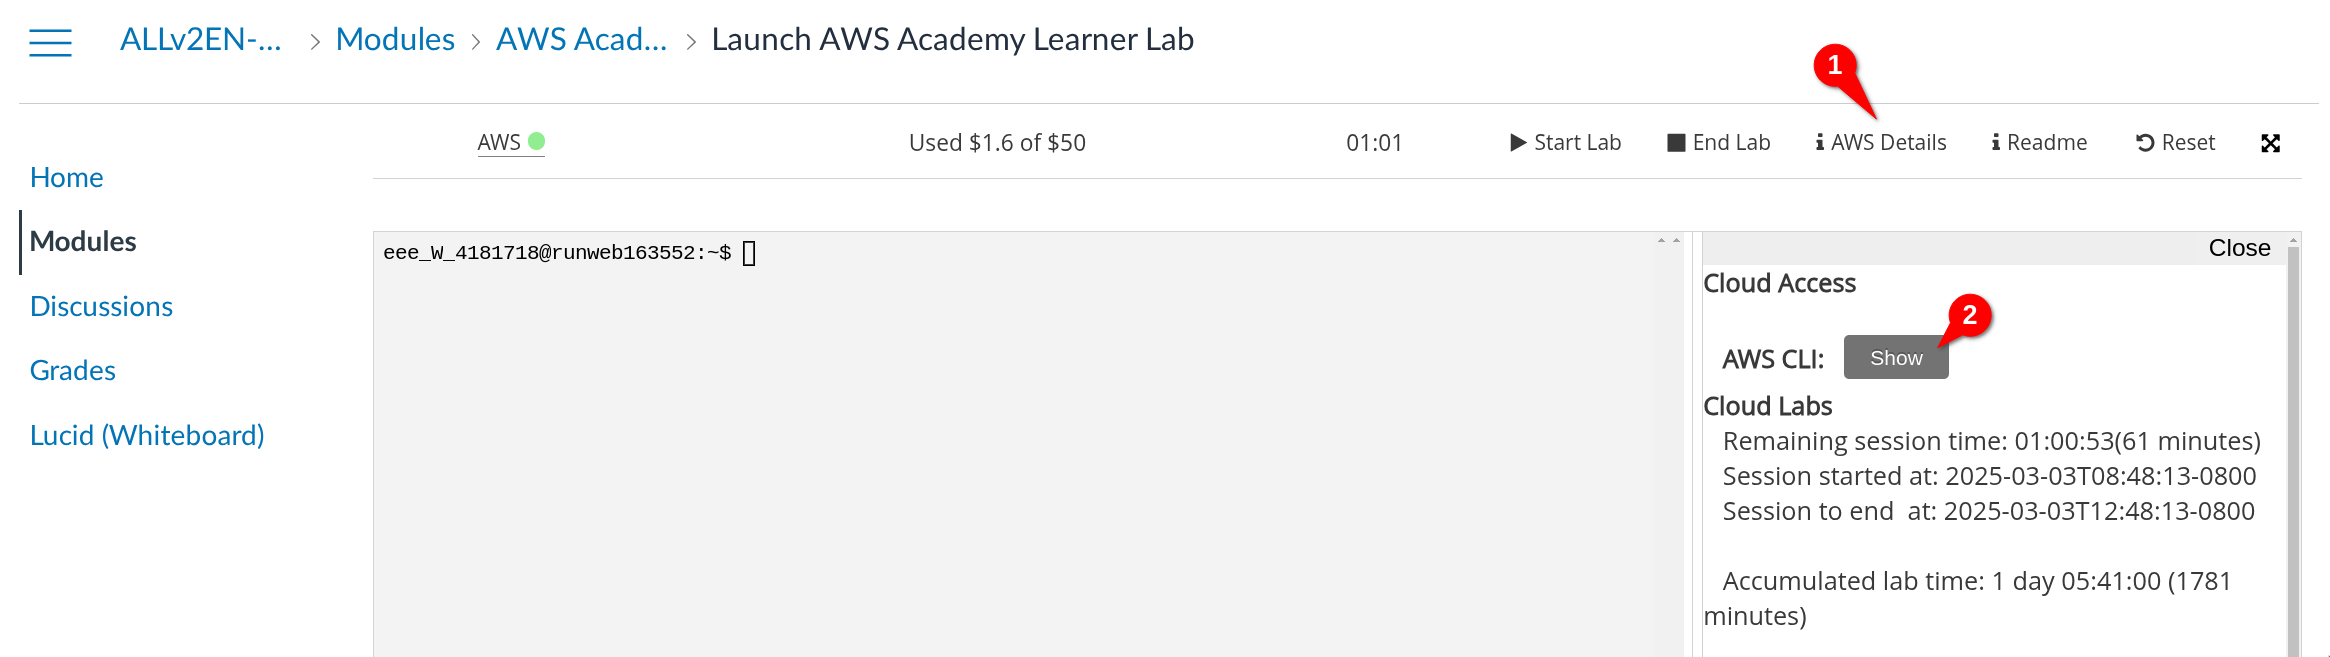
Some text will show up. Do you see it says we have to write that text on a file called credentials inside the .aws folder? We're going to do just that.
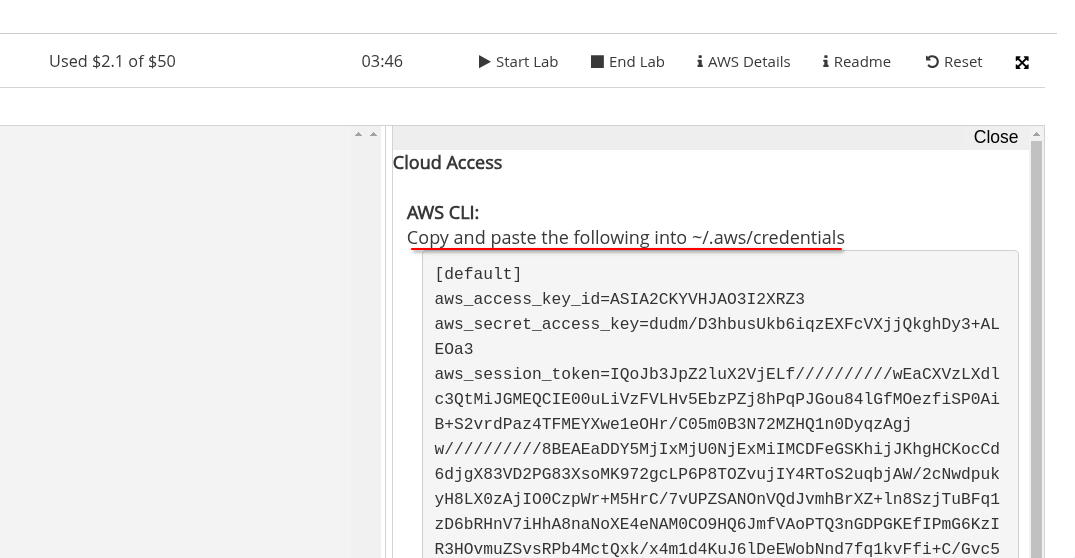
This text will change each time a new lab session is started, that is why we'll have to update the contents of the credentials file each time we start a new lab session.
First step will be to make sure the .aws folder exists. Run the following command:
mkdir .aws
As when we where creating the .ssh folder when generating a key pair, the command may fail due to the folder already existing. If that's the case, don't worry about it. Now we are going to create the credentials file inside the .aws folder. Run the following command:
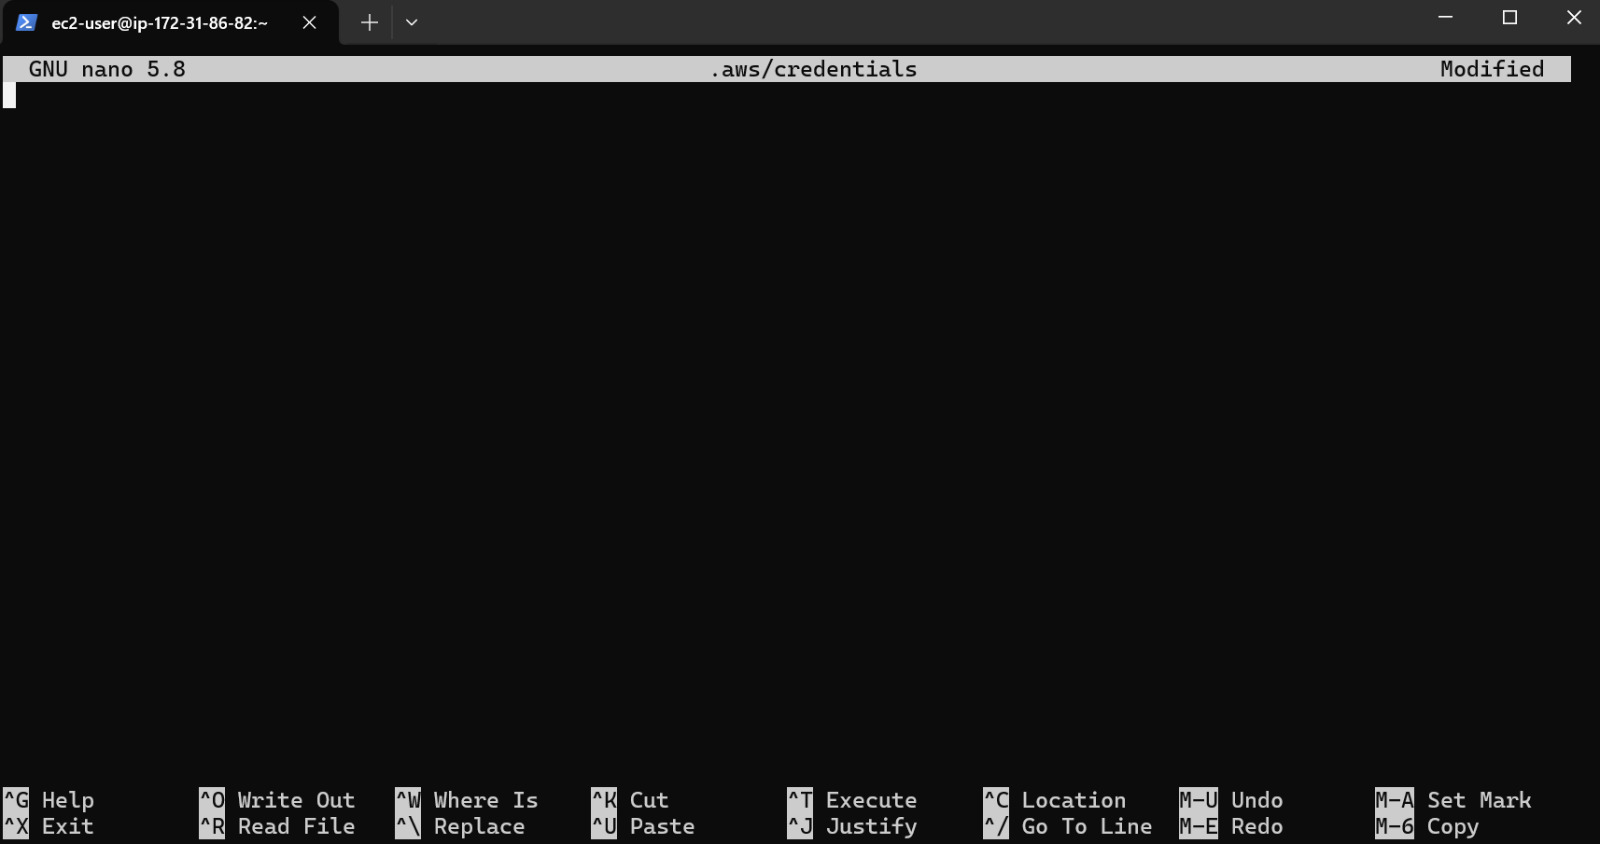
nano .aws/credentials
We are now getting into tricky terminal territory here. This is not something you need to fully understand, but I promise it will be helpful for you to know the basics and gain some experience with the terminal. Check out the video below if you're courious about editing files from the terminal.
The above command will open a text editor called nano. This means you are now editing the contents of the credentials file. I know this may be a bit confusing but try to imagine you are just editing a text file with Microsoft Word, the difference is we are going to do it only using the terminal, which means there isn't a graphical user interface and we can only use our keyobard. You should see something like this:
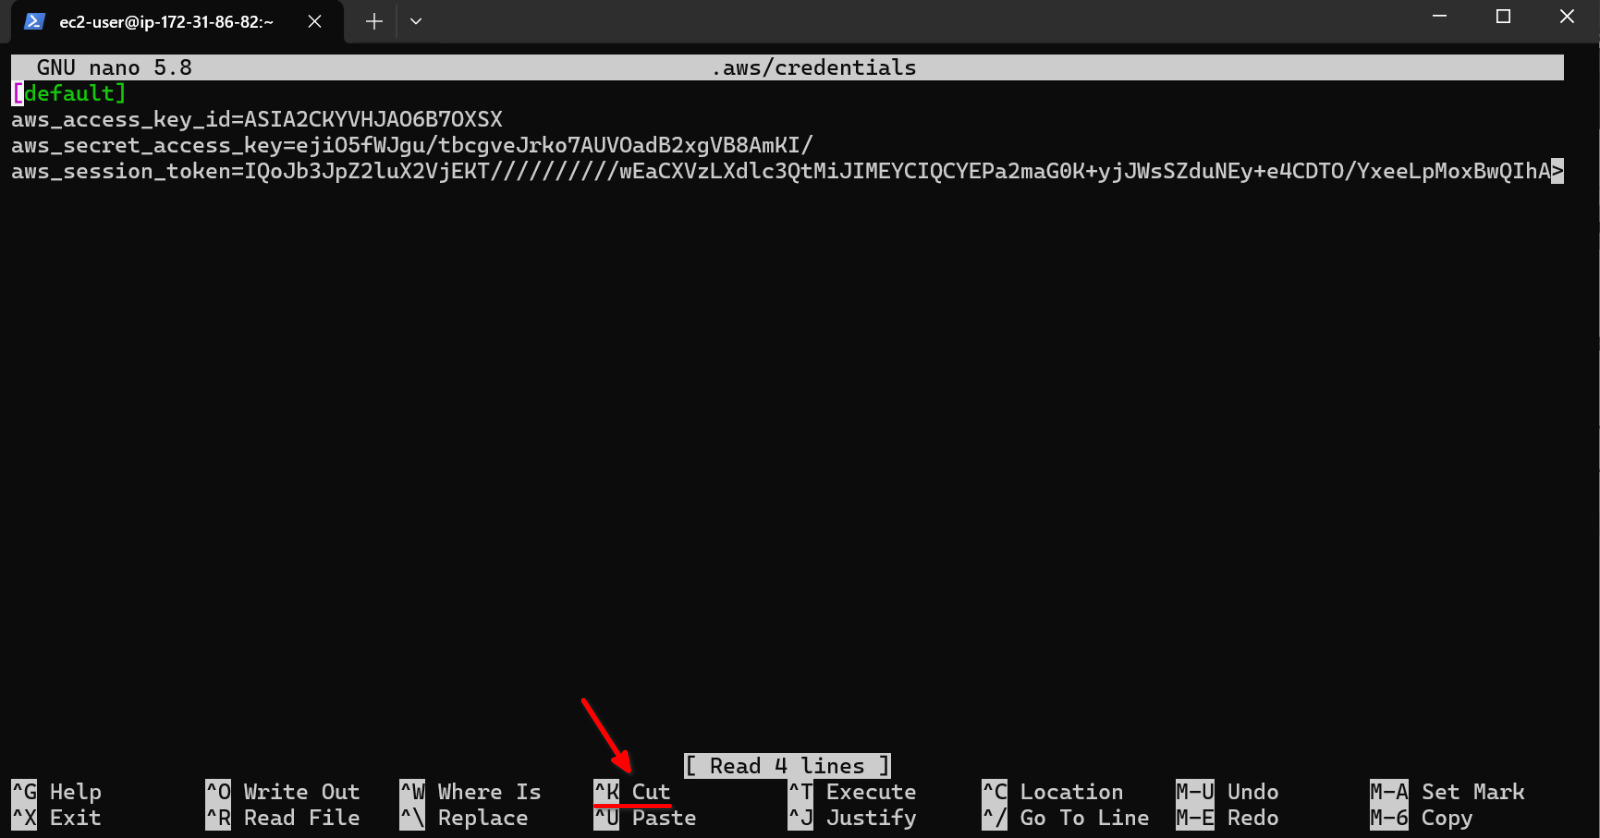
If it is not the first time you are editing this file, you will see some text already written as shown below. There are multiple ways to erase the contents of the file and write your new credentials, an easy one is to repeatedly press Ctrl + K until all the text is erased (each time you press it a line is deleted). Once the file is empty, you can start writing your new credentials.
Next we'll go back to ther terminal where we are editing the credentials file and paste the text with Ctrl + V (try Ctrl + Shift + V if Ctrl + V doesn't work). The copied text is now where we want it and we can proceed so save the file and exit. To do so, press Ctrl + X as indicated in the cheatsheet at the bottom of nano.
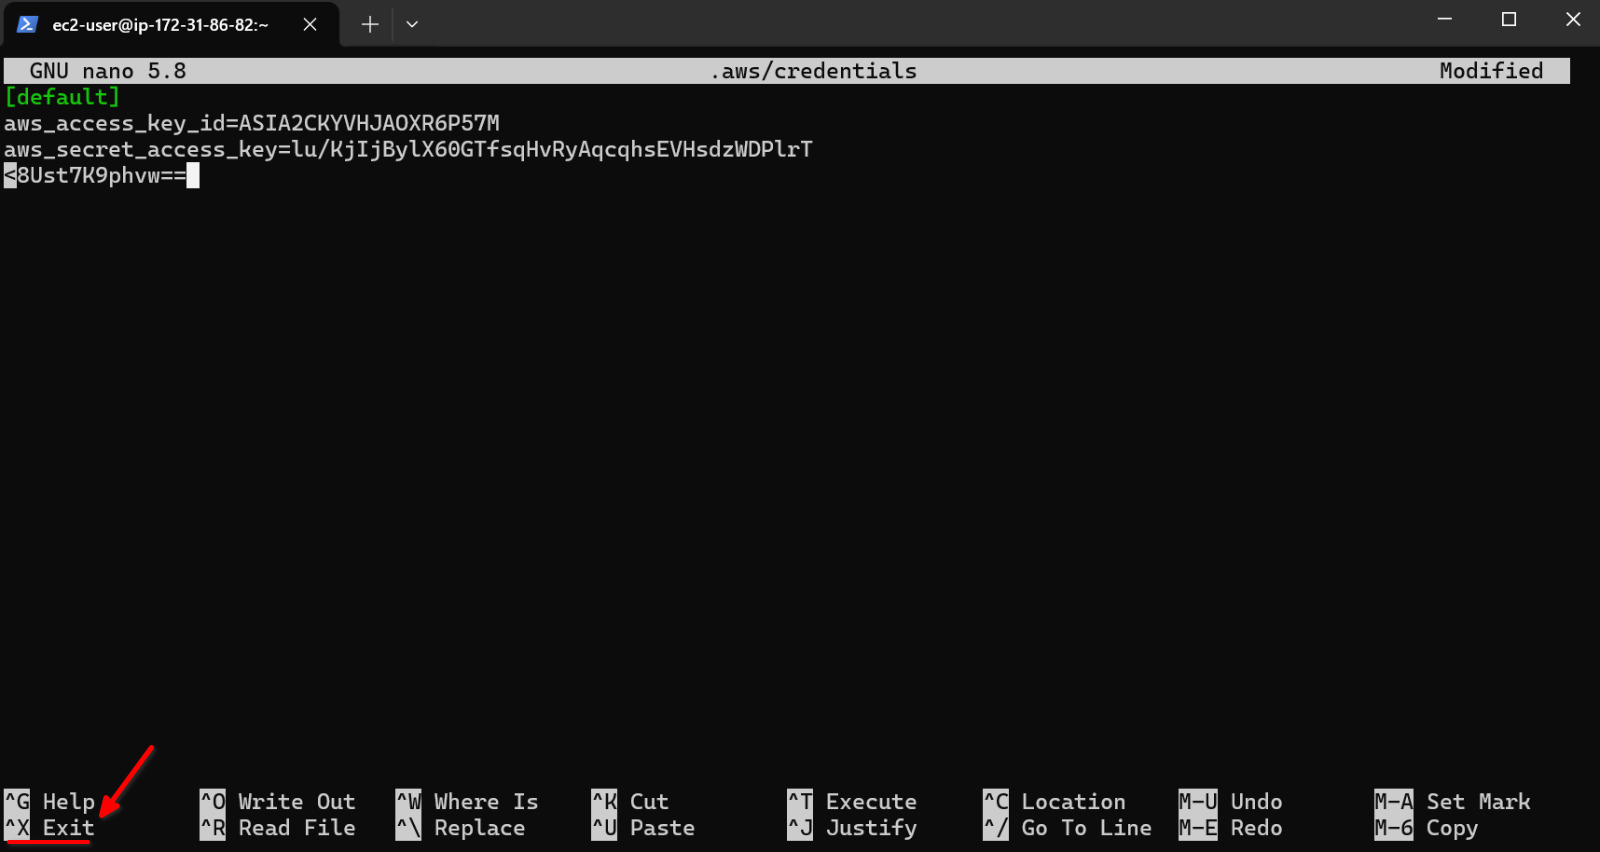
You will be asked if you want to save the changes. Press Y to save the changes.
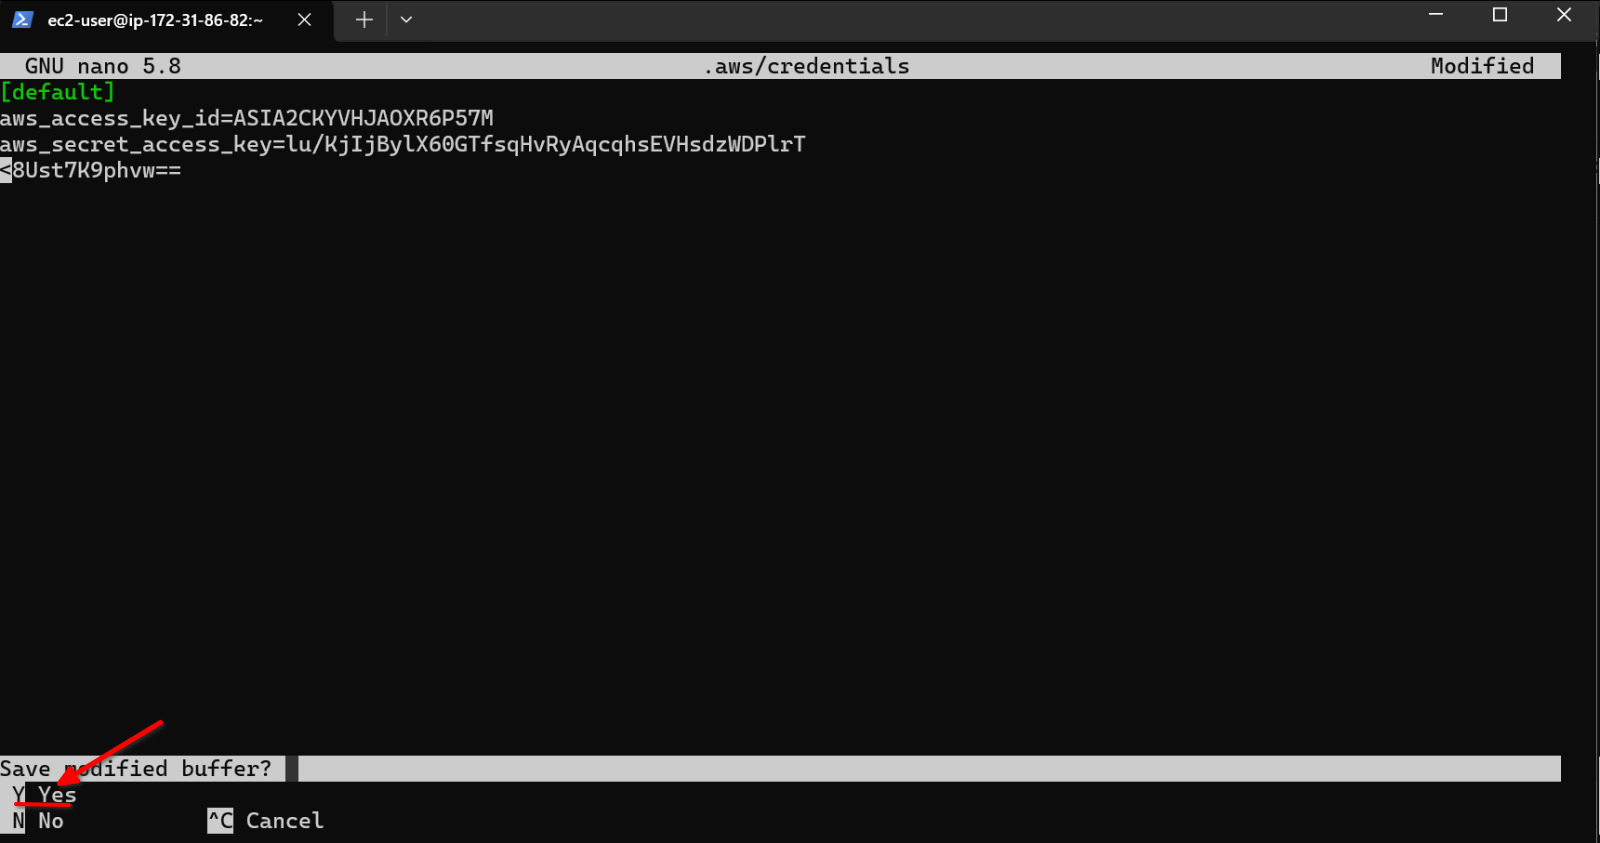
Finally we'll be asked for the file name to write the changes to. Just press Enter to confirm the file name since it is already correct.
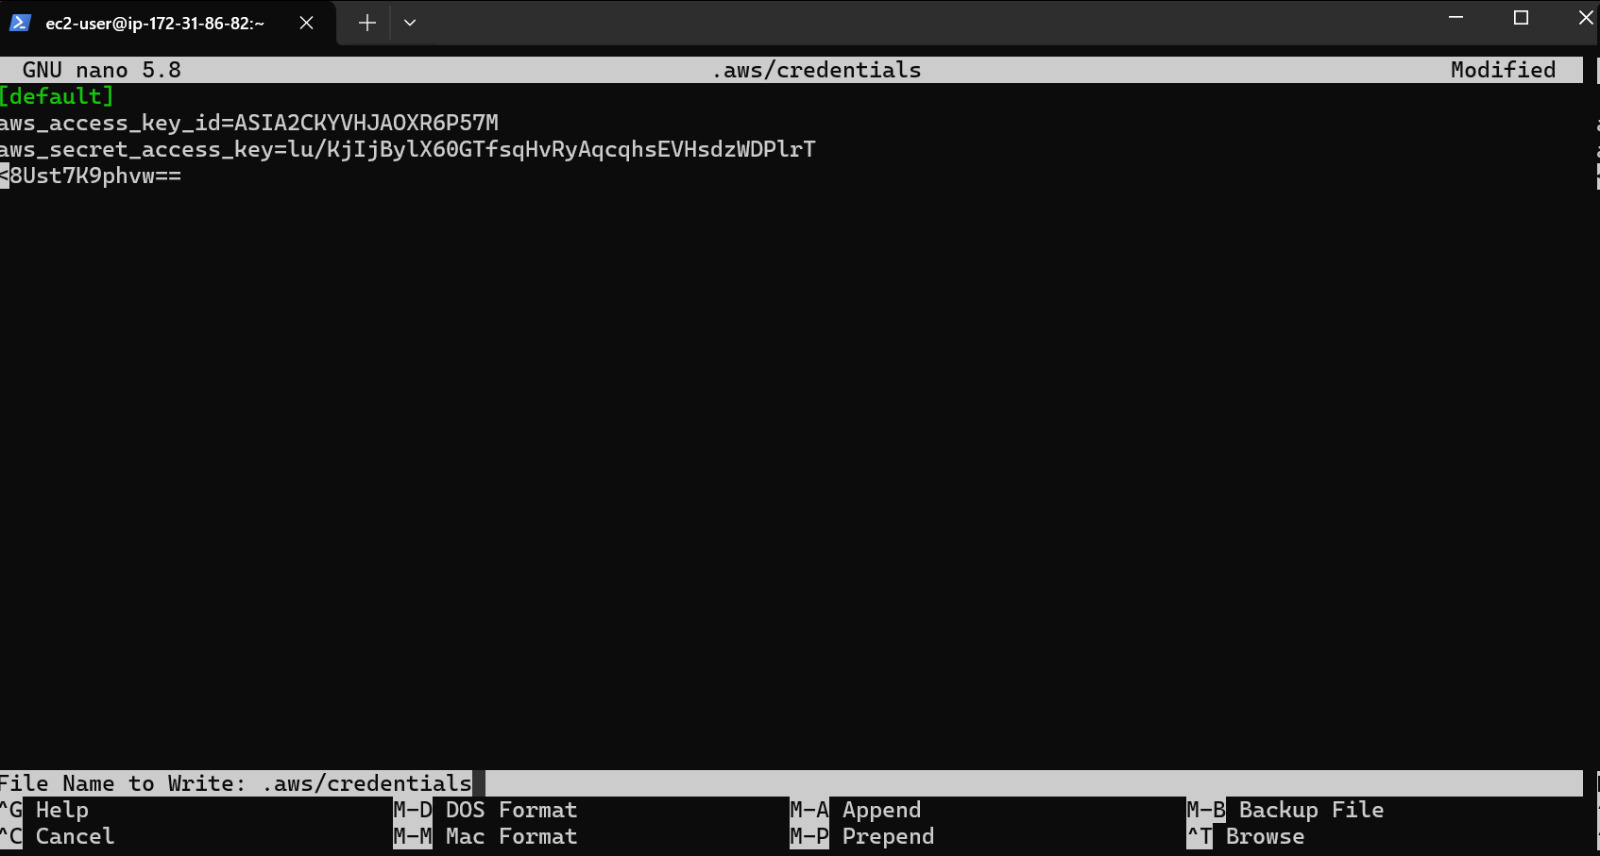
Great! We've written a file just using the terminal. We can now check the contents of the file using cat:
[ec2-user@ip-172-31-86-82 ~]$ cat .aws/credentials
[default]
asdfaaaws_access_key_id=ASIA2CKYVHJAOXR6P57M
aws_secret_access_key=lu/KjIjBylX60GTfsqHvRyAqcqhsEVHsdzWDPlrT
aws_session_token=IQoJb3JpZ2luX...
[ec2-user@ip-172-31-86-82 ~]$
To test if the configuration was successful, run aws sts get-caller-identity and you should see something like this:
[ec2-user@ip-172-31-86-82 ~]$ aws sts get-caller-identity
{
    "UserId": "AROA2CKYVHJALK46ZMHVM:user3869188=Ferran_Aran_Test",
    "Account": "692212546112",
    "Arn": "arn:aws:sts::692212546112:assumed-role/voclabs/user3869188=Ferran_Aran_Test"
}
[ec2-user@ip-172-31-86-82 ~]$
Perfect! We have now configured the AWS CLI on the remote machine and we are now able to run commands to interact with AWS services.
Step 5: Configure AWS credentials on your local machine
Let's now configure the AWS CLI on your local machine.
Start by opening a new terminal on your machine, NOT on the remote one. To check if the AWS CLI is installed, run aws --version and you should see something like this:
aws --version
aws-cli/2.24.15 Python/3.12.9 Windows/10 exe/AMD64
If the command instead outputs an error that means we have to install the AWS CLI on our local machine. Follow the steps on the AWS CLI installation guide to do so.
Now we are going to configure the AWS CLI on your local machine. The steps are very similar as when we did it on the remote EC2 machine, in fact if you are on MacOS you can just follow the exact same steps of Step 4 because you'll be able to use the nano command. For Windows users, you can follow the steps below:
Make sure the .aws folder exists on your local machine by running:
mkdir .aws
Remember if it throws an error there's nothing to worry about, it just means the folder already exists. Now we are going to create the credentials file inside the .aws folder. Run the following command:
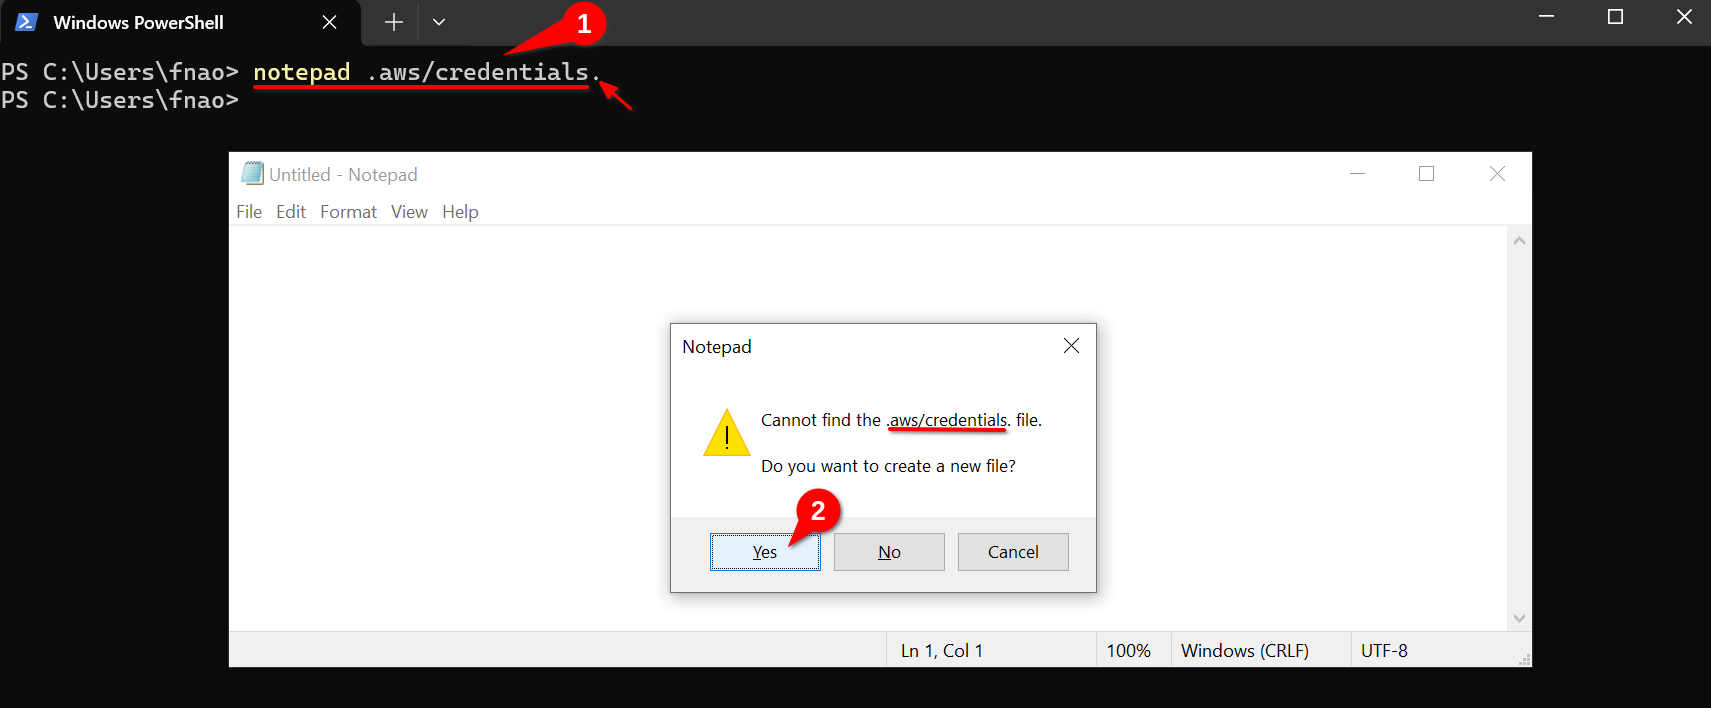
notepad .aws/credentials.
This will open a text editor where you can write the credentials. You'll be asked if you want to create a new file, if it is the first time you are configuring the AWS CLI on your local machine, press Yes as shown below. If it is not the first time you are configuring the AWS CLI on your local machine, you will see some text already written. Just erase it.
Notice we are writing credentials. and not credentials (we are adding a dot at the end of the file name). This is because we want the file to be named just credentials and Windows would automatically add a .txt extension if we just wrote credentials. By adding a dot at the end of the file name we are telling Windows to not add any extension to the file name. Below is a screenshot of what would have happened if we just wrote credentials:
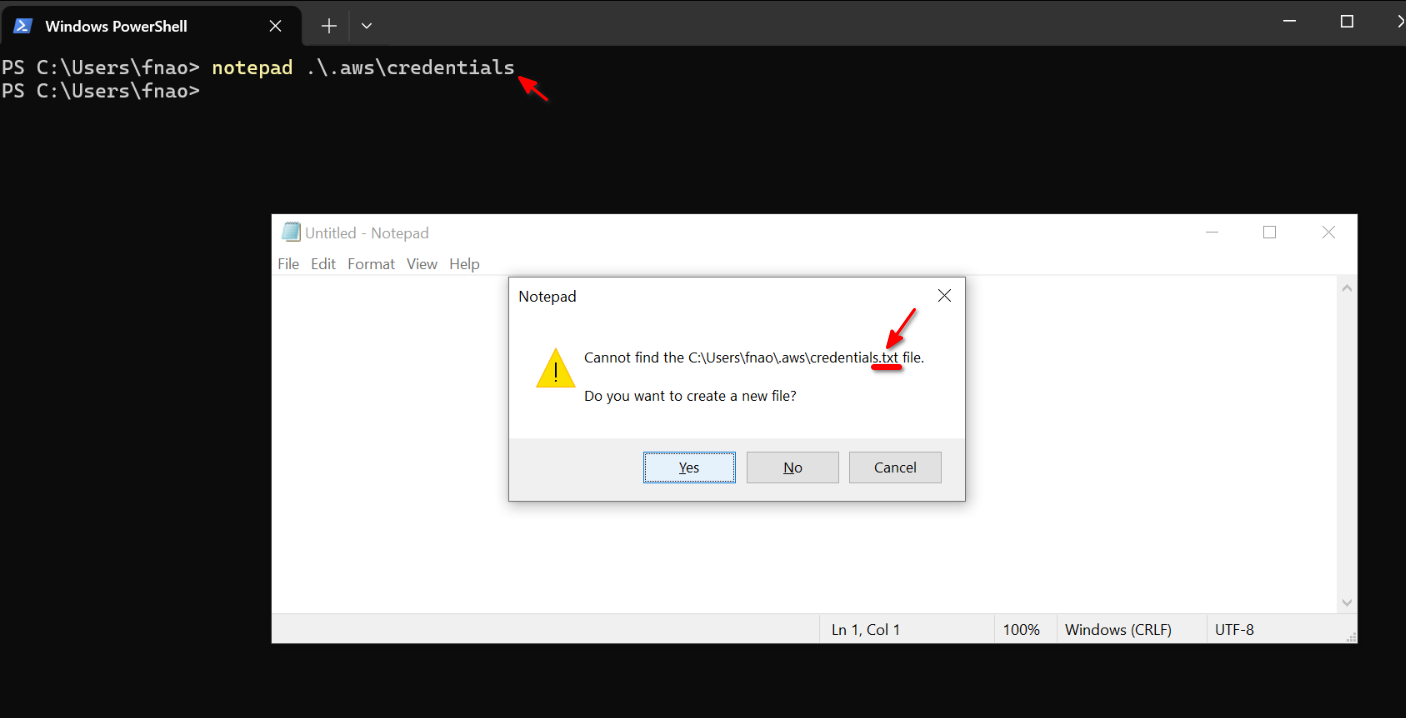
We do not want this. We want the file to be named just credentials. That is why we write .aws/credentials. and not .aws/credentials after the notepad command.
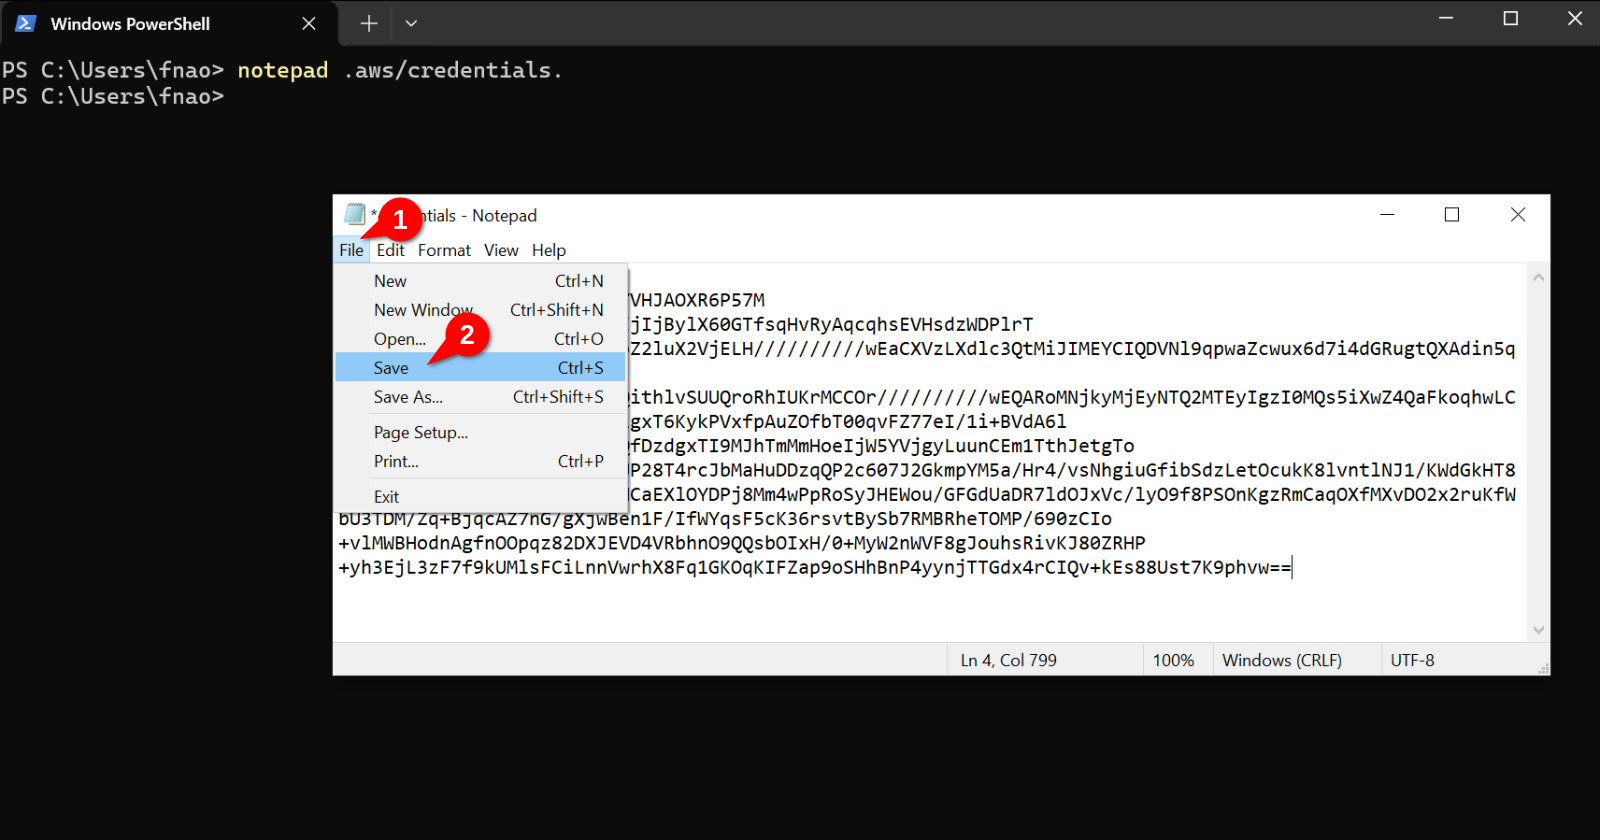
Now we are going to select and copy the text from the AWS Academy website as we did before.
And we now paste it onto the text editor. Once that is done save the file by pressing Ctrl + S or by clicing on File and then Save as shown below:
You can now close the text editor and check the contents of the file using cat:
PS C:\Users\fnao> cat .aws\credentials
[default]
aws_access_key_id=ASIA2CKYVHJAOXR6P57M
aws_secret_access_key=lu/KjIjBylX60GTfsqHvRyAqcqhsEVHsdzWDPlrT
aws_session_token=IQoJb3JpZ2...
PS C:\Users\fnao>
To test if the configuration was successful, run aws sts get-caller-identity and you should see something like this:
PS C:\Users\fnao> aws sts get-caller-identity
{
    "UserId": "AROA2CKYVHJALK46ZMHVM:user3869188=Ferran_Aran_Test",
    "Account": "692212546112",
    "Arn": "arn:aws:sts::692212546112:assumed-role/voclabs/user3869188=Ferran_Aran_Test"
}

PS C:\Users\fnao>
Great! We can now run AWS CLI commands both on our local machine and on the remote EC2 machine.
What's next?
You have now successfully started a new session of your AWS Academy Learner Lab. You have connected to your EC2 instance and configured (or updated if its not the first time) the AWS CLI on both the remote machine and your local machine. You are now ready to keep working on your projects. Remember this guide is intended to be followed each time one wants to start working on AWS and has to start the Learner Lab.
All of this and more was covered during Session 4, this guide is ment to help you out if you got stuck during class and to hopefully make it easier for you to get your AWS Lab set up and running.